
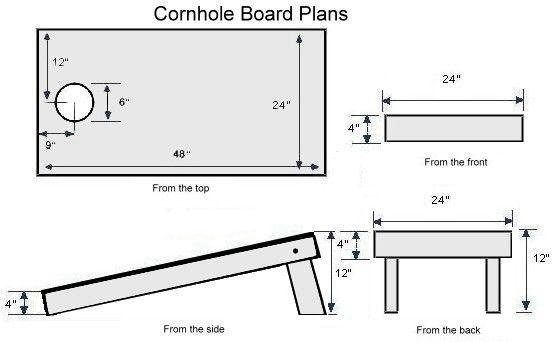
Building a cornhole game requires cutting wood to specific dimensions, assembling the frame, attaching the playing surface, and creating the support legs.
Want to enjoy some backyard fun? Learning how do you build a cornhole game is simpler than you might think! This classic game is a great way to spend time with friends and family.
We’ll walk you through the process step-by-step. By following our easy instructions, you can create your own set. You’ll soon be tossing bags and enjoying friendly competition.

How Do You Build a Cornhole Game?
So, you want to build your own cornhole game? That’s fantastic! It’s a fun project, and playing on a board you made yourself is super satisfying. Don’t worry; it’s not as complicated as it might seem. We’ll walk you through each step, from gathering your materials to that final, satisfying toss of a bean bag. Let’s get started! Cornhole, sometimes called bean bag toss, is a great outdoor game perfect for parties, picnics, or just a fun afternoon. And building your own game is a great way to get some hands-on experience and save some money, too. Plus, you’ll be able to customize your board to your own liking.
Gathering Your Materials
Before we start building, we need to collect all the necessary supplies. Here’s a list of what you’ll need. Think of it like preparing for a cooking recipe – you need all the ingredients before you can start! This step is crucial; having all your materials ready will make the whole process much easier and less frustrating.
Wood for the Boards
The main part of your cornhole game is the wooden boards. You’ll need:
- Two pieces of plywood, each measuring 24 inches wide by 48 inches long. ½ inch thick plywood works great. This gives you the standard size cornhole boards you see everywhere.
- Four pieces of 2×4 lumber, each 48 inches long (for the frame). These pieces will make up the frame that goes around the edge and make the board strong.
- Four pieces of 2×4 lumber, each 21 inches long (for the support). These will be used to brace the board and also support the legs of the board.
You can use other types of wood, but plywood is a good choice because it’s strong and relatively inexpensive. Make sure your wood is smooth and free of any splinters. Also, you can ask the people at the store to cut the wood for you. That can make it even easier to start your building project.
Hardware and Fasteners
To assemble the boards, you’ll need:
- Wood Screws: About 2-3 boxes of 2-1/2 inch screws will be enough
- Wood Glue: This helps create a stronger hold on the wood
- Nuts, bolts, and washers: 3-4 inches long bolts, and nuts to match the bolts, for the legs
Using good quality screws and glue is important. These will hold the cornhole boards together, so you want them to be sturdy and reliable.
Tools
You’ll need some basic tools to build your cornhole boards. If you don’t have them all, check if you can borrow them from a neighbor or friend. Here’s what to gather:
- Circular Saw or Hand Saw: This is for cutting the wood if you are not having it pre cut from the store.
- Drill: Essential for making pilot holes and driving in screws
- Sander or Sandpaper: For smoothing the wood after cutting.
- Measuring Tape: To make sure everything is cut to the right size.
- Pencil: For marking the wood.
- Clamps: To hold the pieces of wood together while the glue dries.
- 10-inch Compass or String and Pencil: To draw the circle for the hole.
- Jigsaw or Hole Saw: For cutting the hole in the board
- Safety Glasses: To protect your eyes from sawdust.
- Ear Protection: To protect your ears when using power tools.
Optional Materials
These are not essential but can be useful:
- Primer and Paint: To paint and decorate your cornhole boards.
- Polyurethane: To seal and protect your finished board.
- Vinyl Decals: To customize your board with designs.
- Leg Hinges: To make the legs fold flat for easy storage.
Adding paint, decals, and a sealant makes your cornhole game look great and last a long time. It also makes it much more unique.
Building the Frames
Now that we have our supplies, we can begin building the frames for the boards. This is the structural foundation of our cornhole game, so precision is key. It’s important to take your time and make sure everything is lined up properly.
Assembling the Frame
Let’s put together the frame:
- Lay the two 48-inch 2×4 boards parallel on a flat surface. Make sure they are about 24 inches apart, which will be the width of your plywood.
- Take two of the 21-inch 2×4 boards and place them perpendicular to the 48-inch boards, forming a rectangle. These will be the ends of your frame.
- Make sure you have a perfect rectangle with all the edges lined up correctly and a corner that is exactly 90 degrees. Check that your frame is square by measuring the diagonals; they should be the same length. This will ensure your board will be square and not warped.
- Use wood glue on the joining surfaces, and clamp the corners together. Then use the drill to make pilot holes and then screw the boards together using two or three screws per corner.
- Repeat these steps to build the second frame for the other board.
Adding Support
To make the frame stronger, we will add support:
- Take the remaining two pieces of 21-inch 2x4s. Place them on the inside of each frame, making a “H” pattern inside each rectangle. Measure carefully, placing each support to fit snugly.
- Apply wood glue to each of the support pieces and screw them in place with pilot holes and screws. Two screws per side should be enough.
- Now, you have two complete wooden frames. Make sure they are square and strong before proceeding.
Attaching the Plywood
Now, we attach the plywood to the frames. This will create the playing surface of the cornhole game. It is crucial to align the plywood accurately for a smooth and even surface.
Securing the Plywood
Here’s how to attach the plywood to the frames:
- Place one of your plywood pieces on top of the frame. Make sure that the edges of the plywood are flush (lined up) with the edges of the 2×4 frame.
- Use the drill to create pilot holes. Make sure you drill pilot holes before putting in any screws. Pilot holes make sure the wood does not split.
- Now screw the plywood into the frame. Use wood screws every 8-10 inches along the edges and in the supporting pieces to secure the plywood firmly.
- Repeat the same steps with the other plywood piece and frame.
Creating the Hole
The next step is making the hole on the board. This hole is what we aim for when playing cornhole. Making the hole is a careful task. Let’s learn how to create a perfectly round hole.
Marking the Circle
Follow these steps:
- Measure 9 inches from the top edge of the plywood and 12 inches from each side. Mark this spot with your pencil. This is the center point for the hole.
- Use your compass or the string and pencil method to draw a 6-inch circle (3-inch radius) around the center point. This will be your cutting guide.
Cutting the Hole
Now let’s cut out the circle:
- Drill a pilot hole inside the circle. You can do that using a large drill bit or you can also use your jigsaw to drill the pilot hole
- Use your jigsaw or hole saw to carefully cut out the circle. Go slowly and follow your line carefully.
- Use sandpaper to sand the edges of the circle smooth.
- Repeat the same steps for the other board.
Making the Legs
The legs are essential for propping up the board at the correct angle for play. They should be strong and stable. We will also talk about how to attach them so they can fold in for storing.
Preparing the Legs
Here are the steps:
- You will need four pieces of 2×4 lumber, each about 12 inches long.
- Round the top of each leg.
- At the top of each leg, drill a hole for the bolt and nut, about 2-3 inches from the top of each leg.
Attaching the Legs
Now, let’s attach the legs to the board using bolts, washers, and nuts:
- Place the leg at the end of each board at the support area where you placed the 2×4 support pieces. Align the leg so it’s flush with the edge of the board and where you placed the support.
- Drill a hole through the support and the leg.
- Attach the leg using the bolts, washers, and nuts. Make sure you do not tighten the nut to much because the legs should pivot freely. The washers will make sure the legs have movement.
- Test to make sure the legs are at the correct angle, and fold in and out easily.
If you have purchased hinges, place the hinges at the point of contact between the leg and the board. Make sure you secure them using the screws that come along with the hinges.
Finishing Touches
We’re almost done! Now comes the fun part where we personalize and protect our boards. The finish makes the boards look amazing and protects them from wear and tear.
Sanding and Priming
Follow these steps:
- Sand all the surfaces of the boards to make them smooth and ready for paint. Make sure all edges are smooth so they do not hurt anyone.
- Apply a coat of primer to the entire board. Primer will help the paint stick better and last longer.
- Let the primer dry completely.
Painting and Decorating
Let your creativity shine:
- Choose your favorite colors and paint the boards. You can paint them solid colors or add designs.
- If using vinyl decals, apply them to the dry painted surface. Make sure you smooth out the decals well and no air pockets are present.
- Let the paint and decals dry completely before moving on to the final step.
Applying Polyurethane
To protect your beautiful boards:
- Apply 1-2 coats of polyurethane to seal the boards and protect them from the weather and wear.
- Let the polyurethane dry completely.
Now you have a finished cornhole game that is ready to use. Be proud of what you have created, and get your friends and family together for a game.
Building your own cornhole game is a rewarding project that gives you something to be proud of. You can customize the boards with any colors or designs you like. Remember to take your time and be careful when using power tools. With a little patience and effort, you’ll have a fantastic game that provides hours of entertainment.
How To Make Cornhole Boards! | Easy DIY w/ Free Plans!
Final Thoughts
Building a cornhole game involves cutting wood for the frame and top, attaching the legs with hinges, and drilling the hole. You need basic tools and some woodworking skills. Applying paint or stain adds a personal touch.
The key steps include assembling the frame, securing the playing surface, and adding the foldable legs. Proper measurements are critical for good gameplay. With this you will understand ‘how do you build a cornhole game’.

