
To change which monitor a game opens on Steam, you can typically adjust the display settings within the game itself, or configure your primary display in Windows settings.
Frustration mounts when your favorite game insists on appearing on the wrong screen. It’s a common issue for multi-monitor setups. Figuring out how to change which monitor a game opens on Steam can really improve your gaming experience. You don’t need to struggle with moving the game window every time.
Luckily, it’s a pretty simple fix. You can usually handle the settings directly or with your operating system’s configurations. This small adjustment avoids game-launch annoyance and ensures your gameplay is always on the desired display.

How to Change Which Monitor a Game Opens On Steam
Have you ever started a game on Steam, only to have it pop up on the wrong screen? It’s a common annoyance, especially if you use multiple monitors for your computer setup. It can be really frustrating when you’re ready to play, and the game decides to hide on a monitor you’re not even looking at! The good news is, you don’t have to keep moving game windows around. There are several easy ways to tell Steam exactly which monitor you want your games to use. Let’s explore these methods and get your games playing where you want them to!
Understanding Your Display Setup
Before we jump into specific steps, let’s talk about how your computer sees your monitors. Your operating system, whether it’s Windows, macOS, or Linux, assigns a primary display. This is usually the monitor where things like the login screen and your taskbar appear. Games often default to this primary monitor. But, you can change this primary display, and you can also tell games specifically which screen to use.
Identifying Your Monitors
First, you need to know which monitor is which. You might think you know, but let’s make sure. Here’s how to check in Windows:
- Right-click on your desktop and choose “Display Settings.”
- You’ll see a diagram of your monitors. Each one is labeled with a number (1, 2, 3, etc.).
- Click on a monitor in the diagram. The corresponding monitor will often flash briefly, making it easy to identify.
- Note down which number corresponds to the monitor you want your games to appear on.
On macOS, you’ll find the display arrangement in:
- Apple menu > System Settings > Displays.
- Similarly to Windows, you’ll see a diagram of your displays and can identify them by clicking on them.
For Linux distributions, the process varies depending on your desktop environment. Generally, you can find display settings within your system’s settings or control panel. Look for the “Displays” section. You should see a visual layout of your monitors here as well.
Setting Your Primary Display
Sometimes, the easiest solution is to make the monitor you want games to use your primary display. Keep in mind that this changes where your taskbar, desktop icons, and new windows will appear by default. Here’s how to set a primary monitor in Windows:
- Open Display Settings (right-click on the desktop and choose “Display Settings”).
- Click on the monitor you want as the primary display.
- Scroll down to the “Multiple Displays” section.
- Check the box that says “Make this my main display.”
- Click “Apply” to save the change.
On macOS, follow these steps:
- Go to Apple menu > System Settings > Displays.
- Click the monitor you want as the main display.
- In the Arrangement tab, drag the white bar at the top of one display and move it to the top of the display you wish to be primary.
If this is an acceptable solution, your games will likely open on your chosen screen without further adjustments, because many games will open on your set primary monitor.
Using Steam’s Built-in Options
Steam provides a few ways to control where your games appear. These are useful even if you don’t want to change your primary display.
Game-Specific Launch Options
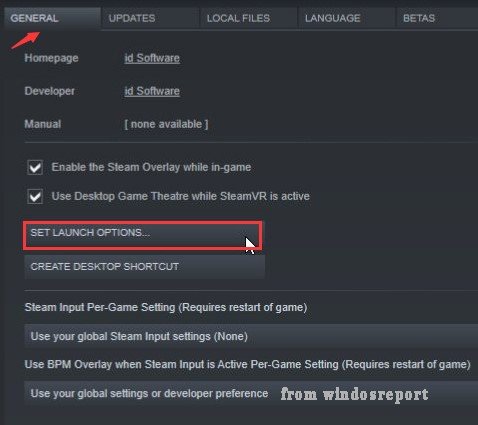
One of the most effective ways to target a specific monitor is by using launch options. These are special commands you can add to a game’s settings in Steam. Here’s how to do it:
- Open Steam and go to your Library.
- Right-click on the game you want to adjust.
- Select “Properties…”
- In the Properties window, go to the “General” tab.
- Look for the “Launch Options” text box, usually near the bottom.
- Here, you can enter specific commands.
The most useful command for changing the monitor is -monitor [number]. Replace [number] with the number of the monitor you want to use. For example, if you want the game to use your second monitor, you would enter -monitor 2. Remember to identify your monitor numbers beforehand as explained above.
Here’s a table summarizing launch options for monitor selection:
| Launch Option | Description |
|---|---|
-monitor 1 |
Forces the game to open on monitor number 1. |
-monitor 2 |
Forces the game to open on monitor number 2. |
-monitor 3 |
Forces the game to open on monitor number 3. |
-primary |
Forces the game to open on the primary monitor set by your OS |
After entering the launch option, simply close the Properties window. The next time you start the game through Steam, it should launch on your specified monitor.
Steam’s Big Picture Mode
Steam’s Big Picture Mode is designed for playing games on a TV or a larger display. While not always directly related to monitor selection, it can influence where your games appear because it operates on a particular display. If you often play using Big Picture Mode, here’s something useful to know:
Big Picture Mode usually opens on the display set as primary. If you’ve changed your primary display to a TV connected via HDMI, for example, Big Picture Mode, and subsequently launched games will mostly likely use that display. This can be a helpful way to make games go to your desired output, even if you prefer to navigate Steam using its normal interface.
Using Steam’s Overlay
Steam overlay, a handy tool allows you to use a Steam interface inside game. You can open the overlay while playing a game using shift + tab, and usually you can drag the overlay on different monitors to see the functionality of it. Steam itself does not have any feature in its overlay that helps you to change which monitor game opens, but, by using some of the ways in this article, you can make games open where you want.
Using Third-Party Tools
If Steam’s built-in options aren’t quite working for you or you prefer more control, third-party tools might offer a solution. There are several programs designed to help manage window placement and monitor assignments. These programs may have additional features that Steam does not.
DisplayFusion
DisplayFusion is a popular tool for Windows that provides advanced multi-monitor support. It offers many features, including:
- Window management tools: You can define how and where application windows should appear.
- Monitor profiles: Switch between different monitor configurations quickly.
- Customizable hotkeys: Set up keyboard shortcuts for many functions related to window placement.
- Application-specific settings: You can configure settings for individual applications, so that some applications open on specific monitor and some on other monitor.
While DisplayFusion is a paid program, it offers a trial version. If you work frequently with multiple displays, the investment might be worthwhile. With DisplayFusion you can create rules for Steam games, so each specific game will launch on a different monitor, this is useful if you have multiple monitors and you want different games to open up on different displays.
Other Third-Party Options
There are other utilities available that provide similar functionalities, though DisplayFusion is one of the most popular and feature-rich. Some other applications you can research are:
- Actual Multiple Monitors
- UltraMon
- MultiMon Taskbar
These tools usually offer some form of free trial, so you can test them before purchasing to find the option that best suits your needs. These tools, similarly to DisplayFusion, can offer you more granular control over game windows and help ensure that your game launches on the display you want.
Game-Specific Settings
Some games have their own built-in settings that can determine which monitor they use. These settings can sometimes override Steam’s launch options or your primary display choice. It’s useful to explore your game’s settings menu if you continue to have monitor placement issues.
Checking In-Game Graphics Settings
Most games have a “Graphics” or “Display” settings section in their options menu. Look for options related to:
- Display device: This might allow you to pick which monitor to use directly.
- Windowed, Fullscreen, Borderless Windowed modes: Sometimes changing the window mode can affect which monitor a game chooses. A good strategy is to use borderless windowed mode.
- Monitor resolution and refresh rate: Some games will auto-detect your monitor and resolution when you pick full screen, but sometimes you need to manually choose.
Try experimenting with these settings. If you find a “Display” or “Monitor” dropdown, you’ll be able to select your preferred display directly within the game’s configuration.
Understanding Window Modes
The window mode a game uses can greatly affect how the game interacts with multiple monitors:
- Fullscreen: In this mode, the game typically takes over the entire screen and usually defaults to the primary display. However, setting the monitor through Steam’s launch options or in-game settings should work reliably in this mode.
- Windowed: In windowed mode, the game appears within a regular window on your desktop. You can move it to different monitors as any other window.
- Borderless Windowed: This mode is a mix of both modes. It looks like fullscreen, but it behaves like a window. It’s easy to move to another monitor, and often more forgiving to alt-tab out. It will also respond better to Steam launch options and third-party tools that change the monitor display.
Sometimes, switching between these modes can solve monitor placement issues. If you are struggling to force a game to a monitor, try changing the window type and try again.
Troubleshooting Common Problems
Even with all these tips, you might still encounter issues. Let’s go through some common scenarios and solutions.
Game Still Opens on the Wrong Monitor
If your game is stubborn and continues to open on the wrong monitor even after following the steps above, try these fixes:
- Double-check your launch options: Ensure you typed the -monitor command correctly, and that you are using the right number of your monitor.
- Confirm your primary display settings: Make sure your primary display is set correctly in your operating system’s display settings.
- Close the game and re-launch: Sometimes, simply restarting a game after applying settings can make the changes work.
- Check game settings: As mentioned earlier, a game’s internal settings may be overriding other choices.
- Update your drivers: Make sure you have the latest graphics drivers installed for your GPU.
- Restart Steam: Quitting Steam completely and then restarting can sometimes fix the issue if Steam is not recognizing your monitor settings.
Games Opening on Startup
If a game is opening automatically when your computer starts and it is opening on a wrong display, follow these steps:
- Check Steam settings, there might be an option to run some specific game on startup, turn it off from steam if you don’t want game to open on startup.
- Check for startup apps settings on your OS, it is possible that your game has been set as a startup application by mistake, turn it off.
Inconsistent Behavior
Sometimes, game behaviors can be inconsistent. Some games will use your primary display by default, while others might remember the last monitor they were used on, which can cause confusion. Here are some steps to take:
- Be consistent: Choose one method (either setting a primary display, Steam launch options, or a third-party tool) and stick with it for each game.
- Test changes: After making adjustments, close the game and re-launch to confirm the results.
- Note down your settings: Keep a note of settings for games you frequently play, so you don’t have to keep reconfiguring them.
- Restart your computer: If settings are not working, sometimes it might help to restart your computer to apply the settings.
By understanding these common issues, and the solutions, you can troubleshoot and quickly go back to gaming.
Changing which monitor a game opens on Steam doesn’t have to be a source of frustration. By using the tips and techniques in this guide, you can have more control over your multi-monitor setup. Whether you are using Steam’s launch options, your operating system settings or third-party tools, you now have the knowledge to play your games where you want them. Happy gaming!
How to Open Game on Second Monitor on Steam (Full 2024 Guide)
Final Thoughts
To change a game’s display monitor, use the Steam game’s launch options. You must add the command -window-mode exclusive -adapter [monitor number] . This method forces the game to start on your specified screen. Remember that the monitor number starts from zero.
For example, for monitor two, input -window-mode exclusive -adapter 1. This setting will change the display. This quick fix is how to change which monitor a game opens on steam.

