
To change which monitor Steam games open on, you can set your primary display in your operating system’s display settings, or modify the launch options of individual games in Steam.
Ever fired up a game, only to have it appear on the wrong screen? It’s a common frustration, especially with multi-monitor setups. Many gamers wonder how to change which monitor Steam games open on, and it’s simpler than you might think. This article will quickly guide you through the methods.
The most straightforward approach is to designate your preferred screen as the main display within your computer settings. Additionally, Steam allows for specific game configurations to manage monitor output. This ensures your gaming experience is always on the monitor of your choosing.

How to Change Which Monitor Steam Games Open On
Ever started a super exciting game on Steam, only to find it popping up on the wrong screen? It’s like trying to catch a fish and having it jump into the wrong pond! This happens more often than you think, especially if you have more than one monitor. But don’t worry, it’s not a big problem, and it’s very easy to fix. Let’s dive into the simple ways you can tell your Steam games exactly where to show up.
Understanding Your Monitor Setup
Before we jump into changing things, let’s take a minute to understand how your computer sees your monitors. Imagine your screens are like numbered doors. Your computer calls them “displays” and gives them numbers – usually 1, 2, and so on. Monitor number 1 is often your “main” display, which is the one your computer uses most of the time. This is where your icons, taskbar, and most new windows appear by default. But the fun part is, you can have other displays connected, and they might be all over your desk! It could be a big screen for gaming, or a second monitor for work or watching videos.
How Windows Assigns Monitor Numbers
Windows decides which monitor is which by how you plugged them into your computer. Usually, the first monitor you plug in becomes monitor number 1. However, you can easily change this in your Windows settings. Knowing which monitor is your main display is key to understanding why Steam games might not open where you expect them to.
Here’s a little tip to help you figure out which monitor is which:
- Right-click anywhere on your desktop.
- Select “Display Settings.”
- You’ll see a picture of your monitors with their numbers on them. Click “Identify” and a number will briefly appear on each screen, letting you know which is which.
Take a quick peek and note those monitor numbers! Knowing these will make switching your games easy.
Method 1: Setting Your Primary Monitor
One of the easiest ways to get your Steam games opening on the screen you want is to change your primary monitor. This is like telling your computer, “Hey, this is my favorite door, let’s use it first!” When a game starts, it often defaults to opening on the main display. So changing your main display can be a very effective way to change the monitor for your games.
How to Change Your Primary Display in Windows
Changing the main display is simple. Here’s how to do it:
- Right-click on your desktop background.
- Choose “Display settings.”
- Look for the picture of your monitor displays. Click on the one you want as your main monitor.
- Scroll down a bit and you’ll see a checkbox that says “Make this my main display”. Click it.
- Click “Apply” to save your changes, and that monitor will become the main display now.
Once you’ve done that, try launching your Steam game again. It should now open on the monitor you set as the primary display. Keep in mind that changing your main monitor will also change where other things like new windows open as well, not just games.
Method 2: Using Steam’s Game Launch Options
Sometimes you may not want to change the primary monitor, or maybe the game still does not open on the screen you want even after changing the primary monitor. Steam has a tool called “launch options” that will let you tell a game which display to use every time you play it. This means you won’t have to change your main display each time you want to game on a different monitor. It’s like having a secret code to tell each game where to go! This method lets you control things game by game.
How to Set Launch Options for a Specific Game
Here’s how to use launch options to tell a game where to go:
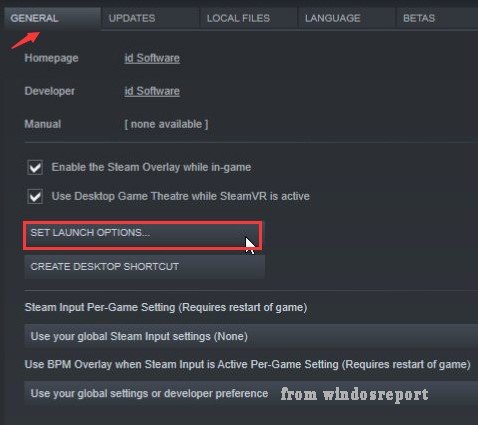
- Open Steam and go to your game library.
- Right-click on the game you want to set options for.
- Select “Properties”.
- In the pop-up window, go to the “General” tab.
- Find the “Launch Options” text box, it’s usually under the “Game Launch Options” or “General” header
- In that box, you will write specific command code to the game.
- Click “Close.”
Now, let’s learn the most useful command codes to change the monitor:
Using the “-monitor” Command
The most common command is “-monitor”. You’ll need to follow this command with a number which tells the game which display to open on. For example, if you want the game to open on your second monitor, which Windows usually calls monitor “2”, you would type:
-monitor 2
If you want it to go to monitor number 1, you would type:
-monitor 1
Make sure there is a space between the word “monitor” and the monitor number. If you have three monitors, use “-monitor 3” to open the game on your third screen. This is super helpful to make games pop up where you want every time.
A Tip About Borderless Windowed Mode
Some games will ignore the -monitor option. This usually happens when a game is set to open in “borderless windowed” mode. Borderless windowed mode is a type of display setting where a game looks like it is in full screen, but it is actually a window without any borders around it. This is common with newer games that lets you alt-tab out of the game very easily. The game may open in your primary monitor no matter what.
If that happens, you can try going into the games video settings, or configuration menu from the game, and change the video output to “full screen” mode. Once the game is running in full screen, your launch options will usually work correctly.
Method 3: Using Windowed Mode and Moving the Window
Sometimes, even with launch options and primary monitor changes, a game just doesn’t cooperate. Or, you might only want to play on a certain monitor temporarily. This is where using windowed mode comes in handy. In windowed mode, a game plays inside a regular window, just like any other program on your computer. This lets you move it to different monitors manually.
How to Use Windowed Mode
Here’s how to put your game into windowed mode:
- Start the game.
- Look in the game’s settings for “Graphics” or “Display” settings.
- Search for an option like “Windowed,” “Windowed Mode,” or “Borderless Windowed.” Click the box next to the “windowed mode” option.
- If you see a different option called “full screen” click the box to deselect that option.
- Click “Apply” or “OK” to save these changes and start the game in windowed mode.
Moving the Game Window
Once your game is running in a window, moving it between monitors is easy:
- Click and hold the top of the game window.
- Drag the window to the monitor where you want to play.
Once you get the hang of it, you will find this to be an easy way to get your games to the screen you want. You can then switch between monitors as you need. To make the game appear larger, you can maximize the game window after you move it to the correct monitor.
Note: If the game is running in borderless windowed mode you may need to change it to “windowed mode” to be able to move the window from screen to screen. Sometimes, if the window is maximized, it is not as easy to drag it from screen to screen. You may need to click the button to “restore down” the window, which makes the window slightly smaller, which will then make it easy to move to another monitor.
Method 4: Using Third-Party Tools
If none of the above methods work well enough for you, or you want to have more control over window placement, you can explore third party tools. These are programs built by other people that can help manage windows on multiple monitors. These tools can provide additional options, such as setting rules for which monitor specific games open on.
How These Tools Can Help
These tools work by adding special features to your Windows system. Many times they provide easy ways to move windows between screens, and remember the last screen you played on. They can sometimes provide even more fine-tuned controls than built-in Windows or Steam options.
Examples of Third-Party Tools
There are a few third party tools you can try, but be sure to research them and ensure they are safe to use. Some popular examples include:
- DisplayFusion – This is one of the most common tools. This tool gives you a lot of control over your monitors.
- Actual Multiple Monitors – It provides similar features to DisplayFusion and can help manage your multi-monitor setup.
- MultiMon TaskBar – A less complex program, but still good for managing multiple monitors.
These tools can be very useful for more advanced setups or if you have many applications to manage.
While using third party tools can seem complicated, they can often provide the best control for those who prefer fine tuned settings. If you find that the other methods don’t give you enough control, you might find them useful for your gaming setup.
Tips for Troubleshooting Monitor Issues
Even with these methods, sometimes games just act up. Don’t worry; you’re not alone! Here are some quick tips if you run into trouble:
- Restart Your Computer: Sometimes a simple restart will fix any glitches causing your game to open on the wrong monitor.
- Check Your Graphics Drivers: Make sure you have the latest graphics drivers. Outdated drivers can cause display issues. Usually you can find the latest drivers on your video card manufacturer’s website. This is Nvidia or AMD if you are using a standard PC.
- Verify Game Files: Sometimes, game files can get corrupted. In Steam, you can verify the integrity of game files. Right click on the game, click “properties”, and then you should find an option to verify game files. Steam will then check the files to make sure the game is not corrupted and will re download any corrupted files.
- Try Different Display Modes: Try different full screen, windowed, or borderless settings in your game to see if one works better.
- Check Game-Specific Forums: Sometimes issues are specific to a game. Check the game’s forums for solutions that other players have shared.
By trying these tips, you can usually get your games to show up on the screen you want.
Changing which monitor your Steam games open on might seem a little tricky at first, but with these simple methods, you can easily take control of your gaming experience. Whether you are changing your main display, using launch options, moving windowed games, or using third-party tools, you have lots of options to make sure your games appear exactly where you want them. With a little experimentation, you will soon be launching your games to the correct screen every time!
How to Open Game on Second Monitor on Steam (Full 2024 Guide)
Final Thoughts
Changing the display for your games is straightforward. The steps include adjusting your primary monitor in Windows settings. Then, Steam needs configuration via game launch options.
You can specify the desired monitor using arguments like -monitor 1 or -monitor 2. These commands dictate where your game window appears. Successfully managing monitor selections this way will ensure a better experience with how to change which monitor steam games open on.

