
To delete Game Bar, you must disable it within Windows Settings, specifically under the “Gaming” section, then toggle the “Xbox Game Bar” switch to off.
Annoyed by that persistent Game Bar popping up when you least expect it? It’s understandable. Many find it intrusive rather than helpful. Learning how to delete Game Bar and reclaim your screen is a common desire.
We will show you the easy method that lets you disable it and stop its interruptions. This quick guide can help you in just a few simple steps. The method will ensure it is no longer a screen nuisance.

How to Delete Game Bar: A Complete Guide
Game Bar, a feature that comes with Windows, is designed to make gaming more fun and convenient. It lets you take screenshots, record gameplay, chat with friends, and more. However, if you’re not a gamer, or you simply find it annoying, you might be wondering how to get rid of it. You’ve come to the right place! This article will show you step-by-step how to delete Game Bar (or disable it if you prefer) so you can enjoy a less cluttered experience on your computer. We will explain all the different methods and their pros and cons.
Understanding Windows Game Bar
Before we jump into deleting it, let’s quickly talk about what Game Bar is. Think of it as a small toolbar that pops up when you are playing a game (or even sometimes when you’re not!). It gives you quick access to various tools, like the ability to record your screen, manage audio settings, and see how well your computer is performing. While it is helpful for gamers, for those who rarely or never play games, it’s just another thing that might get in the way. Sometimes it pops up randomly when you are not playing any game, which can be irritating.
Why Delete Game Bar?
There are several reasons why you might want to remove Game Bar:
- Resource Hog: Even if you’re not using it, Game Bar can sometimes use up computer resources in the background, which can make your computer run a bit slower.
- Annoying Pop-ups: It might appear when you don’t want it to, interrupting your work or other activities.
- Unnecessary Feature: If you’re not a gamer, you simply don’t need it and would rather not have it taking up space.
- Privacy Concerns: Some users worry about the recording and social features of the Game Bar and prefer to disable it completely.
Now that we understand why you might want to delete or disable Game Bar, let’s get into the how-to part.
Disabling Game Bar Through Windows Settings
The easiest way to get rid of Game Bar is to disable it through the settings menu. This method doesn’t completely remove it, but it stops it from running and appearing. Here’s how to do it:
- Open Settings: Click the Start button (usually the Windows logo in the bottom-left corner) and then click on the gear icon to open Settings. Or you can just press Windows key + I to directly open the setting app.
- Go to Gaming: In the Settings window, look for the “Gaming” option and click on it. It looks like the Xbox logo.
- Select Game Bar: On the left side of the window, you will see a few options. Click on “Game Bar.”
- Turn it Off: On the right side, you’ll see a toggle switch that says “Enable Xbox Game Bar.” Simply click the switch to turn it off. It should go from blue (on) to grey (off).
That’s it! Game Bar should now be disabled. It will no longer pop up or use background resources. Remember, this method only disables it, it does not completely delete it.
Completely Removing Game Bar: Advanced Methods
If you want to remove Game Bar completely, you’ll need to use a slightly more advanced method using PowerShell. This method will remove the Game Bar application from your computer. Don’t worry; we’ll guide you through each step. It might sound technical, but it is actually very simple, if you follow the below steps:
Using PowerShell to Uninstall Game Bar
PowerShell is a powerful tool that allows you to make changes to your system. Here’s how to use it to delete Game Bar.
- Open PowerShell as Administrator: Click the Start button, type “PowerShell,” and right-click on “Windows PowerShell.” Then, select “Run as administrator.” This is important because you need administrator rights to uninstall apps.
- Enter the Uninstall Command: In the PowerShell window, copy and paste the following command:
Get-AppxPackage Microsoft.XboxGamingOverlay | Remove-AppxPackage
This command tells PowerShell to find the Game Bar package and remove it.
- Press Enter: After pasting the command, press the Enter key. PowerShell will run the command and remove Game Bar. You might see some text scrolling in the window, but you don’t need to worry about it.
- Verify Removal: To be sure that the Game Bar is gone, you can try to open it by pressing the Windows key + G. If it doesn’t open, it means you have successfully removed it.
Important Considerations When Using PowerShell
- Administrator Rights: Always remember to run PowerShell as administrator. Without administrator rights, the command won’t work.
- Command Accuracy: Double check that you’ve typed or pasted the command correctly. A small mistake can cause issues.
- Reinstalling: If you ever want Game Bar back after uninstalling it this way, you will need to reinstall it from the Microsoft Store. We’ll cover that further in this article.
Alternative Method : Using Third-Party Software
While the PowerShell method works effectively, some users might prefer using a third-party software for removing the game bar. This method might be a better option for users who are not very comfortable with command lines. These applications usually come with a user-friendly interface, making the process even easier.
Choosing the Right Third-Party Tool
It’s essential to be careful when choosing a third-party tool. Always do your research and choose trusted and reviewed software. Some applications might come bundled with unwanted software or can be malicious, so take caution. Make sure to download the software from the official source and do check reviews before downloading any software.
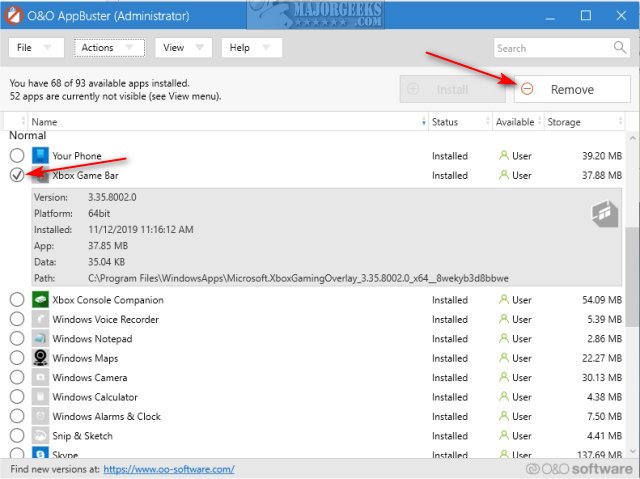
A good example of third-party software is O&O AppBuster which is a free software that can help you remove not just the game bar, but also other windows default app.
Using O&O AppBuster
- Download and Install O&O AppBuster: Go to the official O&O Software website and download the free O&O AppBuster software. Run the installer and install the software by following the on-screen instructions.
- Locate the Xbox Game Bar: Launch the O&O AppBuster software. It will list all the installed apps on your computer. Scroll through the list and look for the Xbox Game Bar entry.
- Uninstall: Select the Xbox Game Bar and then click on the uninstall button.
- Restart Your Computer: After uninstalling, it is always good to restart your computer for the changes to take effect.
This method is straightforward and easy. It might be a better option for those who aren’t comfortable using command-line tools.
Reinstalling Game Bar After Removing It
Okay, so you’ve deleted Game Bar, but what if you change your mind and want it back? It’s not a problem. You can easily reinstall Game Bar from the Microsoft Store. Here’s how:
- Open Microsoft Store: Click the Start button and type “Microsoft Store.” Then, click on the Microsoft Store app to open it.
- Search for Xbox Game Bar: In the search bar at the top of the Microsoft Store, type “Xbox Game Bar” and press Enter.
- Install the App: Click on the “Xbox Game Bar” app in the search results. Then, click the “Get” or “Install” button.
- Wait for Installation: The Microsoft Store will download and install the app. This might take a few minutes depending on your internet speed.
- Launch Game Bar: After installation is complete, you can launch the app by clicking the “Launch” button, or by pressing Windows key + G.
Now Game Bar should be back, just as it was before you uninstalled it.
When Disabling Is Better Than Deleting
Before you decide to remove Game Bar completely, consider that disabling it might be a better option in some situations. Here are a few reasons why:
- Easy Reversal: Disabling is easy to reverse. You can simply go back to settings and turn it back on. Deleting it requires you to reinstall it from the Microsoft Store, which is an extra step.
- Potential Usefulness Later: Even if you don’t need it right now, you might find yourself wanting to use Game Bar later, perhaps if you start playing games. If you just disable it, it will be there whenever you need it.
- Fewer System Changes: Disabling does not require advanced commands or third-party software. You can control it directly from the system settings.
If you’re not sure if you’ll ever want Game Bar again, it’s usually safer to disable it rather than delete it. That way, it’s easily available if you change your mind.
Troubleshooting Common Issues
Sometimes, things don’t go as planned. Here are a few common issues you might encounter when trying to delete or disable Game Bar and how to fix them.
Game Bar Still Pops Up
If Game Bar still pops up after you’ve disabled it in Settings, try these steps:
- Restart Your Computer: Sometimes a simple restart can solve minor glitches.
- Check Settings Again: Make sure the toggle switch in settings is still turned off. It might have been turned back on accidentally.
PowerShell Command Does Not Work
If the PowerShell command doesn’t work, make sure of following things:
- Run as Administrator: Double check that you’ve opened PowerShell as an administrator.
- Correct Command: Verify that you’ve entered the command exactly as shown.
- System Integrity: If these methods still doesn’t work, you can try to scan for corrupted system files by running the system file checker command on PowerShell, the command is sfc /scannow, type this command on PowerShell and hit enter.
Game Bar Errors After Reinstallation
If you experience issues with Game Bar after reinstalling it from the Microsoft Store, try the following:
- Check for Updates: Go to the Microsoft Store and check for updates for the Xbox Game Bar.
- Restart Your Computer: Again, a restart can often solve issues with newly installed programs.
- Reinstall Again: If nothing works, you can uninstall and reinstall the app again to make sure it is correctly installed.
By understanding these common issues and fixes, you’ll be better prepared to handle any problems you might encounter.
Hopefully, this guide has given you a clear understanding of how to delete Game Bar or disable it, depending on your needs. Whether you are a gamer or not, it’s important to have control over the features on your computer. You now know how to keep your computer clean from unwanted apps and to keep your computer running at its optimal performance.
How to Remove the XBox Game Bar on Windows 11
Final Thoughts
To quickly remove the Game Bar, use Windows settings or the registry editor. These methods directly disable the functionality. The settings menu offers a simple toggle.
If you prefer a more permanent solution, editing the registry keys works. Remember to back up the registry first, as improper changes can cause issues. This ensures you can revert if needed.
Therefore, understanding how to delete game bar involves these simple steps. Either method will effectively remove the feature from your system. Choose based on your comfort level with system settings.

