Click the ‘Play’ button next to the game you wish to launch within the Vortex dashboard.
Ever found yourself staring at your modded game list, wondering how to quickly jump into the action? Figuring out how to launch game from vortex dashboard can be quicker than you think! This short guide will give you the direct answer.
It’s a simple process that gets you straight to playing. This saves you time navigating menus or remembering command lines.

How to Launch Games from the Vortex Dashboard
So, you’ve got Vortex installed and ready to go! That’s fantastic. Now, let’s talk about the fun part: actually playing your games using this neat tool. Launching a game from the Vortex dashboard is really easy, and once you get the hang of it, it’ll become second nature. Think of Vortex as your central control panel for all things gaming. It helps you manage your mods, and yes, it also lets you fire up your games directly. Let’s explore all the steps involved in doing this.
Understanding the Basics: Vortex and Game Management
Before we dive into the “how,” let’s quickly recap what Vortex does. It’s a mod manager, but much more than that, it’s a tool that keeps all your game files organized. When you install a game that Vortex supports, it creates what’s called a “Managed Game.” This lets Vortex see the game’s files, allowing you to modify it with mods or launch it directly from the dashboard. This is why launching a game from Vortex is often much more convenient than launching it from the game’s own launcher or from Steam/GOG. You will find that it’s easier to manage your mods, keep track of which version of the game you are playing, and you also get to see if any issues exist. Knowing this basic process will help you understand why this is a convenient method.
Setting Up Your Game in Vortex
The first thing you should be doing is ensuring that your game is correctly detected by Vortex. If it is not, Vortex will not be able to launch it. Usually, Vortex automatically detects most compatible games installed on your computer. But sometimes, especially if you have installed a game outside its usual location, you may need to help it a bit.
- Automatic Detection: Usually, Vortex will scan your hard drives and automatically recognize many games. If it does, the game will appear on the Games tab with a checkmark beside it.
- Manual Game Scan: If your game isn’t automatically detected, you can manually scan for it. To do this, in the Games tab of your Vortex dashboard click on ‘Scan for Games’. This will prompt the system to look for the supported games and will show them on the list if they are found.
- Manual Game Definition: If the game is not found, then you can add it manually by using the ‘Add a Game’ feature. You’ll need to browse to the folder where your game’s executable file (.exe) is located. Once you’ve done that, click on ‘Select Folder’ and Vortex will now recognize that folder and treat it as a game folder.
- Confirming the Game: After the game appears in the games list, you have to make sure that Vortex is configured for that game. In the Games tab, the game will appear and on the right side you can click ‘Set as the game’ which will configure Vortex to manage that game and mods for that game.
The Games Tab: Your Gateway to Gaming
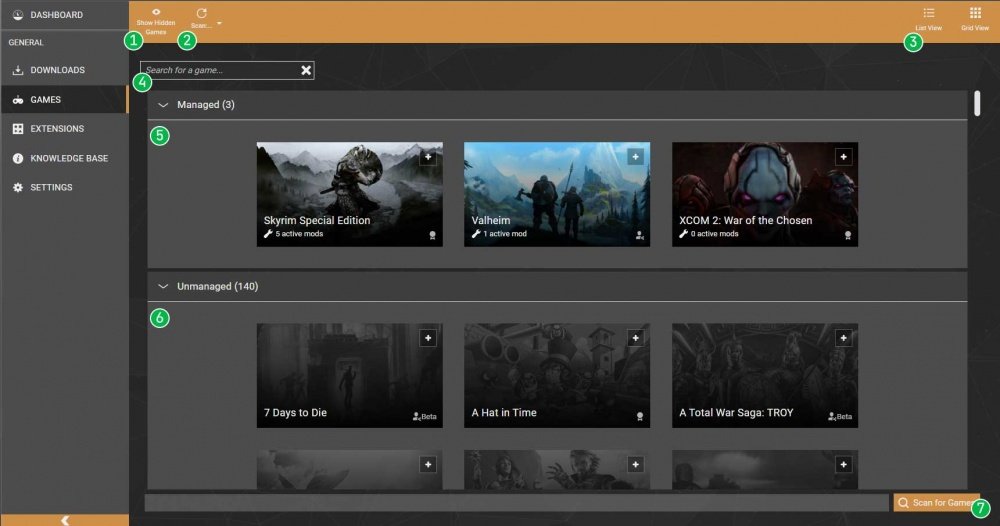
Once you have all of your games detected and recognized in Vortex you’re now ready to launch them from the software. The core of the process happens in the “Games” tab in Vortex. This tab is where you’ll see all the games Vortex is managing. It’s like a library where you get to choose which book (game!) you want to open up. Think of it this way: the Games tab is the launchpad for all of your gaming adventures.
Locating Your Game in the Games Tab
The Games tab shows you a list of the games you have added to Vortex. You can also sort these games based on various categories like alphabetical order or the last modified time of that game profile. To launch a game, you will need to find it within this list. If you have many games, use the search feature at the top of the tab to quickly find the one you want to play. This helps you save time.
Launching Your Game: Step-by-Step
With your game now located, we can start to explore how to launch it. This process is quite simple, so don’t be scared. It’s like pressing a big ‘play’ button!
Simple Launch Method
The simplest way to launch a game is to click the “Play” button next to the game in the Games tab. When you click this button, Vortex will launch the game directly. The game will start, and you can begin playing! It’s that easy. Here are the steps in a more detailed manner:
- Open Vortex.
- Navigate to the “Games” tab.
- Find the game you want to play.
- Click the “Play” button next to the game’s name.
Advanced Launch Options
While the simple “play” button works most of the time, Vortex also provides advanced launch options if you need them. These options can help if you need to bypass any game launchers, launch with a specific save profile, or other customizations. These advanced options are usually located within the game’s profile page, which you get when you click on the game’s thumbnail or name in the Games Tab. Here’s an explanation of some common advanced options:
- Launch with Specific Profile: If you have different profiles for your game that change settings or game files, you can choose the profile you want to use when you launch the game. This lets you play the game with different mods and settings.
- Skip Launcher: Some games have their own launchers, which you might not need. Vortex may have the option to skip these launchers and go straight into the game. This can save some time.
- Command Line Arguments: For players who need even more customization, the advanced options may also allow you to enter command line arguments. These are very specific instructions for the game, such as running it in a windowed mode or disabling certain settings. This is a very rare use case though, and you may not need to worry about it at all.
Troubleshooting Launch Issues
Sometimes, things might not go as smoothly as we’d like. If you run into problems launching your game from Vortex, here are some common issues and ways to fix them:
- Game Not Detected: As we have explored earlier, if Vortex isn’t showing the game, double-check that you have correctly used the steps to set the game, so that it’s detected. Also, remember to restart Vortex so that it refreshes all of the game files and detection info.
- Game Won’t Start: If the game crashes or doesn’t launch, verify the game files on Steam or GOG to check for any corrupted or missing files. Sometimes these issues can cause the game to fail while launching it from Vortex.
- Incorrect Game Path: If the game is being launched with incorrect paths, you may get an error. Double-check the game path within the settings in the Vortex dashboard, and make sure that the location is correct.
- Mod Conflicts: If you have installed mods, sometimes there could be a conflict between some of these mods. When this happens, the game might not launch properly. Try disabling some of your recently added mods, and try to launch the game. If the game launches successfully this time, then the problem lies within those disabled mods. After this, you can start enabling your mods one by one, to see which specific mod is causing problems.
- Permissions Issues: Sometimes, Vortex needs to be given the proper permissions to launch a game. Try running Vortex as an administrator (right-click the Vortex icon and select “Run as administrator”). This can solve many problems.
If none of these solves your issues, try to contact Vortex support through their forum pages.
Understanding Game Profiles
Vortex uses the concept of game profiles to manage different ways of playing the same game. Imagine you want to play one game with different mods or settings. With profiles, you can easily switch between these setups without having to manually change all the files each time. It’s like having multiple save states for the way you play the game.
Creating and Managing Game Profiles
To make a new profile for your game, you can do the following steps:
- Go to Game Page: First, select the game you want to create a profile for in the “Games” tab.
- Find the Profile Area: On the game’s page, find where it shows the current profile (usually on the top left corner).
- Create New Profile: Click the “New Profile” button. You might be asked to give the new profile a name, like “Vanilla Gameplay” or “Modded Fun”.
- Activating a Profile: To use a profile, click on it. Vortex will now use the settings and mods in that profile.
Benefits of Using Game Profiles
Using game profiles can make playing a game that relies heavily on mods, much easier. Here are some good reasons to use profiles:
- Play Different Mod Setups: You can make one profile for the game without any mods and other profile with lots of mod. This is very convenient.
- Easy Switching: Switching between profiles is very quick. It’s faster than having to turn mods on and off all the time.
- Different Game Experiences: You can have a specific profile for playing the game in a normal manner, and another profile with lots of mods for a much different experience. This makes the same game much more replayable.
Keeping Your Games Organized
Vortex does not only launch your game, it also helps keep things nice and tidy. Let’s explore some of the features that Vortex offers to keep your games well organized.
Mod Management
Vortex allows you to manage mods very well. You can do things like enabling or disabling mods, checking if there are any mod conflicts, and see what mods are active in a profile. By keeping an eye on all of this, you can make sure that your game runs smoothly.
Game File Management
Vortex helps you manage the game files. It makes sure that they are all in the right places, which will help with less problems down the line. This helps you to worry less about these technicalities, and let you focus on enjoying your game.
Updating Vortex and Game Support
The Vortex team always does their best to keep Vortex working well with new games and new updates to existing games. You should always keep Vortex up to date to get the most out of it. To do this you should make sure that you have auto updates turned on. Vortex usually prompts you to do that. Keeping things up-to-date will ensure that Vortex continues to support your game properly. This will also ensure that Vortex does not have any bugs that may cause issues with your games.
Final Tips for Smooth Gaming
Before you go, here are some quick tips to help you have a great gaming experience with Vortex:
- Read Mod Descriptions: Before installing a mod, read the instructions for it. This helps you find mods that work well, and helps you to avoid any issues.
- Check for Conflicts: If your game has any issues after installing a new mod, make sure that you check for mod conflicts. Most of the time these conflicts can be the reason for game crashes.
- Use Profiles Wisely: Organize your game profiles so that it’s very easy for you to switch between different ways of playing your game.
- Keep Vortex Updated: Make sure you’re using the latest version of Vortex to get all the latest features and fixes.
- Experiment and Have Fun: The most important thing is to have fun experimenting with mods and enjoying your games!
So, there you have it! Launching games from the Vortex dashboard is really simple and is a very handy way to play all your favorite games. From detecting your games to understanding game profiles, and getting some very helpful tips, you should be all set to have great time with Vortex. Go ahead and get started!
How to manage games on vortex
Final Thoughts
To launch a game, first find it on your Vortex dashboard. You should see an icon representing the game you want to play. Simply click this icon to start the game.
The game will initiate, using the settings you’ve previously selected. Remember, your game needs to be properly configured. This will ensure a smooth game launching experience.
Following the above steps, how to launch game from vortex dashboard becomes very straightforward. Click the game’s icon and enjoy your play.

