
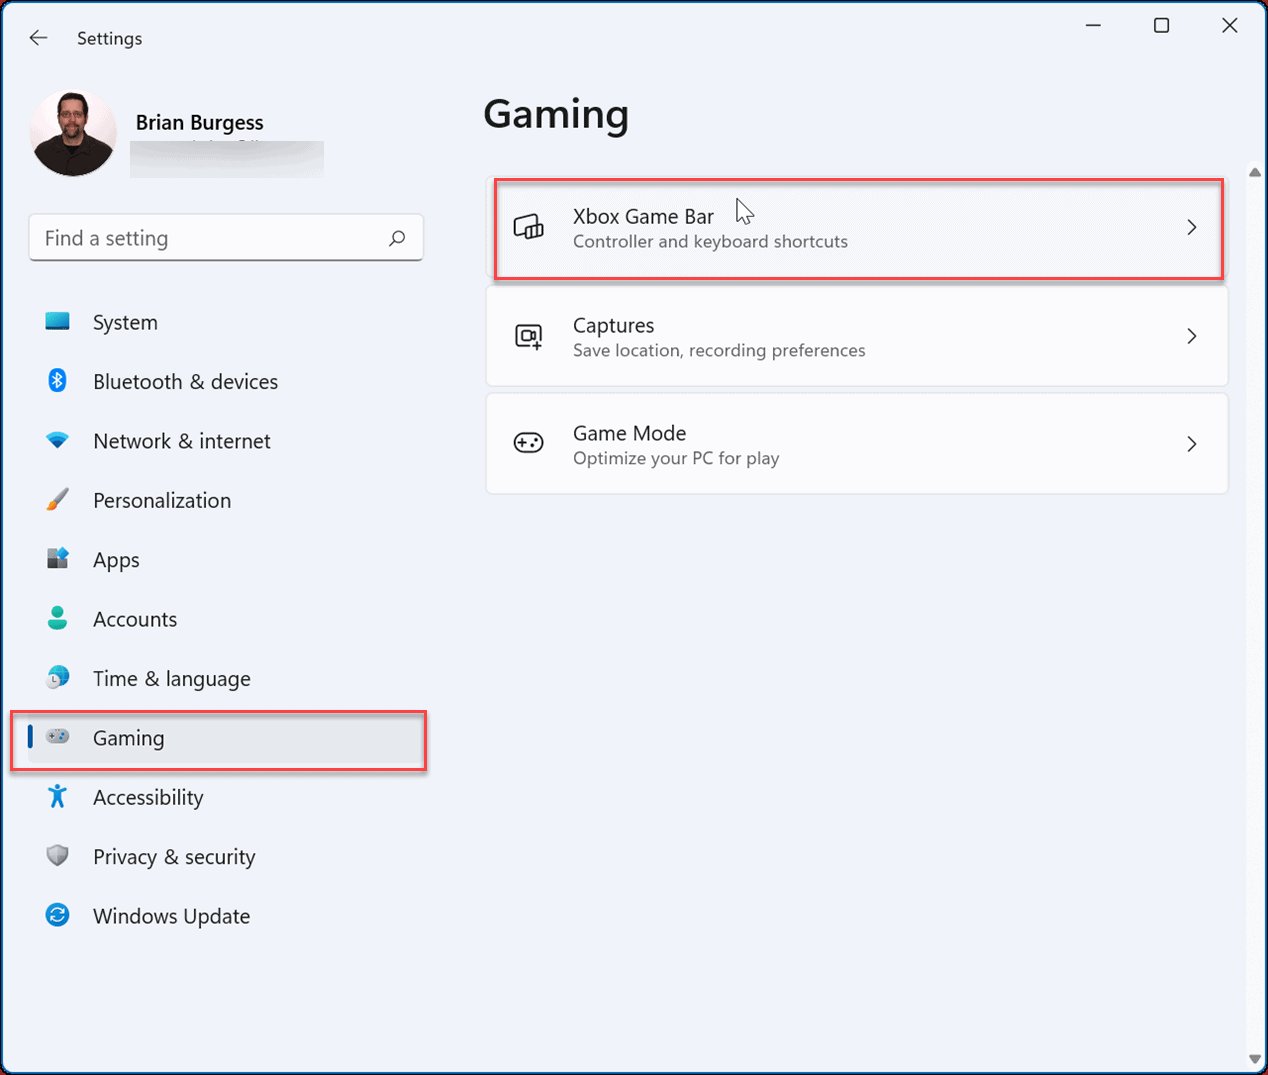
To remove Game Bar on Windows 11, navigate to Settings, then Gaming, and toggle the “Open Xbox Game Bar using this button on a controller” option to off.
Annoyed by the persistent Game Bar popping up while you’re trying to focus? Many users find it intrusive, especially when not actively gaming. This quick guide will show you exactly how to remove game bar win 11 and regain control of your screen.
We will walk through a simple process using your system settings. This method is straightforward and should only take a few moments to implement. This change helps improve your overall experience.

How to Remove Game Bar Win 11
The Game Bar in Windows 11 is a handy tool for gamers, letting you record gameplay, take screenshots, and chat with friends. But, sometimes you might not need it, or it might even get in the way. Maybe you’re not a gamer, or maybe you prefer using different tools. Whatever the reason, you can definitely remove the Game Bar if you want. This article will guide you through all the ways you can get rid of the Game Bar, from simple settings changes to more advanced methods.
Why Remove the Game Bar?
Before we jump into the how-to, let’s understand why someone might want to remove the Game Bar. It’s not a bad feature, but it can have some drawbacks for certain users:
Resource Usage: Even when you’re not using it actively, the Game Bar can sometimes use up system resources, like memory and processing power. This might slow down your computer, especially if you have an older machine or are trying to run other demanding applications.
Interference: The Game Bar can sometimes pop up unexpectedly, even if you’re not playing a game. This can be annoying if you’re in the middle of something important.
Cluttered Interface: For non-gamers, the Game Bar can feel like unnecessary clutter. If you prefer a minimalist setup, removing the Game Bar can make your system feel cleaner and simpler.
Alternatives: Some users prefer using other tools for screen recording or capturing gameplay, like OBS Studio or Nvidia ShadowPlay. In these cases, the Game Bar becomes redundant.
Ultimately, whether you keep the Game Bar or remove it is a matter of personal preference and how you use your computer. If it doesn’t serve a purpose for you, it’s perfectly fine to get rid of it. Now, let’s move on to the methods for doing so.
Disabling Game Bar Through Settings
The easiest and most straightforward way to stop the Game Bar from bothering you is to turn it off through the Windows Settings. This is the recommended approach for most users, as it doesn’t involve any complicated steps. Here’s how you do it:
1. Open Settings: Click on the Start menu, which is usually the Windows logo at the bottom-left corner of your screen. Then, click the “Settings” icon, which looks like a gear.
2. Navigate to Gaming: In the Settings window, look for the “Gaming” option and click on it.
3. Find Game Bar Settings: On the left side of the screen, you’ll see a few options. Click on “Game bar.”
4. Turn it Off: You’ll see a switch that says “Open Xbox Game Bar using this button on a controller”. Toggle this switch to the “Off” position. This will stop the Game Bar from popping up when you press the Windows key + G shortcut.
5. Optional: Turn Off Background Recording: Below the main Game Bar toggle, you’ll see “Capture settings.” Click on that. You can also turn off background recording if you don’t want Windows to continuously capture your gameplay. Toggle “Record in the background while I’m playing a game” to off position.
6. Close Settings: You can now close the Settings window. The Game Bar should no longer bother you.
By making these simple changes in settings, you should completely turn off game bar. However, sometimes, simply disabling the Game Bar from the settings might not be enough to completely stop it, if that the case, you might need more advanced method.
Completely Uninstalling Game Bar
If you want to get rid of the Game Bar more completely, you can choose to uninstall it using PowerShell. This method removes it from your system more thoroughly, though it can be a bit more technical. However, do not worry, because we have broken down each step, and you can follow it easily. Remember that by uninstalling it this way, you can install it again later if you change your mind. This involves using PowerShell, a command-line tool.
1. Open PowerShell as Administrator: In the Start Menu’s search bar (the magnifying glass icon), type “PowerShell.” You’ll see “Windows PowerShell” or just “PowerShell” in the search results. Right-click on it and select “Run as administrator.” You’ll be asked to give permission to open PowerShell. Click “Yes.”
2. Get the Package Name: In the PowerShell window, type the following command and then press enter:
powershell
Get-AppxPackage Microsoft.XboxGamingOverlay
This command gets the details about the Game Bar app package. You’ll see a bunch of information appear in the PowerShell window. Look for a line that says “PackageFullName.” Note down the exact text that comes after that. It’ll look something like “Microsoft.XboxGamingOverlay_1.48.11002.0_x64__xxxxxxxxxxxxx”, but the numbers might be different. This is the specific name of the package we need to uninstall. Copy this, because you’ll need to paste it in the next step.
3. Uninstall the Game Bar: Now, type (or paste) the following command into the PowerShell window. Be sure to replace the [PackageFullName] with the actual PackageFullName you noted down in the previous step.
powershell
Remove-AppxPackage [PackageFullName]
For example, if your PackageFullName was Microsoft.XboxGamingOverlay_1.48.11002.0_x64__xxxxxxxxxxxxx, the complete command would be:
powershell
Remove-AppxPackage Microsoft.XboxGamingOverlay_1.48.11002.0_x64__xxxxxxxxxxxxx
Then, press Enter.
4. Wait for it to Finish: PowerShell will take a moment to uninstall the Game Bar. You may not see any progress indicators, but wait for PowerShell to finish. If the uninstallation was successful, you’ll be returned to the normal PowerShell prompt.
5. Verify Uninstallation: You can try to open the Game Bar by pressing Windows Key + G, to verify that it has been completely uninstalled. You should not see it open anymore.
By following these steps carefully, you have completely uninstalled Game Bar from your computer.
Using Registry Editor (Advanced Users)
There is another method by which you can disable the Game Bar, however, it is meant for the advanced user, and if you don’t know how to use the registry editor, it is recommended that you don’t go with this method, and use other methods explained above in this article. This method involves using the Registry Editor, which allows you to change your system’s settings at a lower level. Making mistakes in the Registry Editor can sometimes cause problems with Windows, so it is very important that you follow these steps carefully.
1. Open Registry Editor: Click on the Start menu, which is usually at the bottom-left of your screen, type “regedit” and click on “Registry Editor”. You might need to say “Yes” to give it permission to open.
2. Navigate to the Key: In the Registry Editor, you’ll see a folder-like structure on the left side of the window. You need to go to a specific location. Carefully click through each of the folders in this order:
HKEY_CURRENT_USER > SOFTWARE > Microsoft > Windows > CurrentVersion > GameDVR
When you click on the folder, you will see a setting on the right side.
3. Modify the Setting: Look on the right side of the window for something called “AppCaptureEnabled”. If it’s there, double-click on it. If it is not there then, right click anywhere on the right side window and select New->DWORD(32-bit) value, and give this name to this newly created value – AppCaptureEnabled.
4. Change Value: A small window will open with a value called “Value data” under base section. You might see 1 in it. Change that value to “0” (zero). Click “OK”.
5. Optional: Another Setting: You can also look for a setting called “EnableGameOverlay”. If you see it, double click it and change the value data to “0” too. If it is not there, then, you can create a new DWORD(32-bit) value with name “EnableGameOverlay”, and change its value data to 0.
6. Close Registry Editor: Close the Registry Editor and restart your computer for the changes to take effect.
Now that you have changed the value of these settings in registry editor, the game bar should stop interfering, and it should not open anymore.
Re-installing Game Bar if You Change Your Mind
If you have uninstalled the Game Bar using the PowerShell method, and you decide later on that you want it back, don’t worry; you can reinstall it from the Microsoft Store. It’s a simple process. Here are the steps you should follow.
1. Open Microsoft Store: Click on the Start menu, type “Store,” and click on the “Microsoft Store” application.
2. Search for Xbox Game Bar: In the Microsoft Store, you’ll find a search bar at the top. Type “Xbox Game Bar” and press Enter.
3. Select the App: Click on the “Xbox Game Bar” app from the search results. It should be the one published by Microsoft.
4. Install It: Click the “Install” or “Get” button on the app page. The Microsoft Store will download and install the Game Bar on your computer.
5. Start Using It: Once installed, you can open the Game Bar by pressing Windows key + G or using any of the methods you would have used earlier before uninstalling it. You can also find its icon in the start menu.
This way, you have re-installed the Game Bar. The Game Bar setting, which you might have changed earlier by navigating through settings section, can still be set back to the way you want it now.
Troubleshooting Common Issues
Sometimes, things might not go exactly as planned. Here are some common problems you might face while trying to remove or reinstall the Game Bar, and what you can do to solve them:
Game Bar Still Pops Up After Disabling:
Make sure you have switched off all Game Bar-related settings in Settings > Gaming > Game Bar and also Gaming > Captures. Also turn off Xbox Game Bar using Windows key + G shortcut.
Restart your computer.
Try uninstalling the Game Bar using the PowerShell method.
Cannot Uninstall Game Bar Using PowerShell:
Ensure you are running PowerShell as an administrator.
Double-check you copied and pasted the package full name correctly from the output of the Get-AppxPackage command.
Make sure you are using the command Remove-AppxPackage to uninstall it.
Cannot Modify Registry Settings:
Ensure you have opened Registry Editor as administrator.
Be careful to enter and navigate to correct location inside registry editor, if you change some other settings inside registry, it might have unwanted effect on your computer.
Error Installing Game Bar From Store:
Check your internet connection.
Make sure your Windows 11 is up to date.
Try restarting your computer and then try installing again.
If problem persists, search for “wsreset” in the start menu, and then click on it to reset the store. After that, try reinstalling it again.
Game Bar Remains in Processes:
Even after uninstalling, you might see Game Bar related processes running in task manager. They might be running some background processes. They usually will not consume that much of CPU and memory, and there is nothing to worry about it, until it starts to. Also, they mostly stop running when your computer is restarted.
If you don’t want it then you can try to end it using the “End Task” button in task manager under the processes section, after selecting the process with Game Bar name.
If none of these fixes work, you might consider checking Microsoft support or other online communities for further help. It is important to know that sometimes computer problems can be complex and might require professional assistance.
Removing the Game Bar in Windows 11 doesn’t have to be a confusing task. You can choose the method that suits your needs, whether it’s a simple toggle switch in settings, a more thorough uninstall using PowerShell, or tweaking registry editor. Remember, you can always get it back if you want it. The key thing is that you are in control of your computer, and you can change your settings to fit your own style and needs.
How to Remove the XBox Game Bar on Windows 11
Final Thoughts
To remove the game bar in Windows 11, you can easily disable it within the settings app. Navigate to the Gaming section and then to Game Bar. Simply toggle the switch to off to disable this feature. This action prevents the game bar from opening during gameplay or other activities.
Alternatively, you can utilize the Windows Registry to remove game bar win 11 more permanently. Carefully editing the Registry, locate the relevant entries related to the game bar and modify them. Always back up your Registry before making any changes though, just to be safe.

