
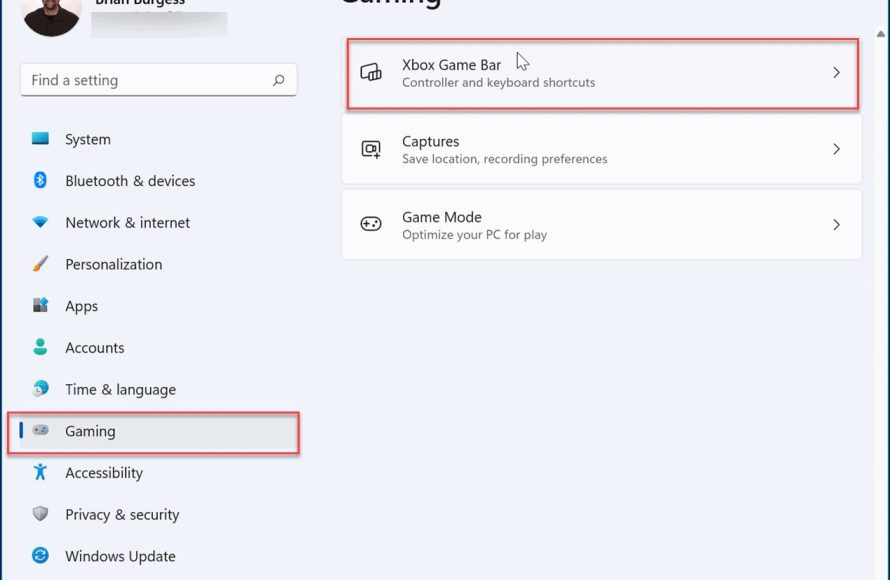
To remove game bar, go to Windows Settings, click on Gaming, then select Game Bar and toggle the switch to the off position.
Tired of the game bar popping up unexpectedly during crucial moments? It can be quite disruptive, especially when you’re not actively gaming. Many users find it helpful to disable this feature to avoid any accidental interruptions.
This quick guide will show you exactly how to remove game bar from your Windows system. The process is simple, and it should only take a minute.
We’ll guide you through the necessary settings changes to disable this feature. This will prevent the overlay from appearing going forward.

How to Remove Game Bar: A Complete Guide
The Game Bar, a handy tool that comes with Windows, lets you record game clips, take screenshots, and even chat with friends. It’s great for gamers, but sometimes, it can get in the way. Maybe you don’t play games, or perhaps you just find it popping up when you don’t need it. If the Game Bar is more of a nuisance than a help, you’re in the right place. This guide will show you all the ways to remove it or turn it off, making your computer experience smoother.
Understanding the Game Bar
Before we dive into removing the Game Bar, let’s understand what it is and why you might want to get rid of it. The Game Bar is a built-in Windows feature designed to enhance your gaming experience. It offers quick access to features like:
- Screen recording
- Screenshot capture
- Performance monitoring
- Xbox Social features (like chat)
While helpful for gamers, these features can sometimes interfere with other activities or simply be unwanted if you don’t use them. The Game Bar can also use up some system resources, potentially slowing down your computer if it’s older or not very powerful. This is why many users seek ways to disable or remove it completely.
Why You Might Want to Remove the Game Bar
There are several reasons why you might be looking for ways to remove or disable the Game Bar:
- Unwanted Pop-Ups: The Game Bar might appear accidentally when you press certain keyboard shortcuts, interrupting your work or gameplay.
- Performance Issues: On older or less powerful computers, the Game Bar can consume resources, causing slowdowns and performance problems, especially when you are performing resource-intensive work.
- Battery Drain: It can use more power, which is something that will concern you when you are using your laptop when it is not plugged in.
- Personal Preference: Maybe you simply don’t like or need the features, you prefer to keep your system as clutter-free as possible.
- Conflict With Other Software: Sometimes Game Bar may conflict with other softwares.
Different Ways to Remove or Disable Game Bar
Luckily, there are a few ways to stop the Game Bar from bothering you. You can either disable it temporarily or remove it completely. We’ll explore both options.
Disabling Game Bar Through Settings
The easiest way to stop the Game Bar is by disabling it in your Windows settings. This method doesn’t remove the Game Bar, but it will prevent it from opening or interfering with your activities. Here’s how to do it:
- Click on the Start button (the Windows logo in the bottom-left corner of your screen).
- Click on the Settings icon (it looks like a gear).
- In the Settings window, click on “Gaming”.
- On the left side, click on “Xbox Game Bar”.
- You’ll see a toggle switch labeled “Enable Xbox Game Bar”. Click this switch to turn it to the “Off” position. It should turn gray.
- You can now close the settings, and the Game Bar will no longer bother you.
This is the quickest and simplest method to stop the Game Bar from popping up accidentally, it is a reversible process as you can enable it back by just toggling it back on.
Disabling Game Bar Shortcuts
Even with the Game Bar disabled, certain shortcuts might still trigger some of its features. This next step is for those who wish to completely disable all of the Game Bar’s keyboard shortcuts to prevent accidental triggers.
- Follow the same first three steps as above (Start button → Settings → Gaming).
- Click on “Xbox Game Bar” in the left menu.
- Scroll down until you see “Shortcuts”.
- Here, you will see all of the shortcuts for the Game Bar. You can click on any existing shortcut and press the “backspace” key to delete the shortcut. If you want to disable all shortcuts then you have to individually delete all of the shortcuts here.
Now, even if the main Game Bar toggle is still enabled (not recommended when you want it completely turned off), these shortcuts should not do anything as there is no shortcuts connected to it.
Completely Removing Game Bar Through PowerShell
If disabling the Game Bar isn’t enough, and you want to completely remove it from your system, you can use PowerShell. This method requires a bit more technical skill, but it will get the job done. This method will remove all of the component of Game Bar.
Important Note: Removing the Game Bar through PowerShell is a more advanced process and should only be done if you are comfortable using command line tools and understand the risks involved. There is a small risk of things not working as they should. Always create a system restore point before doing this, this will let you go back to where it was before, in case anything goes wrong.
- Type “PowerShell” in the search bar located near the start button.
- Right-click on “Windows PowerShell” and select “Run as administrator”.
- A blue window will open, that is PowerShell.
- Type the following command and press Enter:
Get-AppxPackage Microsoft.XboxGamingOverlay | Remove-AppxPackage - Wait for the command to finish executing, this might take a few seconds.
- Type the following command and press Enter, to remove the game related services, this is done in the same PowerShell window.
Get-AppxPackage -AllUsers | Where-Object {$_.PackageFullName -like "xbox"} | Remove-AppxPackage - Again, wait for the command to finish executing, this will uninstall all of the xbox related features.
- Restart your computer to complete the removal.
After your computer restarts, the Game Bar should be completely gone. This means it won’t pop up even if you accidentally press the shortcut keys.
Reinstalling Game Bar (if needed)
If you decide later that you want the Game Bar back, you can easily reinstall it through the Microsoft Store. Here’s how:
- Open the Microsoft Store (search for it in the search bar).
- In the search bar, type “Xbox Game Bar”.
- Click on the Xbox Game Bar app.
- Click the “Install” button and the Game Bar will be installed and you can use it again.
Using Registry Editor for Game Bar Removal (Advanced Method)
The registry editor is another way to disable the game bar. This method is for very advanced users who are familiar with making changes to the registry. Making changes in the registry can cause system instability, if something is done wrong, so it is always better to first create a backup of the registry before making any changes in it, so that you can revert back to the original settings.
Important Note: Making changes in the registry is an advanced method, and if something is done wrong, it may cause harm to your system, it is only recommended for experts.
Here is how to disable game bar using Registry editor:
- Press the Windows Key + R to open the Run dialog box.
- Type “regedit” and press Enter.
- This will open the registry editor.
- Now in the Registry Editor window, navigate to the following location using the left pane.
HKEY_CURRENT_USER\SOFTWARE\Microsoft\GameBar - In the right pane, look for an entry named “AppCaptureEnabled”.
- If this entry does not exist then right-click on the empty space, go to New-> DWORD (32-bit) Value, then rename it to “AppCaptureEnabled”.
- Double-click on “AppCaptureEnabled”.
- Change the Value data to 0 and click OK.
- Now navigate to the following location in Registry Editor.
HKEY_CURRENT_USER\System\GameConfigStore - In the right pane, look for “GameDVR_FSEBehavior”.
- If this entry does not exist then right-click on the empty space, go to New-> DWORD (32-bit) Value, then rename it to “GameDVR_FSEBehavior”.
- Double-click on “GameDVR_FSEBehavior”.
- Change the Value data to 0 and click OK.
- Close the registry editor and restart your computer for these changes to take effect.
Choosing the Right Method for You
The best way to remove or disable the Game Bar depends on what you need. Here’s a quick recap:
- Disable through Settings: Great for quickly turning off the Game Bar and stopping accidental pop-ups. Easy to reverse if you need it again.
- Remove shortcuts: Helps to prevent Game Bar from triggering, when you use shortcuts, without completely disabling the service.
- Remove using PowerShell: Best for completely getting rid of the Game Bar and its associated files for good. Use this when you don’t plan on ever using it. This method provides maximum system resource gain.
- Disable using Registry Editor: For users who want a more advanced option to disable the Game Bar. Not advisable for beginners.
If you’re not sure, start with disabling it through the Settings menu. This is the easiest and safest way to begin. You can always move to more advanced options, like PowerShell removal or registry edit, if needed.
Troubleshooting Common Issues
Sometimes, you might run into problems when trying to disable or remove the Game Bar. Here are some common issues and how to fix them:
Game Bar Still Opens
If the Game Bar still opens even after disabling it in settings:
- Make sure you’ve also disabled the shortcuts, as some keys can still trigger the Game Bar.
- Restart your computer. Sometimes a simple restart is all you need.
- If that doesn’t work, try disabling the game bar in the registry editor as described above in this guide.
Errors When Using PowerShell
If you see errors when trying to use PowerShell to remove the Game Bar:
- Make sure you’re running PowerShell as an administrator. Right-click on PowerShell and choose “Run as administrator”.
- Double-check the commands you entered. Any mistake in the command might lead to an error.
- If the commands still don’t work, there might be an issue with your Windows installation or user permissions, so try the other methods instead.
Game Bar Features Still Running
If you think that the Game Bar features are still running, then you should check the processes that are running in the background, here is how to check it
- Press Ctrl + Shift + Esc keys together to open Task Manager.
- Check the process under the “Processes” tab.
- Look for processes related to ‘Xbox’ or ‘GameBar’.
- If these are still running, then your system might have some error or maybe you did not properly remove the game bar.
By following these troubleshooting tips, you should be able to fix the most common Game Bar issues.
Removing or disabling the Game Bar can help improve your computer’s performance, prevent unwanted pop-ups, and make your computing experience more tailored to your needs. Whether you are a casual user or a gamer, understanding how to manage the Game Bar can help you have a better user experience.
How to Remove the XBox Game Bar on Windows 11
Final Thoughts
To remove game bar, first access your Windows settings. Go to the “Gaming” section and then to “Xbox Game Bar”. There, toggle the switch to the “off” position. This action disables the game bar feature completely.
Alternatively, you can disable specific game bar components. You can find these options within the same “Xbox Game Bar” settings area. Choose the settings that suit your preferences. So, these steps cover exactly how to remove game bar.

