
Saving your Roblox game happens automatically through the platform’s cloud system; changes are saved continuously as you build.
Ever wondered how to save a game on Roblox, keeping all those amazing builds and scripts safe? You don’t actually have to do anything manually! Roblox cleverly takes care of saving for you. The platform constantly saves your work, which is great news for game creators.
Every change you make, from placing a brick to coding a complex function, is saved automatically. This makes sure you can always come back to your work without any worry. It’s all in the cloud, so you don’t have to stress about losing your precious creations.

How to Save a Game on Roblox
Okay, so you’ve been building something amazing in Roblox Studio, a fantastic castle, an awesome race track, or maybe a super cool hangout spot for your friends. But what happens if you accidentally close the program? Poof! All your hard work could disappear. That’s why knowing how to save your game on Roblox is super important! It’s like having a superpower that lets you keep your creations safe and sound, ready to be shown off to the world or continued later. Let’s dive in and learn all the ways to make sure your Roblox masterpieces are always saved.
Understanding the Basics of Saving in Roblox Studio
Before we get into the step-by-step instructions, let’s understand what saving actually means in Roblox Studio. Unlike some other games where you might just click a ‘save’ button and be done, Roblox Studio uses a more detailed system. You’re not just saving a point in the game; you’re saving the entire game world – all the buildings, characters, scripts, and everything else you added! The great news is, Roblox Studio makes this pretty easy once you get the hang of it. There are two primary ways to save your work:
- Saving to Roblox: This means your game will be stored on Roblox’s servers, making it accessible from any computer where you log into your Roblox account. This is ideal for sharing your game and allowing others to play.
- Saving Locally: This saves your game file to your computer. It’s a great backup option and good for if you want to work on your game offline.
Why Both Types of Saving are Important
Having both options is fantastic! Saving to Roblox lets you share your game with your friends and the whole world. Saving locally makes sure you always have a copy on your own computer in case something happens online. Think of it like keeping a copy of your drawings in your notebook and also showing them off at school – two different, but great ways to keep your creation safe. This also offers security against any unpredictable issue that might happen with your account or Roblox’s servers, your progress is always safely secured in your computer.
Saving to Roblox: Publishing Your Game
Let’s begin with how to save to Roblox itself – otherwise called, ‘Publishing’. This method allows your game to be played by everyone. This is where you bring your creation to life. It’s also where you will also need to be cautious since others might get ahold of your game. So be careful.
Step-by-Step Guide to Publishing
Follow these easy steps to save your game directly to Roblox:
- Open Roblox Studio: First, open the Roblox Studio where you’re building your game.
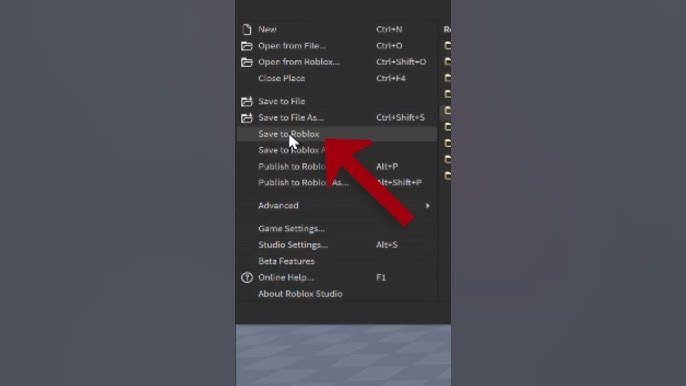
- Find the File Tab: Look at the top-left corner of your screen, and click on the “File” tab. This will open a dropdown menu.
- Select “Publish to Roblox”: From the dropdown menu, select “Publish to Roblox.” You can find this option a little further down the options.
- Choose Existing or New Place: Now, a window will pop up. Here you have two options: If you already have a game page created that you want to update, then you can select your game. If you’re creating a new game for the first time, then you can either choose to add it to an existing experience or create a new one entirely. For the sake of our tutorial, we’ll assume that you are creating a new experience. So, click on the “Create New Game” button.
- Name Your Game: You’ll see the “Create New Game” panel. Here you will need to give your game a great name, just like you would name a character in your game, or a place. A good name makes your game easier to find later, so choose something exciting and memorable!
- Add a Description: Don’t forget to add a short description! This is where you tell people what your game is all about. Is it a racing game? A castle adventure? Let people know! It is also a good place to add your user name, to get proper credit for your work.
- Choose Your Genre and Device: Next, pick a “genre” (like action, adventure, or building) that fits your game. Also select the device option where it can be played – PC, Mobile, and Console. Try to make it available to everyone, so everyone can enjoy your game.
- Game Avatar Type: Choose the appropriate avatar type. The default is R6, but you can change it to R15. R6 is like the older style, and R15 is more customizable. Choose the one that fits your game best.
- Game Privacy: Then you can select the game’s Privacy type. “Public” means anyone can play it. “Private” means that only you can play it. It’s up to you if you want to show off your game to the world or not.
- Press the Publish Button: Lastly, click the big blue “Create” button to finish publishing your game to Roblox!
Important Things to Remember When Publishing to Roblox
- Game Icon and Thumbnail: After you’ve published it, you can go to your game’s page on the Roblox website to change the icon and thumbnail. These are what people see when they are browsing through games, so make sure they look cool!
- Permissions and Access: You can adjust the settings of your game, such as who can play it (everyone or just your friends), and who can edit it (just you or also your collaborators).
- Regular Updates: Once you publish your game, you can always go back to it to update and add to your game. Simply select the File tab again, and select Publish to Roblox, and then choose your game.
- Testing is key: Before you publish it, make sure you test it properly. It’s easier to correct any problems now than when people are playing your game.
Saving Locally: Saving Your Game to Your Computer
Now, let’s learn about saving your game to your computer. This is like keeping a backup copy of your project. It’s incredibly helpful, especially if you want to keep working on your game offline. Also, it is always a good idea to back up your game on the computer, just in case something goes wrong with your game on Roblox.
How to Save a Local Copy
Follow these steps to save your game to your computer:
- Open Roblox Studio: Just like before, start by opening the Roblox Studio with your game.
- Find the File Tab: Go to the top-left corner and click on the “File” tab.
- Select “Save As”: Choose the “Save As” option from the dropdown menu.
- Choose Save Location: A window will open, allowing you to pick where you want to save the game file on your computer. Pick a place you can easily find, such as the “Documents” folder or even create a new folder specially made for your game.
- Name Your Game: Now, you will name the file. The default is a long number string but you can rename it to whatever you want – like “MyAwesomeCastle” or “RaceTrackFun”. You could also add the date and time to differentiate between different versions of the game if needed.
- Click Save: Finally, press the “Save” button. Your game will now be saved as a .rbxl file (Roblox place file) in the location you chose.
Tips for Managing Local Saves
- Regular Backups: Make sure to save your game often. Don’t wait until you’ve made tons of changes before saving. It’s good practice to save every 10-15 minutes.
- Version Control: If you make significant changes to your game, consider saving it with a new name (like “MyGame_v2”, “MyGame_v3” and so on). This allows you to go back to previous versions if something goes wrong.
- Using Cloud Storage: Think about using cloud storage (like Google Drive or Dropbox) to store your local saves. This way, you can access them from any computer and have another form of backup.
- Keep track of different versions: Make sure you save often in case something goes wrong. You could also keep track of the version by adding a version number to the name, so that you can easily keep track of what you have saved on your computer.
Important Saving Habits to Adopt
To ensure your Roblox creations are safe, there are some crucial habits you should adopt whenever you’re working in Roblox Studio:
The Importance of Frequent Saving
Imagine building a sandcastle and then a big wave comes and washes it all away. That’s what it can feel like if you don’t save your game regularly. Saving often can prevent losing hours of work due to a sudden program crash, internet issues, or accidental closing. Getting into the habit of frequently pressing the save buttons becomes second nature and can save you a lot of stress. Always press “Ctrl + S” or “Command + S” (on Mac) to quickly save your progress. This action, when done regularly, will prevent lost work and stress.
Creating a Backup Strategy
Having a good backup strategy is key to protecting your game. This doesn’t need to be complex; it simply means that you have some different ways of keeping your game safe. It’s like having multiple copies of your favorite toy, just in case one gets lost.
Effective Backup Tips
- Save Both Locally and to Roblox: Don’t just rely on one method. Save to Roblox for sharing and access and save locally for a backup copy on your computer.
- Automated Saves: Get into the habit of using Autosave. By default, Roblox saves your game every few minutes, but double check this in the settings to ensure that this is turned on, just in case you get busy building and forget to save.
- Save After Major Changes: Anytime you add a big feature or make a lot of progress, save your game. This way you will never lose a large chunk of work and have to redo it.
- Cloud Storage: Use cloud storage services to back up your local saves. This adds an extra layer of protection in case your computer has a problem.
Troubleshooting Common Saving Issues
Sometimes, things don’t go as planned. If you run into trouble while trying to save, don’t worry! There are some common problems, and they usually have simple solutions.
“Save Failed” Error
If you see a “Save Failed” error, here’s what to do:
- Check Your Internet Connection: First, make sure that your computer has a stable internet connection, otherwise it will have trouble saving to Roblox.
- Roblox Server Status: Sometimes, the Roblox servers might have issues. Check the official Roblox status page to see if there are any known problems.
- Try Saving Locally: If saving to Roblox is not working, try saving locally first. That ensures you don’t lose progress.
- Restart Roblox Studio: If the issue continues, try restarting Roblox Studio. Sometimes that’s all it takes to fix the problem.
Issues with Local Saves
If you’re having trouble with your local save file:
- Check File Permissions: Make sure that Roblox Studio has permission to save files to your chosen location on your computer. This is very important for security and to make sure the file can be saved.
- Check Disk Space: Make sure that your computer has enough free space to save the game file.
- Try Saving to a Different Location: Save your game to a different location such as the desktop, to make sure that it’s not a location issue.
- Restart Your Computer: Sometimes, a quick restart can fix the issue by clearing any conflicts with other programs.
When Things Go Really Wrong
If nothing seems to work:
- Ask for Help: Don’t hesitate to ask for help from the Roblox community. There are many helpful forums and groups where people are always ready to assist.
- Reinstall Roblox Studio: As a last resort, you could try reinstalling Roblox Studio. It fixes any internal issues that could be affecting your game.
Saving Your Teamwork: Collaboration in Roblox Studio
Roblox Studio also has ways to make it easy to work with a group of friends on a single project. When many people are working on a game, it’s crucial that you understand how saving works in a group setting.
Understanding Team Create
Team Create is a feature that lets multiple people work on the same game at the same time. It makes it easy to create something amazing together.
How to Set Up Team Create
- Go to View tab: Once you open your game, go to the top of the screen, and click on the “View” tab.
- Click on “Team Create”: Once you press the “View” tab, click on “Team Create.” A window will now appear.
- Press the “Turn On” button: Now, simply press the “Turn On” button to activate Team Create.
- Give Your Friend Permissions: Now, you will need to give permissions to the members of your team by adding them to the “Collaborators” section.
Saving in a Collaborative Environment
In Team Create, it’s very important to keep in mind how saving works:
- Automatic Saving: Team Create automatically saves changes as you make them. It makes it easier to create together without having to manually save all the time.
- Avoid Conflicts: If two people work on the same thing, their changes might not save properly. You need to communicate with your team so that multiple people aren’t working on the same object at the same time.
- Frequent Publishing: While Team Create saves automatically, it’s still a good idea to publish the game often to the Roblox server for more regular backups.
By following these simple steps and best practices, you’ll ensure that all of your hard work in Roblox Studio is always safe and sound. And remember, saving isn’t just about keeping your work; it’s also about making sure you can share your amazing creations with the world. So get building, get saving, and have fun creating your dream games!
How To SAVE Your Roblox Studio Games! | Roblox Studio
Final Thoughts
To save your Roblox game progress, use the “File” menu and select “Save to Roblox”. This action will overwrite the previous version. You can also opt for “Save to Roblox As” for a new game slot.
Remember, saving is crucial to prevent loss. Regularly use these methods to back up your work. This is important for progress in creation.
Therefore, understanding how to save a game on Roblox is absolutely vital. Make sure to save frequently.

