To stop GeForce from changing game settings, disable the ‘In-Game Overlay’ and ‘Optimize games’ options within the GeForce Experience application.
Have you ever been frustrated when your carefully chosen game settings keep reverting? It’s a common issue with Nvidia’s GeForce Experience. Many users wonder how to stop geforce from changing game settings, particularly when the automatic optimization feature overrides their personal preferences. It can be quite annoying when the game you have customized feels different after it changes by itself.
The solution lies within the GeForce Experience app itself. By adjusting specific settings, users gain complete control over their game configurations. This will prevent the software from automatically optimizing your titles and messing your preferred settings.

How to Stop GeForce Experience From Changing Game Settings
Have you ever started a game, excited to play with your carefully chosen settings, only to find that they’ve been mysteriously changed? If you’re an NVIDIA GeForce user, chances are the GeForce Experience software is the culprit. It’s designed to optimize your games for the best performance, but sometimes those “optimizations” can be annoying. The good news is, you don’t have to live with it! This article will walk you through how to regain control of your game settings and stop GeForce Experience from making unwanted changes. We’ll break down the different methods and help you get your games looking and playing exactly the way you want them. This whole guide is made for anyone, from beginners to more tech-savvy users, so let’s get started.
Understanding GeForce Experience’s Optimization
Before we jump into fixing things, let’s talk a bit about why GeForce Experience changes game settings in the first place. The software uses a feature called “Game Optimization.” This feature scans your system to identify games and then tries to pick the settings it thinks will give you the smoothest gameplay based on your graphics card and other hardware. It’s trying to balance visual quality with performance, aiming for the highest frame rate at a good visual standard. This process often involves adjusting graphics options, resolution, and even details like texture quality and shadows. Sometimes, it gets things right, but other times, it can make changes you don’t like. Maybe it lowers your resolution or turns down graphics that you really enjoy. It can also lead to other unexpected issues like graphical glitches or input lag. For people who prefer playing on custom setting, having GeForce automatically changing game settings can be a real pain. So, understanding how this works is the first step in preventing it.
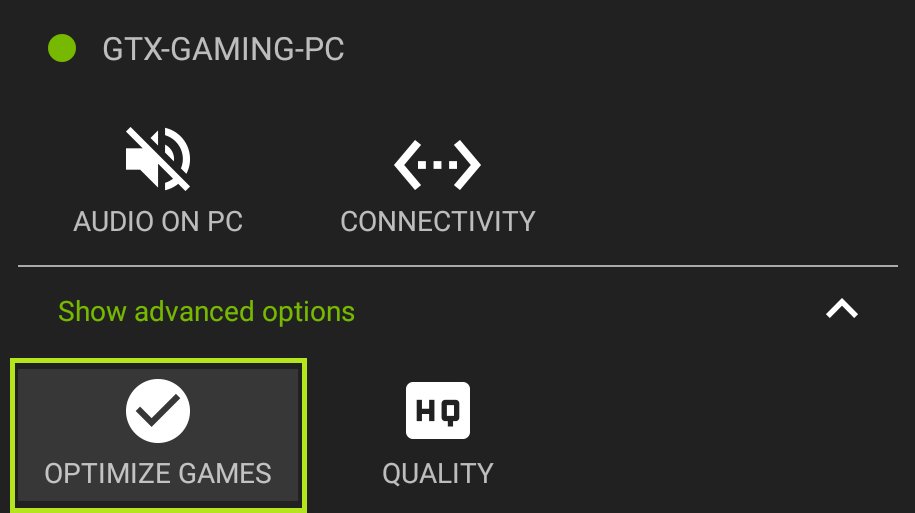
Method 1: Disabling Automatic Optimization for All Games
The most straightforward way to stop GeForce Experience from changing your game settings is to disable automatic optimization altogether. This stops the software from trying to modify any of your games, putting you fully in charge of your visual experience. Here’s how you can do it:
- Open GeForce Experience: Look for the NVIDIA icon (usually green) in your system tray (the bottom right corner of your screen). Click on it to open the GeForce Experience application.
- Navigate to Settings: Once the application is open, click on the gear icon (settings) located at the top right corner.
- Select “Games”: In the settings menu, click on the “Games” tab.
- Turn off Automatic Optimization: Look for a checkbox or toggle switch that says something like “Automatically optimize newly added games” or “Enable automatic optimization for games”. Uncheck or turn this off. This tells GeForce not to mess with any games, old or new.
- Confirm the Change: There may be a save or apply button, make sure to click it, if available, to confirm the change. Now, GeForce will no longer automatically make changes when you add a new game to your library.
By following these simple steps, you’re telling GeForce Experience to leave your game settings alone. This method is ideal for those who want complete control over how their games look and play.
Method 2: Disabling Optimization for Individual Games
What if you want to keep the automatic optimization feature for most games but want to manually manage the settings for just a few particular titles? Good news—GeForce Experience lets you do that as well. This approach lets you fine-tune settings per game, without affecting your general preferences. Here’s how you can disable optimization for individual games:
- Open GeForce Experience and Go to Games: Open the GeForce Experience application and make sure you are at the “Home” tab showing the list of your installed games.
- Select Your Game: Choose the game that you want to manage by clicking on it from the list of installed games.
- Click the “Details” Option: After clicking on a specific game, you should see a “Details” button, usually positioned next to the game’s launch button or thumbnail, click that.
- Choose a Custom Settings: You will be redirected to a screen showing the recommended settings for that game by NVIDIA. You will notice that a button that says “optimize” is selected, click it to “Custom Settings”.
- Manually Set Your Settings: You can now customize all the graphics settings for the game. These are the settings that you want the game to use. Once you are done, click apply.
- Prevent Further Changes: By doing this, GeForce experience will not automatically try to optimize these specific settings, instead it will use whatever values you set here.
This method offers flexibility, enabling you to keep the convenience of automatic optimization for most games while retaining total control over the specific game settings you want. This approach is ideal for situations where you want the best of both worlds.
Method 3: Using the “Optimal Playable Settings” Slider
In the older versions of GeForce Experience, you might have seen an “optimal playable settings” slider. This slider allowed you to change the level of automatic optimization. While NVIDIA has removed the slider for now, understanding how it worked can help you see their goals with automatic game optimization.
Previously, the slider allowed you to move between a “Quality” and “Performance” setting. Moving towards “Quality” resulted in NVIDIA choosing graphics settings that are more visually impressive. While moving towards “Performance” prioritized games running fast with a smooth frame rate. Though it’s not directly available anymore, you could still achieve this level of fine-tuning by manually adjusting the game’s settings using the steps explained in method 2.
Method 4: Reverting Changed Settings
Sometimes, despite our efforts, GeForce Experience may have already changed your settings before you could adjust them. In this situation, it is very easy to revert back to your prefered settings. The great news is that, even after GeForce optimizes, you can manually change your settings back in your game itself, and the game will remember your last-picked configurations when you relaunch it.
Reverting in-Game Settings:
Here are the steps to take to manually set the in-game settings:
- Launch the Game: Run the game that has had its settings altered.
- Access Graphics Settings: Go to the game’s settings menu. Find the graphics settings section, which may be labelled as “Video,” “Graphics,” or something similar.
- Manually Adjust: Now, carefully go through all the settings. Change each setting to exactly what you prefer, just like you had before.
- Save and Confirm: Once you’re happy, save all your changes in the game. The game will normally save your configurations, and will remember them the next time you play it.
By doing this process, your games will now be configured exactly how you want them.
Method 5: Checking For Conflicting Software
In some rare instances, other software running on your computer might conflict with GeForce Experience, causing unwanted changes to your game configurations. It is worth checking to see if there are any conflicting applications running on your computer that could be interfering with your games settings.
Identifying Potential Conflicts:
Here is a list of possible softwares that could be a problem:
- Other Game Optimization Tools: Sometimes, third-party game optimizers can interfere with GeForce Experience. If you have such an application, try temporarily disabling it to see if it fixes your problem.
- Overlays and Screen Recording Software: Sometimes, tools that add overlays, like Discord or screen recording softwares, can have unwanted interactions with your games. Trying closing the applications or disabling their overlay features might be worth trying.
- Hardware Monitoring Tools: Certain hardware monitoring softwares can also interfere with game settings. Temporarily disable these to rule out any potential conflicts.
After checking for any conflicts, if you did find some conflicting softwares, try to only launch the game after making sure these softwares are closed. Doing this will reduce the possibilities of conflicts.
Method 6: Keeping GeForce Experience Updated
It’s always a good idea to keep your GeForce Experience software up-to-date. NVIDIA regularly releases updates with bug fixes and other improvements. An outdated version might be causing issues with game settings. Check for updates regularly and install them.
Updating GeForce Experience:
- Open GeForce Experience: Locate the NVIDIA icon in your system tray and click on it.
- Go to Settings: Click the gear icon in the upper right part of the application to access the settings.
- Check for Updates: Under the “General” settings, find the button or option to check for updates. Click on it.
- Install Updates: If there are any new updates, follow the onscreen prompts to download and install them. After installing the updates, restart your PC for all the changes to take full effect.
Keeping everything updated not only makes sure that you don’t encounter any problems, but also that you always have the latest features, and optimizations to improve your gaming experience.
Method 7: Reinstalling GeForce Experience
If you’ve tried all other steps, and are still struggling, a full reinstall may be necessary. This will remove all the current files and set-up to install everything again from scratch. This is a more advanced step, but sometimes it is needed.
How to Reinstall:
- Uninstall GeForce Experience: Go to your Windows Control Panel or the Settings application, find “Apps” or “Programs”, and uninstall GeForce Experience from the list.
- Restart your PC: After uninstalling, restart your computer for good measure.
- Download the Latest Version: Go to the NVIDIA website and download the latest version of GeForce Experience.
- Install: Run the setup file you just downloaded, and go through the installation process.
- Restart: After installing the application again, restart the computer for the final time to make sure everything is in order.
By reinstalling the application, you should have the most recent working version with all the bugs fixed. This process should fix many of the unknown problems with the application itself, including all game settings issues.
Important Considerations
While disabling or adjusting GeForce Experience’s automatic optimization will prevent unwanted setting changes, there are a few other things to keep in mind:
- Performance Impact: Manually set game settings might not always be the best for performance, especially for those with lower-end PCs. Consider manually adjusting settings with small increments if you notice stuttering or low frame rates.
- Driver Updates: Make sure your graphics card drivers are updated. Newer drivers can also fix graphical issues or increase your game’s performance.
- Experiment: It’s always a good idea to experiment with different graphics settings to find a good balance between visual quality and performance for each specific game that you play.
By being mindful of these points, you can get the best visual experience for all your games while also achieving the performance that you desire.
Taking control over GeForce Experience’s optimization is crucial for making sure your games look and play exactly as you want them to. By applying all the methods that we’ve mentioned, you should be able to prevent GeForce Experience from messing with any of your prefered configurations. Whether you prefer disabling automatic optimization completely or simply taking control of individual games, you now have the tools necessary to set up a personalized and satisfactory gaming experience. Remember to keep your software up-to-date, and don’t forget to experiment with your game settings to see what works best for you and your machine.
How to turn off Geforce Experience ALT+Z
Final Thoughts
To stop GeForce Experience from altering your game configurations, opt out of automatic optimization within its settings. Manually configure your games and save. Then, prevent GeForce from overwriting those settings by disabling automatic game optimization completely.
Alternatively, you can use a separate configuration file. This prevents GeForce from affecting in-game options. That’s it for how to stop geforce from changing game settings effectively and easily.

