
You can transfer Steam games to another computer by copying the game files from the original computer’s Steam library folder to the new computer’s Steam library folder.
Switching to a new computer but worried about losing your game progress and having to redownload everything? The process of moving your precious gaming collection can seem daunting. Thankfully, learning how to transfer steam games to another computer is simpler than you think. It doesn’t involve complicated tech knowledge.
You can avoid the hassle of lengthy downloads by copying game files between PCs. It saves you time and bandwidth. Follow the steps, and you will be gaming on your new machine in no time.

How to Transfer Steam Games to Another Computer
Moving your favorite games from one computer to another can seem tricky, but it’s actually quite straightforward. Whether you’re getting a new gaming rig or just want to play on a different machine, there are several ways to get your Steam games over without having to download everything again. This article will guide you through all the methods, explaining each step in simple terms so even a beginner can do it. You’ll learn about everything from the simple backup and restore feature, to using external drives, and even how to move game files manually. So, let’s jump right in and get your games moving!
Understanding Your Options
Before we dive into the “how,” let’s look at the different paths you can take to move your Steam games. Each method has its own benefits and might be better for certain situations.
Steam’s Built-In Backup and Restore Feature: This is the easiest method for most people. Steam creates a backup copy of your games that you can then move and restore on another computer. It’s great for single games or a few small titles, but can be a bit slow for large game libraries.
External Hard Drives or USB Flash Drives: This method involves copying game files directly to an external storage device and then moving them to the new computer. It’s a faster method for large game libraries compared to Steam’s backup and restore.
Manual File Transfer: For the tech-savvy, you can manually copy game files between computers using a network or external storage. This method gives you more control, but requires a bit more knowledge of where the game files are stored.
Local Network Transfer: For the fastest transfer speeds within your household, you can transfer games directly from one computer to another on your local network if you are comfortable with sharing the files.
Using Steam’s Backup and Restore Feature
This is the simplest method, perfect for beginners. Let’s see how to make a backup and restore the files onto a different computer.
Creating a Game Backup
1. Open Steam: Start by opening the Steam application on the computer that has the games you want to transfer.
2. Go to Library: Click on “Library” at the top of the window. This will show your list of games.
3. Select a Game: Right-click on the game you want to back up. A menu will appear, showing you different things to choose.
4. Choose Backup Game Files: Select “Backup Game Files” from the menu. This will open the Backup window.
5. Select Games to Back Up: In the Backup window, you can choose which games you want to back up by ticking the box next to each game’s name.
6. Click Next: Once you’ve chosen your games, click the “Next” button.
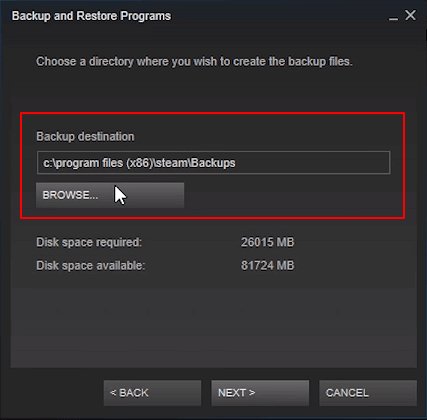
7. Choose a Backup Location: Now, you need to select where you want to save the backup. This could be your computer’s hard drive, an external drive, or a USB flash drive. Click “Browse” to select the desired location.
8. Click Next Again: After you’ve selected the save location, click “Next”.
9. File Size and backup settings: It will show you file sizes of the game and you can also split the size of the backup file into specific size chunks by selecting “CD/DVD media” or “Custom” in the option, it will also ask for backup name.
10. Start the Backup Process: Click the “Next” button to start the backup process.
11. Wait for the backup to complete: Steam will now create a backup of your chosen games. This may take some time, depending on the size of the game and the speed of your computer.
12. Confirm the backup: Once the process is complete, click “Finish”.
Restoring Games from a Backup
Now, let’s see how to restore your games on the other computer.
1. Open Steam on the New Computer: Start by opening the Steam application on the computer where you want to play the games.
2. Go to Steam Menu: Look at the top-left of the Steam window and click on “Steam”.
3. Select Backup and Restore Games: From the menu, hover your cursor over “Backup and restore games…”, this will open a new window.
4. Choose Restore a backup: In the new window, click on “Restore a previous backup”.
5. Locate Backup Files: Now you need to find the backup files you created earlier. Navigate to where you saved the files. It will show all the backup files of the games you backed up, select the appropriate one and click “Next”.
6. Confirm the location: It will ask you to confirm the location you want to restore the games, you can select any location by clicking “Browse” or keep it as default.
7. Start the Restore Process: Click “Next” to start restoring your games.
8. Wait for the Restore Process to Complete: Steam will now restore your games to your new computer. This may take some time, depending on the size of the game.
9. Play your games: Once it’s done, click “Finish”, and you can start playing your favorite games again.
Transferring Games Using External Hard Drives or USB Drives
This method is faster and better for larger game collections. It involves manually copying the game files to an external device and then moving them to the new computer.
Finding Your Steam Game Files
First, you need to know where Steam stores your games. Here is how to find them:
1. Open Steam: Open the Steam application on the computer with your games.
2. Go to Settings: Click on “Steam” in the top-left corner of the Steam window and select “Settings.”
3. Click on Downloads: In the Settings window, click on “Downloads.”
4. View Steam Library Folders: You’ll see a “Content Libraries” section. Click on “Steam Library Folders.”
5. Locate Game Installation Folder: A new window will appear showing where your games are installed. Usually, the path looks like this: C:\Program Files (x86)\Steam\steamapps\common.
6. Note the Path: Remember this path, as this is where you’ll find the game folders you need to copy.
Copying Game Files to an External Drive
Now, let’s move your game files:
1. Connect External Drive: Connect your external hard drive or USB flash drive to the computer. Make sure it has enough space for all your games.
2. Open File Explorer (Windows) or Finder (Mac): Open the file explorer in windows or finder if you are using mac.
3. Navigate to Steam Game Location: Go to the location you noted earlier, like C:\Program Files (x86)\Steam\steamapps\common.
4. Find Game Folders: You’ll see folders named after your games (for example, Counter-Strike Global Offensive folder or the folder of your game).
5. Copy Game Folders: Copy the folders for all the games you want to transfer by selecting all the game folders and right-clicking and selecting copy or press CTRL+C for windows or Command+C for mac.
6. Navigate to External Drive: Go to your external drive in the file explorer or finder.
7. Paste Game Folders: Paste the copied folders by right-clicking and selecting paste or press CTRL+V for windows or Command+V for mac.
8. Wait for Copying to Complete: This might take a while, depending on how many games you have and how large they are.
Moving Games to the New Computer
Now you need to move the copied files onto the new computer:
1. Connect External Drive to New Computer: Connect your external hard drive or USB drive to the new computer.
2. Open File Explorer (Windows) or Finder (Mac): Open the file explorer in windows or finder if you are using mac.
3. Navigate to External Drive: Go to your external drive.
4. Copy Game Folders: Copy the folders you previously pasted on the external drive.
5. Navigate to the new computer’s Steam Installation Folder: Go to Steam’s installation folder on your new computer, usually it is like, C:\Program Files (x86)\Steam\steamapps\common or if you have selected custom location during installation, then go there.
6. Paste Game Folders: Paste the game folders into the common folder on your new computer.
7. Wait for Pasting to Complete: This can also take some time, depending on the size of your games.
Verifying Game Files
After you have copied the game files over, it’s good practice to verify them with Steam:
1. Open Steam: Open the Steam application on the new computer.
2. Go to Library: Click on “Library” at the top of the window.
3. Select a Game: Right-click on the game you have just transferred.
4. Go to Properties: Select “Properties”.
5. Go to Local Files Tab: Click on the “Local Files” tab.
6. Click “Verify integrity of game files”: Select the “Verify integrity of game files” option.
7. Wait for Verification to Complete: Steam will check to make sure all the files are there and correct, downloading any missing files.
Manual File Transfer over Local Network
If you have two computers connected to the same local network, you can transfer games directly between them. It can be faster than using an external drive.
Setting Up File Sharing
First, you need to make sure file sharing is set up on both computers.
1. Enable File Sharing on Host Computer (Windows):
Go to “Control Panel”.
Click on “Network and Internet” then “Network and Sharing Center”.
Click on “Change advanced sharing settings” on the left panel.
Turn on “Network discovery” and “File and printer sharing” under the network profile you are currently using (Private or Public).
Click on “Save changes”.
2. Enable File Sharing on Host Computer (Mac):
Click on the Apple menu and choose “System Preferences”.
Click “Sharing”.
Select “File Sharing” from the list, and click on the checkbox to enable it.
Select Options to choose which protocols to use for sharing.
3. Shared Folder: You also need to select which folders will be shared with other devices on your network. Usually, you can share the steam game folders or common folder directly.
Windows: Go to the location of the steam games folder, right-click and select properties, then share it under the sharing tab.
Mac: In the file sharing panel, click the + button and add the steam games folder, choose which users can access the folder.
Accessing the Shared Folder from the Other Computer
Now, you need to access the shared folder from the other computer.
1. Open File Explorer (Windows): Open the file explorer on the second computer.
2. Click on “Network”: Click on “Network” on the left panel.
3. Find the host Computer: You’ll see the name of the computer sharing the folder. Click on it.
4. Enter Credentials: You may be asked for your credentials. If asked, enter the username and password of the host computer.
5. Access Shared Folder: Open the shared folder.
6. Finder in Mac: From finder, click Go and then connect to server, enter the computer network path, which is like smb://
Copying Game Files over the Network
With both computers connected, it’s time to copy the games.
1. Copy Game Folders: From the shared folder, copy the game folders you want to transfer.
2. Paste Game Folders on the new computer: Paste the copied folders into the common folder of the Steam installation directory on your new computer.
3. Wait for Copying to Complete: The copying speed will depend on the speed of your network.
Verifying the games
Same as the previous method you have to verify the game files on the new computer.
Important Considerations When Transferring
Before you move your games, keep a few things in mind:
Storage Space: Make sure that your external drive or the new computer’s hard drive has enough space for all the games you want to move.
Updates: After transferring, games might still need updates, so be prepared for extra downloads on the new computer.
Steam Cloud Saves: Steam usually syncs your game saves to the cloud. However, check if your game supports Cloud Saves just to be sure that you don’t lose your game progress.
DLCs and Mods: Don’t forget any DLCs or mods. If you have mods, you might need to install them again manually on the new computer.
Steam Version: Make sure the version of Steam on both the source and destination computer is same or at least updated to the latest version.
The process of transferring Steam games to another computer is usually simple. With these simple methods and clear instructions, you can easily move your favorite games to your new setup. Remember to always verify your files to prevent any issues with your gameplay. Whether you choose the built-in backup, an external hard drive, or network transfer, you are now ready to play on any computer you choose.
Fastest way to move Steam games from one PC to another
Final Thoughts
To transfer your Steam games, you can use the built-in backup feature or copy the game files directly. Ensure both computers have Steam installed, this process is essential for success. For backup method, restore games from the backup files on the new computer.
Alternatively, locate the ‘steamapps’ folder and copy it over to the new computer, replacing the existing folder. Then, verify the game files within Steam. Both these methods achieve how to transfer steam games to another computer. The main aspect is ensuring a seamless transfer of your game library.

