To use models in Roblox Studio, simply drag and drop them from the Toolbox into your game’s workspace. You can then position, scale, and customize them further.
Ever wanted to populate your Roblox creation with awesome structures and items quickly? Then learning how to use models in Roblox Studio is a key skill. Models save you time and allow you to add complex elements. This powerful feature enhances your game design workflow.
Adding pre-built items, characters or even entire landscapes is straightforward. You can access a wide array of community-made and Roblox-created models within the Toolbox section. From there you can adjust as you like.

How to Use Models in Roblox Studio
Have you ever wanted to build amazing things in Roblox Studio, like castles, race cars, or even a whole town? Models can help you do that much faster! They’re like pre-made building blocks that you can easily add to your games.
This guide will show you how to use models in Roblox Studio, step-by-step. We will cover how to find them, put them in your game, and change them to make them your own.
Finding Models in the Toolbox
The Toolbox is where you find all sorts of cool models, scripts, images, and other items for your Roblox games. It’s usually on the left side of your screen.
When you open the Toolbox, you will see a few tabs at the top. Click on the “Models” tab. This is where all the pre-made objects are.
You can use the search bar at the top of the Toolbox to find specific models. For example, if you need a “tree,” type it in and hit enter. You’ll see lots of different trees to choose from.
Exploring the Model Library
The Roblox model library has tons of free stuff, but sometimes you might find models from other creators. Always be careful when using models made by others. Look at their rating and see if other people had good experiences with them.
Some models have a small green checkmark next to them. This means Roblox has approved the model and it is safe to use. It’s a good idea to choose these whenever you can.
Before you add a model, look at its picture. It helps you decide if you want it for your game. Some creators also add descriptions of what is in the model and what it does, this can also help.
Adding Models to Your Game
Once you’ve found a model you like, adding it to your game is super easy. Just click on the model you want, and it will magically appear in your game’s Workspace.
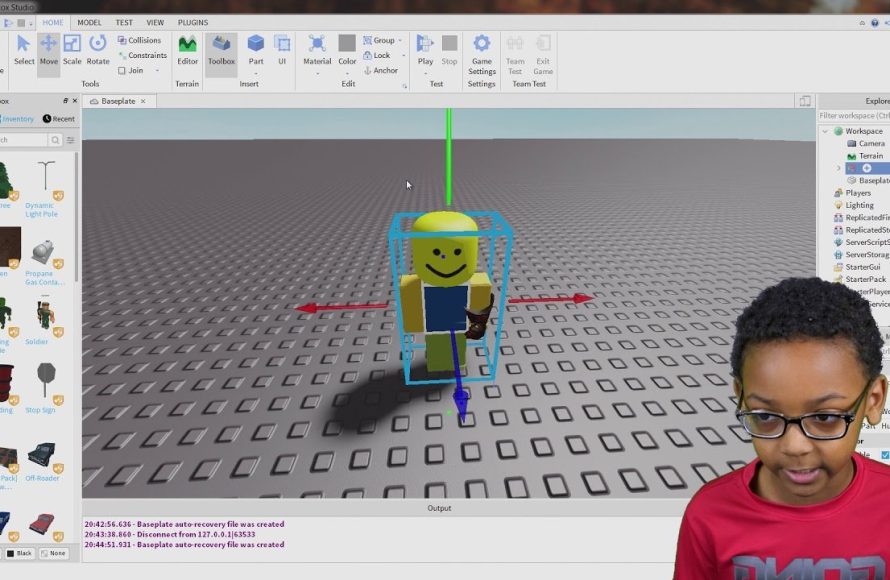
The Workspace is the area where you build your game. You can see it in the middle of the screen, and also in the Explorer window on the right side. When you select the model in the workspace, you will see different colored arrows appear. These arrows help you move and change the model around.
If you want to add a model by dragging it to the Workspace, simply click and hold the model from the Toolbox and drag your mouse over to the middle area. When you release the mouse, the model will drop into place.
Understanding the Workspace
The Workspace is the heart of your Roblox game. This is where all your game objects, including models, exist. It is important to keep the workspace organized.
You can move, rotate, and resize models using the tools at the top of your screen, next to the “File” button. They have little images that show what they do.
If a model is made of many parts, they will all be grouped together in the Workspace. It helps you to pick a group of items easily.
Moving and Resizing Models
After adding a model, you probably want to move it around. Select the model in the workspace, and you will see the movement arrows appear around it.
Use the blue, red, and green arrows to move the model along different axes. Blue is up and down, red is side to side, and green is forward and backward. Select the right color of the arrow and drag it with the mouse.
To resize your model, click the “Scale” tool at the top of your screen. Now, you will see little balls around the model. Drag those to make the model bigger or smaller.
Rotating Models
Rotating the models is as easy as moving and resizing. Click on the “Rotate” tool at the top of the screen. Now you will see circular lines around the object
Click on these circles of different colors, and drag your mouse, you will see that the model is rotating. You will be able to rotate your model in all three axes (X, Y, Z).
The Y-axis rotation is mainly used for changing the direction of the model.
Customizing Models
Adding models is fun, but changing them is even more fun! You can change the color, texture, and even add or remove parts of models.
Select the model in the Workspace. Then, look at the Properties window on the right side of your screen. You will see many options to change the model.
You can change the color by clicking on the color box. You can also change the texture by selecting a new texture from the dropdown menu.
Working with Model Parts
Each model is made up of smaller parts. You can see them by clicking the small arrow next to the model’s name in the Explorer window.
You can change the parts individually. Click on one of the parts, and you can move it, resize it, and change its appearance. This is useful when you need to add a window or remove some items from a model.
Some models use more complicated parts, like scripts, sounds, or other special parts, these can also be changed and modified in the same way.
Grouping and Ungrouping Models
Sometimes you might want to combine two or more models into one, or separate a single model into multiple parts. This is where grouping and ungrouping come into play.
To group models, select all the models you want to group together by holding the ctrl or shift key and then clicking on each model in the workspace or the explorer window. Then right click and select “Group”. Now, you will have one group with all the items you have selected. You can now move, resize, and rotate the group.
To ungroup, select the group and right click and select “Ungroup”. Now all the models are separated and you can move them separately again. When a model is ungrouped, it reverts back to the original items.
Saving Your Modified Models
If you’ve created a model that you really like, you can save it to use in other games! You must select the model and then right click and then select “Save to Roblox.”
When you save your model, you give it a name and a description. This is like making your own building block. It will appear in your inventory, and you can add it in any other game that you make.
If you save it as private, only you can use the model. if you save it as public, anyone can add your model in their games.
Using Free Models Safely
While the Toolbox offers many free models, it’s important to be careful. Sometimes, creators might add scripts that can cause problems in your game. These scripts are often called viruses or backdoors.
Before adding a free model, check its rating and comments. If other users report problems, avoid using that model. It’s better to be safe than sorry.
If you are not sure, try out the model in a test game first. This way, if something goes wrong, it will not affect your main game.
Tips for Finding Good Models
Look for models made by Roblox. These are usually safe to use. Roblox always puts a green checkmark next to its items.
Try to use models with a good rating, good review or high “like” count. You will find these below the name of the model in the Toolbox.
If a model seems too complex or too good to be true, it might have a hidden script that could cause problems. So always be careful with the models that seem to be very complicated.
Advanced Model Techniques
Once you are familiar with using basic models, you can start to learn advanced model techniques. You can do this by combining models, creating custom models, and even using scripts to add interactivity to your models.
Combine different parts of different models to make something completely new. This helps you to have more variety in your games. With this method, you are not limited to pre-made models.
You can also learn how to use Blender, and other 3D software to create custom models for your games. You can then import these models in Roblox Studio and use them in your games.
Using Scripts with Models
You can add scripts to your models to make them move, change color, make sounds, or do other interesting things. Scripts add a whole new dimension to your models.
You can find many scripts in the toolbox that you can add to the models. Just search for the functionality that you want to add.
Learning how to script might take a little time, but it opens up endless possibilities for your games. If you don’t know scripting, there are many tutorials available on the internet to learn scripting.
Organizing Models
As your game grows, you will probably have lots of models. Keeping your Workspace and Explorer organized helps you work easier and faster. You don’t want to get lost in a sea of models.
Use folders to group related models together. For example, put all your trees into a “Trees” folder. Use folders to keep your workspace organized.
You can also rename your models to give them clear names. Instead of “Model123,” use a name like “Big Tree.” This way you can easily identify the model even if you have a lot of models.
Troubleshooting Model Problems
Sometimes, models might not work as you expect. They might be too big, too small, or not in the right place. Don’t worry, there are ways to fix these issues.
If a model is too big, use the Scale tool to make it smaller. If a model is not in the right place, use the move tool and the movement arrows.
If something goes wrong, undo your changes by pressing Ctrl+Z on your keyboard. It’s a great tool to have in your arsenal for experimenting with different changes.
Using models is a great way to build games quickly and easily. By understanding how to find, add, change, and save models, you can make really cool games in Roblox Studio. Always make sure to keep your game models organized and easy to find.
Best Roblox Studio Plugins! #shorts
Final Thoughts
You can insert models using the toolbox or by importing them. Once inserted, you can move, rotate and scale these models. Knowing how to use models in roblox studio, speeds up the development process considerably.
You can also adjust model properties in the properties window. This allows you to change their appearance and behavior. Remember to group components of your model for better organization.

