
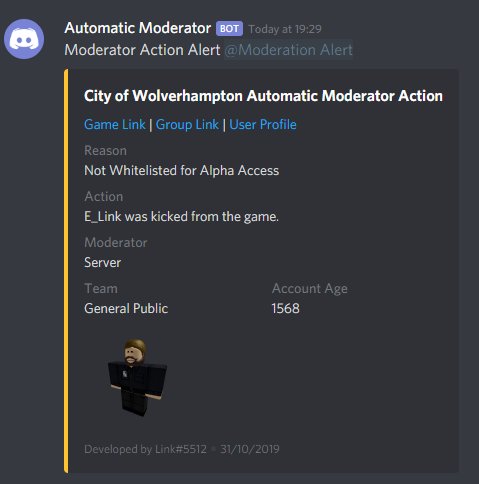
Webhooks on Roblox allow you to send automated messages to external services when certain in-game events happen; you set up the webhook URL in the Roblox game and specific in-game triggers send data to that URL.
Want to enhance your Roblox game with real-time notifications or data logging? Learning how to use Roblox webhooks offers powerful possibilities. This article guides you through the process. You will learn how to connect your game to external platforms.

How to Use Roblox Webhooks
Have you ever wanted to know when someone joins your Roblox game, or when a player buys something special? Webhooks can help you do just that! They are like little digital messengers that send important information from Roblox to another place, like a Discord channel or a website.
Think of it like this: instead of you constantly checking Roblox for updates, Roblox will tell you when something interesting happens. This is what webhooks do, they automatically send updates.
Understanding Webhooks
Before we get into how to use them, let’s talk about what a webhook actually is. Imagine a tiny robot that waits for something to happen and then, when it does, the robot shouts a message to a specific address.
That message contains data about the event. Webhooks work in a similar way, but with computers instead of robots.
What Exactly Does a Webhook Do?
A webhook is basically an automated message sent from one application to another. When an “event” occurs in one place (like a player joining a Roblox game), the webhook sends a message to another place.
This message includes information about the event. For example, it might tell you which player joined the game or what item a player purchased.
Key Concepts: URL and Payload
There are two main things you need for a webhook to work correctly: a URL and a payload.
The URL is the “address” where the webhook sends its messages. It’s like the robot’s destination. The payload is the actual message containing information about what happened.
This message is usually formatted in a way that the receiving application can understand, like JSON (JavaScript Object Notation).
Setting Up Your Webhook Receiver
Before we configure Roblox to send messages using a webhook, we first need to make sure that we have a location or application that can receive these messages. This is called setting up a webhook receiver.
Using Discord as a Webhook Receiver
Discord is a popular choice for receiving webhook messages. It’s easy to set up and a great way to get notifications about your Roblox game.
Here’s how you can create a webhook in Discord:
- Open your Discord server.
- Go to the channel where you want to receive messages.
- Click the settings icon (the cogwheel) next to the channel name.
- Click on “Integrations” and then “Webhooks”.
- Click “Create Webhook”.
- Give the webhook a name and choose an avatar.
- Copy the Webhook URL, that is your receiver address, save this URL, you’ll need it later on.
Now that you have your Discord webhook URL, you’re ready to move on to the Roblox part.
Other Options for Webhook Receivers
Discord is not the only application you can use to receive webhook data. You can also use other applications, or even create your own server to process webhook messages.
Some options to consider:
- Web applications: These can be custom websites or servers designed to handle and interpret webhook data.
- Other chat platforms: Some other platforms have built-in features that can be used to receive webhooks.
- Custom scripts or applications: You can create a script in a language like Python or Node.js to receive and manage incoming webhooks.
Each option has its own set of steps for setup. If you are using a receiver that is not Discord, make sure you read their respective documentation.
Configuring Roblox to Send Webhooks
Now that you have a webhook receiver ready, it’s time to tell Roblox how to use it. We will use Lua scripting to make this work.
Using Lua Scripting in Roblox
Lua is the programming language used in Roblox. You’ll need to write some Lua code to send the webhook messages. You can place these scripts inside your game.
Steps for Sending Webhook Messages
Here is how you can send a webhook message from Roblox:
- Open Roblox Studio and go to the game you want to add webhooks to.
- Add a new Script (or LocalScript) inside of ServerScriptService or anywhere in game (check where to add local script and script).
- Write your Lua code to detect events in your Roblox game.
- Create function that will send webhook messages.
- Send your webhook message with all necessary data.
Basic Lua Script Example for Player Joining
Here is a basic example of how you can send a webhook message when a player joins your Roblox game:
local HttpService = game:GetService("HttpService")
local webhookURL = "YOUR_DISCORD_WEBHOOK_URL_HERE"

game.Players.PlayerAdded:Connect(function(player)
    local playerName = player.Name

    local payload = {
       ["content"] = "" .. playerName .. " has joined the game!"
    }

   local jsonData = HttpService:JSONEncode(payload)

   HttpService:PostAsync(webhookURL, jsonData)
end)
Remember to replace “YOUR_DISCORD_WEBHOOK_URL_HERE” with your actual Discord webhook URL.
This code listens for the “PlayerAdded” event, which happens when someone joins your game. When a player joins, it grabs their name and sends it as a message through the webhook to your Discord.
Understanding the Lua Code
- local HttpService = game:GetService(“HttpService”) This line gets a special service that helps send web requests.
- local webhookURL = “YOUR_DISCORD_WEBHOOK_URL_HERE” This line sets your webhook URL.
- game.Players.PlayerAdded:Connect(function(player) This line listens for players joining the game.
- local playerName = player.Name This line gets the name of the player.
- The payload is a Lua table that contains your message.
- local jsonData = HttpService:JSONEncode(payload) This line converts your message into JSON, which can be read by the receiver.
- HttpService:PostAsync(webhookURL, jsonData) This line sends the webhook message.
Advanced Webhook Data
You are not only limited to send join/leave messages. You can send very complex data using webhooks. You can send details about in-game purchases, specific player actions, or any other event that happens in your game.
For example, you can send data about when a player buys a special item or wins a round. Include things like the player’s ID, the item’s name, or the game score. The more specific the data, the more interesting it will be.
Sending Different Messages Based on Events
You can use if-else statements to send different messages depending on the situation. For example, you can have one webhook message for when a player joins and another for when they leave the game.
You can even customize how these events are sent. This is very useful to make different sections of your discord for different events from game.
Rate Limiting and Error Handling
It’s important to handle things carefully so you don’t overload Roblox or your webhook receiver. Both Roblox and applications like Discord have rate limits. This means there is a limit on how many webhook messages can be sent within a short period of time.
Avoiding Rate Limits
When you are sending frequent messages, it is important to avoid triggering rate limits. If you send too many requests too quickly, the server may temporarily block your request.
Here are some tips to avoid rate limiting:
- Don’t send a message every frame or too frequently. If an event happens often, try to bundle the data and send it less frequently.
- Implement delays or timers between sending messages. This will give the receiving server time to respond.
- Use a queue system to handle messages and prevent sending multiple requests simultaneously.
Handling Errors in Webhooks
Errors can happen for many reasons. Sometimes the webhook receiver might be down, or the connection might fail. Always make sure that you add error handling in your Lua scripts.
Here is an example of basic error handling:
local HttpService = game:GetService("HttpService")
local webhookURL = "YOUR_DISCORD_WEBHOOK_URL_HERE"

game.Players.PlayerAdded:Connect(function(player)
    local playerName = player.Name

    local payload = {
       ["content"] = "" .. playerName .. " has joined the game!"
    }

   local jsonData = HttpService:JSONEncode(payload)

   local success, errorMessage = pcall(function()
      HttpService:PostAsync(webhookURL, jsonData)
   end)

   if not success then
        warn("Error sending webhook message: " .. errorMessage)
    end
end)
In this example, the pcall function is used. This is a Lua function that allows you to run code that could cause an error and provides a way to check if an error occurred. If an error happens during webhook request, you’ll see a message in Roblox output.
Testing Your Webhooks
Testing is an important step for making sure that your webhook is working correctly. Start by sending simple messages to see if your webhook is being received by the correct receiver.
Then, move on to more complex situations and data that you want to send. Always check your Discord channel or your receiver to confirm that it got the message.
Real World Examples
Webhooks can be used for many things in Roblox. Here are some real-world examples:
- Sending in-game event logs to Discord, like when someone buys an item, wins a game or achieves a special goal.
- Notifying moderators about player behaviors, such as a high number of reports, or suspicious activity in game.
- Tracking the total players joining in game, or the popularity of an event inside of your game.
With webhooks, you can automate many actions and enhance communication about your game.
Security Concerns
It’s important to be very careful when handling webhooks. Your webhook URL should be protected and never shown directly in your code. If anyone has access to the webhook URL, they can use it to send messages to the receiver.
Use server-side scripts for webhooks to protect your webhook URL and sensitive information from being viewed by clients.
Webhooks are very powerful tools for Roblox game developers. By using them you can get real-time information from your game to any other server or application, which will be useful to make your game better. Now that you have knowledge how they work, go ahead and experiment with them in your Roblox game. You will be amazed at how much it can improve the gaming experience!
How to use Discord webhooks in Roblox | 2023 (CODE IN DESCRIPTION)
Final Thoughts
To use Roblox webhooks, you first need to set up a Discord server and create a webhook URL. Next, configure your Roblox game or script to send data to that URL using HTTP requests.
This lets your game communicate with your Discord server for things like logging events. You can get notified directly about in-game actions, making ‘how to use roblox webhooks,’ a valuable skill.

