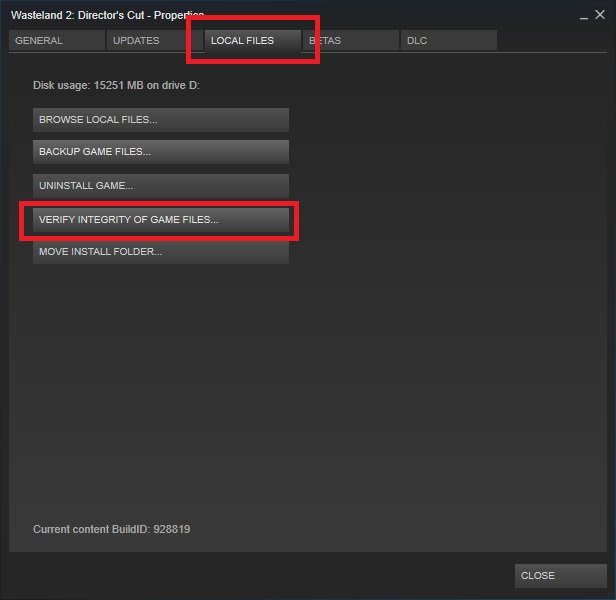
To verify game cache on Steam, navigate to your Library, right-click the game, select “Properties”, go to “Local Files”, and click “Verify Integrity of Game Files”.
Ever faced a game acting strangely, with glitches or crashes? You might think about reinstalling it. Before doing that time-consuming task, there’s a faster option. This involves learning how to verify game cache on steam, a feature that often solves such issues.
Steam’s built-in tool scans your game files for errors. This process can help find and replace corrupted or missing data. Knowing this technique can save you a lot of frustration and wasted downloads.

How to Verify Game Cache on Steam
Have you ever been super excited to play your favorite game, only to find it’s not working right? Maybe it crashes, has weird glitches, or just refuses to start. It’s frustrating, right? One common reason for these issues is corrupted game files. Thankfully, Steam has a built-in tool that helps you fix this: the “verify game cache” feature. This process checks your game files and makes sure they’re all correct. If something is missing or broken, Steam will automatically replace it with the right version. Think of it like a quick repair shop for your games!
Why Game Files Get Corrupted
Before we jump into how to verify the game cache, let’s talk about why game files can get messed up in the first place. There are several reasons, and it’s more common than you might think:
- Interrupted Downloads: If your internet connection hiccups while downloading a game, some files might not download properly or might be incomplete.
- Software Conflicts: Sometimes, other programs on your computer might interfere with game files, causing them to become corrupted. This could be anything from antivirus software to other games or even system utilities.
- Hardware Issues: Problems with your computer’s hard drive or RAM can also lead to file corruption. If your storage device is failing or has bad sectors, it can damage the files saved on it. Similarly, faulty RAM can cause errors during data transfer.
- Operating System Glitches: Sometimes the operating system itself can have issues that lead to file corruption. This can include driver problems, system updates gone wrong, or even malware infections.
- Unexpected Shutdowns: If your computer shuts down unexpectedly (like during a power outage) while the game is running or saving, it can corrupt game files.
- Modding Issues: While mods can make games more fun, sometimes they can conflict with the original game files. If a mod is not installed correctly or if it’s incompatible with the current version of your game, it can cause problems.
Knowing the causes will help you understand why this method is so important. Now that we know why these problems happen, lets fix them.
When Should You Verify Your Game Cache?
It’s a good idea to verify the game files when you experience certain problems. Here are some signs you should use the verify cache tool:
- Game Crashing: If your game frequently crashes or freezes, it’s a good idea to verify the game files.
- Performance Problems: If you notice your game is running slower than usual, or has performance issues, like frame-rate drops, or the game runs in slow motion, it could indicate corrupted files.
- Graphical Errors: If you see strange graphical glitches, like missing textures or distorted images, try verifying.
- Launch Issues: If the game fails to start, or does not respond to the starting signal, the process may be a fix for that.
- Error Messages: If you receive an error message related to missing or corrupted files, verifying cache is a must.
- After Game Updates: Sometimes, during an update, things can go wrong. When you update, verifying will ensure all the updated files were installed correctly.
- After Installing Mods: If you’ve recently installed mods and the game starts to misbehave, verify the files to fix the damage made by the mod.
Verifying game files is a good first step when troubleshooting any issue with a game, so it’s a good habit to get into. It can save you a lot of time and frustration.
How to Verify Game Cache: Step-by-Step Guide
Okay, now let’s get to the main event: how to actually verify your game cache on Steam. It’s a pretty simple process, and here’s a detailed, step-by-step breakdown:
Step 1: Open Steam
First, open the Steam application on your computer. Make sure you’re logged into your Steam account. If you do not have the Steam application installed, you need to go to the official Steam website to download and install it.
Step 2: Go to Your Game Library
After you’re logged in, click on the “Library” tab at the top of the Steam window. This is where you see all the games you own.
Step 3: Find the Game You Want to Verify
Scroll through your game list on the left side of the Steam window. Find the game that’s giving you trouble, and click on it to select it. For this example we will use the game, ‘Counter Strike 2’.

Step 4: Open Game Properties
Once you have selected the game, right-click on the game’s name, or anywhere on its banner, in the list on the left. A menu will appear. Select “Properties” from the menu.

Step 5: Go to the “Installed Files” Tab
A new window will open for the game properties. At the top of this window, you’ll see a few tabs. Click on the one that says “Installed Files.”

Step 6: Initiate the Verification Process
In the “Installed Files” tab, you’ll find a button that says “Verify integrity of game files.” Click this button. Steam will now begin to check all of the game’s files.

Step 7: Wait for the Verification to Complete
Now you just have to wait. Steam will check every file of your game against the ones stored in their database. The amount of time this takes depends on the size of the game and the speed of your storage. Be patient; it could take a few minutes, or even longer for bigger games. During the process, it’s best to not use your computer and let Steam do its job.
You’ll see a progress bar showing you how far along the verification is. When Steam completes the process, it will automatically replace any files that are missing or incorrect. If Steam replaces any files, it might redownload them, which could take extra time.
Step 8: Start your Game
After Steam completes the game file verification, you can close all open windows and start your game. If corrupt or missing game files were causing the problem, the game should run properly now. If the problem is still happening, other troubleshooting steps may be needed.
What Happens During the Verification?
The verification process might seem like magic, but it’s really just Steam doing some clever file comparisons. Here’s a breakdown of what happens behind the scenes:
- File Analysis: Steam analyzes all the files that make up the game. It checks each file one by one.
- Checking Against the Database: Steam compares these files against a “master copy” of the game files stored on Steam servers. This ensures that you have the correct version of every single game file.
- Identifying Issues: If Steam finds a file that is different from the one on its server (meaning it’s corrupted, missing, or outdated), it flags it for replacement.
- Downloading Missing/Corrupted Files: Steam automatically downloads the correct versions of the files that have been identified as missing or corrupted.
- Replacing the old files: Once the new files are downloaded, Steam replaces the old incorrect files.
- Completion Check: After all files have been verified, Steam displays a message if there were any issues and if fixes were made.
Common Issues and Solutions
Sometimes, even verifying the game cache doesn’t solve the problem. Here are a few common issues you might encounter and how to handle them:
Issue: Verification Completes, but Game Still Doesn’t Work
If Steam says it verified your files but you still have problems, try these things:
- Restart Steam and Your Computer: Sometimes, just closing and reopening Steam and rebooting your PC can resolve the issue.
- Check for Game Updates: Make sure your game is fully updated. Maybe there was a new patch that has been released.
- Update Your Graphics Drivers: Old or corrupted graphics drivers can cause issues. Make sure that you have downloaded the correct driver version for your graphics card.
- Disable Background Programs: Sometimes other programs might interfere with your game. Close other applications that may cause conflict.
- Run as Administrator: Try to start the game by right clicking on the game .exe file and selecting “Run as Administrator.” This can give the game additional permissions needed to run properly.
- Reinstall the Game: If nothing else works, try uninstalling the game and downloading a fresh copy. Sometimes, this process is the best solution when there are deep corruptions in your game files.
Issue: Verification Process Takes a Very Long Time
Sometimes, the verification can take a while, especially for larger games. If it seems to take forever:
- Check Your Internet Connection: Ensure your internet connection is stable. If the internet is intermittent, the verification process may take longer than expected, or be interrupted, resulting in no progress at all.
- Close Unnecessary Apps: Close background apps using network bandwidth as this will give more network speed to the Steam verification process.
- Ensure Enough Storage: Ensure you have enough space on your hard drive. The verification might require additional space for temporary files or for downloading new files.
- Avoid Using Computer During the Verification: Try not to use your computer for other tasks while verifying to help the process go faster.
Issue: Steam Continually Redownloads the Same Files
If Steam keeps redownloading the same files, it could mean that your hard drive has some issues or there could be issues with your OS permissions.
- Check Your Hard Drive for Errors: Using a disk checking tool in Windows can reveal if your hard drive is failing or having problems.
- Run Steam as an Administrator: Sometimes permission issues can cause this problem. Ensure Steam is running with admin permissions.
- Temporarily Disable Antivirus: Temporarily disable your antivirus to see if that is causing interference. Make sure to enable it again after troubleshooting.
- Reinstall Steam: If nothing else works, reinstalling Steam can fix some deep issues that can cause this constant downloading of files.
Tips for Preventing Game File Corruption
While you can fix corrupted files, it’s even better to prevent them from happening in the first place. Here are some tips:
- Stable Internet Connection: Make sure you have a stable internet connection when downloading or updating games.
- Avoid Sudden Shutdowns: Do not turn off your computer while a game is downloading or updating.
- Keep Your System Updated: Keep your operating system and drivers updated.
- Run a Good Antivirus Program: Make sure you have an antivirus program installed and use it to scan your computer regularly.
- Safe Modding Practices: When installing mods, ensure that the source of the mod is reputable. Use mods that are compatible with your game version and follow the modding guidelines.
- Regular Disk Checks: Check your hard drives for errors regularly to avoid issues with your storage.
Verifying your game files on Steam is a quick and easy way to fix a lot of common gaming problems. It’s a good habit to get into whenever you’re having trouble with a game. By understanding why game files can get corrupted and knowing how to use the verification tool, you can enjoy smoother gaming experiences.
Hopefully, these details have made things clear and easy for you. Happy gaming!
How to Verify Steam Game Cache
Final Thoughts
Verifying game cache on steam fixes many game issues. This process checks if all game files are correct and downloads any corrupted or missing files. By doing so, you can quickly resolve common game problems.
To verify your game cache, go to your Steam library. Right-click on the game, select “Properties,” then click “Installed Files,” finally select “Verify Integrity of Game Files”. Steam will now handle the work.
Essentially, this process of how to verify game cache on steam ensures the game runs smoothly. It is a quick fix before trying more complex troubleshooting methods. Always try this option first.

