
Viewing and editing Unreal Engine 4 game textures requires you to first locate the texture asset in the Content Browser, then double-click to open the texture editor. Within the editor, you can make changes and save them.
Ever wondered how the intricate details of your favorite games are created? You are probably thinking about the complex 3D models but how about textures. This article will help you if you are looking for information on how to view and edit unreal engine 4 game textures. We will cover the basics, making it easy to understand.
It is quite straightforward process once you understand the basics and locate the areas. This guide will break down the steps so that even beginner can quickly start making changes to textures. This way you can customize your game’s visual style.

How to View and Edit Unreal Engine 4 Game Textures
Ever wondered how those amazing textures in your favorite Unreal Engine 4 games are made? Or maybe you’re working on your own game and want to tweak the way things look? Well, you’ve come to the right place! This guide will walk you through the process of viewing and editing game textures in Unreal Engine 4, making it easier than you think. We will explore everything from locating textures to using external tools and even creating your own!
Understanding Textures in Unreal Engine 4
Before we jump into the how-to, let’s talk about what textures actually are. In simple terms, textures are like the skin of your 3D models. They give them color, detail, and the illusion of a surface. Think of them like pictures that are wrapped around objects. They can be anything from a brick wall to a character’s skin to the rough surface of a rock. Unreal Engine 4 uses many types of textures for different purposes.
Types of Textures You’ll Encounter
Here are some common types of textures you’ll see when working with Unreal Engine 4:
- Albedo (or Base Color): This is the main color of your object. It’s what you would see under normal lighting conditions.
- Normal Maps: These special images create the illusion of bumps and grooves on a surface without changing the actual shape of the model.
- Roughness Maps: These control how shiny or dull a surface is. A rough surface will scatter light more, while a smooth one reflects it like a mirror.
- Metallic Maps: These determine whether a surface acts like a metal or not.
- Ambient Occlusion (AO) Maps: These maps add shadows in crevices and corners, making objects look more grounded.
Locating Textures in the Unreal Engine 4 Editor
Now, let’s get practical! Finding textures in Unreal Engine 4 is pretty easy once you know where to look. First, you will need to open your project.
Using the Content Browser
The Content Browser is your main tool for finding files in Unreal Engine 4, including textures. It’s usually located at the bottom of your screen. Here’s how to use it to find the textures you need:
- Open the Content Browser: If it’s not already open, click on “Window” in the main menu bar and select “Content Browser.”
- Navigate Through Folders: The Content Browser shows your project’s files organized in folders. Double-click to open folders and find where your assets are located. Usually, textures will be in a folder called “Textures,” or within the folder of the specific asset you’re looking at (like a character or a prop).
- Filter for Textures: To make finding them faster, in the “Filter” area of the Content Browser, you can type “.TGA” for Targa files, or “.PNG” or “.JPG” for those formats, or, even better, just type “Texture” . This will only show the texture files in the folder.
Locating Textures from a Material Instance
Often, textures are used within materials. Instead of searching for the texture directly, you can often find them through a material that uses them. Here’s how:
- Select the Object: Click on the object in your level that you want to inspect.
- Find the Material: In the Details panel on the right, scroll down to the “Rendering” section. You’ll see a “Material” property. It will have a small arrow next to it, if you click on that arrow, you’ll see a dropdown menu, find the option ‘Browse to Asset’ if it’s a material instance, or simply the name of the material if it’s not a material instance and the material will be selected in content browser.
- Open the Material: Double-click the material to open it in the Material Editor.
- Find Texture Nodes: In the material graph, look for nodes labeled “Texture Sample” or texture names; these nodes are your textures.
- Locate Texture Asset: If the node has a texture, you can click on the texture name in the node properties. It will show the texture asset in the content browser and you can simply double click on it to open the texture viewer.
Viewing Textures in Unreal Engine 4
Great! Now you’ve found your texture. How do you actually look at it? Unreal Engine 4 has a built-in texture viewer that lets you inspect all the details. You can view it in the editor or also in another window.
Using the Built-In Texture Viewer
Here’s how to open the texture viewer:
- Select a Texture: Find the texture you want to view in the Content Browser.
- Open the Viewer: Double-click on the texture. It will open in a new window, displaying the texture along with its properties.
Understanding the Texture Viewer Interface
The texture viewer shows a lot of useful information:
- Preview Area: The main area shows the texture itself.
- Properties: On the right side, you’ll see details like texture size, format, and compression settings.
- Zoom and Pan: You can zoom in and out and pan around the texture by using mouse scroll and left mouse click.
Editing Textures in Unreal Engine 4
Alright, let’s get to the exciting part: editing textures! While Unreal Engine 4 doesn’t have a full-blown image editing suite, it does provide some options, and you can also use external tools.
Basic Editing with the Texture Editor
The texture editor provides some very basic controls. But remember, for significant alterations it’s best to use an external image editor.
- Adjusting Compression Settings: In the texture editor’s details panel, under “Compression,” you can change the compression format and quality. Lower compression means higher quality, but bigger file size. It’s good to keep the compression to default and avoid changing it, unless you know exactly what you are doing.
- Changing the Texture’s Wrap Mode: In the “Texture” category of the details panel, you’ll find options to change how the texture repeats when tiling. This includes “Clamp” (it doesn’t repeat), “Wrap” (repeats the texture), or “Mirror” (it repeats the texture and mirrors it).
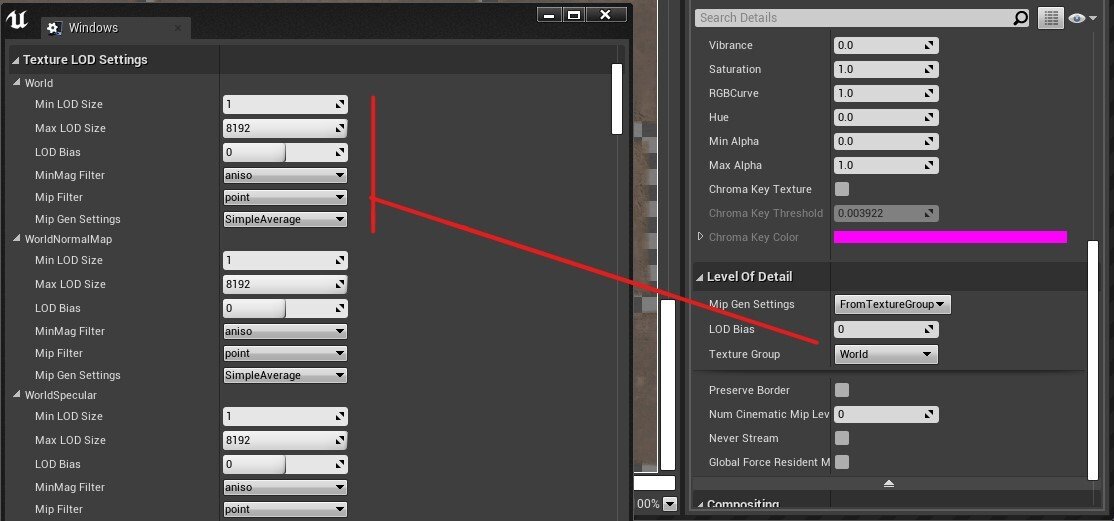
- Adjusting the Texture Group: This setting allows you to control how the texture will be sampled. For example, “World” should be used for textures used on level geometry and “UI” is used for textures on UI elements.
Using External Image Editors
For serious texture editing, you’ll need an external image editor. Here are some popular choices:
- Adobe Photoshop: A powerful industry standard, great for all kinds of texture work, but it is a paid program.
- GIMP: A free, open-source alternative to Photoshop, which provides powerful tools.
- Krita: Another free and open-source option, excellent for painting and digital art, which can be used to create textures.
- Substance Painter/Designer: A popular tool for 3D texturing, especially for PBR (Physically Based Rendering) workflows.
Workflow for Editing Textures Externally
Here’s the process of editing a texture using an external editor:
- Locate the Texture File: In the Content Browser, right click on the texture and find the option “Show in Explorer.” This will open the folder where the texture file is located.
- Open the Texture in Your Editor: Open the file with your external image editor.
- Make Your Changes: Edit the texture however you like. You can change colors, add details, or create entirely new designs.
- Save Your Changes: After making the necessary changes, save the texture. Make sure to save it in the same format as the original (e.g., .TGA, .PNG, or .JPG).
- Reimport the Texture in Unreal Engine: Go back to Unreal Engine 4. The texture in Content Browser will automatically update. If not, right click on texture and click on Reimport.
Practical Examples of Editing Textures
To give you a better idea of how texture editing works, let’s look at some simple examples.
Changing the Color of a Texture
Let’s say you have a wooden plank texture. You want to change its color to make it look like a darker wood.
- Open the Texture: Locate and open the wood texture using your external image editor.
- Adjust the Color: Using the color adjustment tools in your editor (e.g., Hue/Saturation, Color Balance), make the wood darker.
- Save the Texture: Save the changes in the same format.
- See the Results: Go back to Unreal Engine 4 to see the updated texture on your wood asset.
Adding a Detail to a Texture
Suppose you want to add some scratches to a metal texture.
- Open the Texture: Open the metal texture in your editor.
- Add Scratches: Use a brush tool with a darker color to add scratch lines and smudges to the surface.
- Save the Texture: Save the texture.
- Check in Unreal: See how the scratches have altered the appearance of your material in Unreal Engine.
Creating New Textures From Scratch
You can also create textures entirely from scratch. Here’s a brief overview:
- Open a New File: Open a new file in your image editor with the desired dimensions and color mode (e.g., RGB).
- Create Your Design: Start painting, drawing, or using various tools to create the texture you desire. You might use brushes, filters, or even photo manipulation.
- Save the Texture: Save the texture to a file format Unreal Engine 4 can understand (.TGA, .PNG, or .JPG)
- Import into Unreal: Drag and drop the texture into your Content Browser.
- Apply the Texture: Create a new material, assign the texture to the proper channel, and apply it to your assets.
Important Considerations When Editing Textures
Before you dive too deep into editing, keep these tips in mind:
- Texture Resolution: High resolution textures (e.g., 2048×2048, 4096×4096) give great detail, but they also take up more memory and can slow down the game. Lower resolution textures are faster, but they can look blurry up close. Choose the resolution that gives you the best balance of quality and performance.
- Texture Formats: .PNG and .JPG are common formats for base color textures, because .JPG format applies compression to the image, it is not a good practice to use that format for other textures like the normal map, roughness, metallic map. The .TGA format is also very common and can hold additional data like alpha channels.
- File Size: Keep an eye on the file size of your textures. Large files can bloat your game and slow down loading times. Compression is one way to reduce file size.
- Consistency: When creating or modifying textures, try to maintain a consistent style throughout your project. This helps to ensure a uniform and professional look for your game.
- Naming Conventions: Use clear and descriptive names for your textures, making them easy to find and identify. It can also help to organize them in folder in the content browser.
Tips for Better Texture Workflows
Here are some pro tips that can make your texture work more efficient:
- Use Layered Editing: In your image editor, work with layers, which allows you to modify sections of your textures independently without affecting other parts.
- Create Texture Libraries: Organize your textures into libraries. This way, you can easily reuse them in your projects.
- Experiment: Don’t be afraid to play around with different colors, patterns, and effects to achieve unique looks.
- Reference Images: When creating a texture, it is always a good idea to collect reference images, it helps you create a texture that feels real and grounded.
- PBR Textures: Understand how Physical Based Rendering textures work, and how they are used in material creation. Using PBR workflow will greatly improve the quality of the textures.
- Always back up your files: It is always a great idea to backup your files, this can avoid unwanted problems.
Editing textures in Unreal Engine 4 is a powerful way to customize the look of your game. By understanding how textures work and utilizing external editors, you have the ability to make incredible-looking games. Just keep practicing, experiment, and have fun!
How to Extract 3D Models, Textures, Music from Unreal Engine Games
Final Thoughts
You can view textures within Unreal Engine 4’s content browser. Double-clicking opens the texture editor for basic viewing and property adjustments. For direct edits, you will need an external image program like Photoshop or GIMP.
Remember to save the updated texture file and re-import it into your project. Learning how to view and edit unreal engine 4 game textures directly impacts visual outcomes. This process improves your game’s final graphics.

