
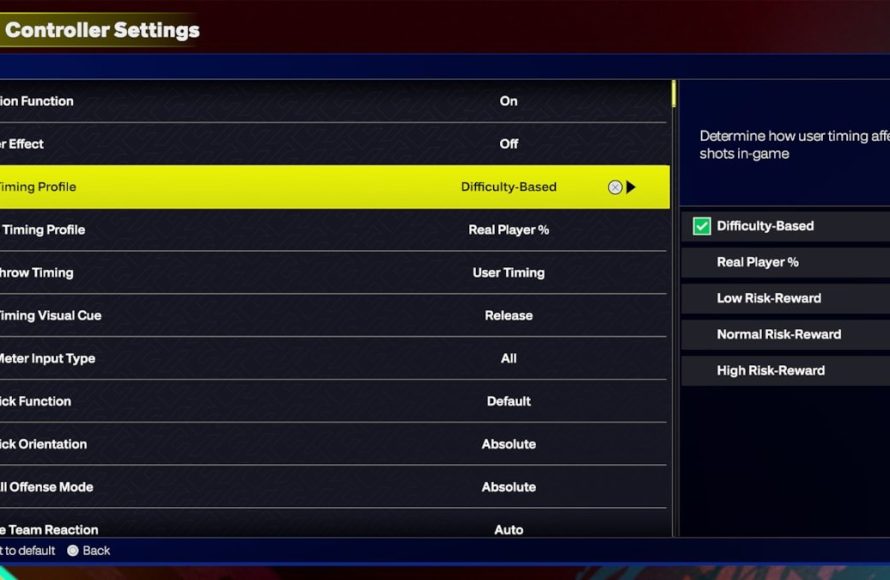
‘Optimal NBA 2K25 controller settings vary by player preference, but generally involve customizing shot timing, dribbling moves, and defensive controls for improved gameplay.’
Fine-tuning your game in NBA 2K25 hinges on getting the controller settings just right. It’s amazing how different a game can feel with small tweaks. Many players don’t delve into these options, which can actually hinder their performance.
Finding the perfect NBA 2K25 controller settings can make you more effective on the court. You need to experiment with various settings to see what fits your play style. Don’t be afraid to change things up.
By adjusting the controls, you can improve your shooting accuracy and dribbling skills. It’s about personalizing the experience to make it enjoyable and competitive for you.

NBA 2K25 Controller Settings: Your Key to Victory
Getting the hang of NBA 2K25 can be tough. It’s not just about knowing the game; it’s also about how your controller is set up. The right settings can make all the difference between a buzzer-beating win and a frustrating loss. Whether you’re a rookie or a seasoned pro, understanding and adjusting your controller settings is a vital part of becoming a better player. This guide will walk you through everything you need to know to optimize your gameplay in NBA 2K25. We’ll go over the basics, talk about the different controller styles, and help you find what works best for you.
Understanding the Basic Controller Layout
Before diving into specific settings, let’s make sure we all know what each button does. In NBA 2K25, the controller buttons are used for all sorts of actions, from passing and shooting to dribbling and defending. Here’s a quick overview:
- Left Stick: This is how you move your player around the court. Push it forward to run, to the side to move sideways, and back to move backwards.
- Right Stick: This stick is mainly for shooting and dribbling moves. Flicking it can do different kinds of shots or flashy moves.
- A Button (Xbox) / X Button (PlayStation): Usually used for passing. Tap it for a quick pass, or hold it for a bounce pass.
- B Button (Xbox) / Circle Button (PlayStation): This is your shooting button. Pressing it and letting go at the right time is very important for scoring.
- X Button (Xbox) / Square Button (PlayStation): This is used for dribbling moves. Different presses can result in different types of dribbling.
- Y Button (Xbox) / Triangle Button (PlayStation): Often used for calling for screens and sometimes for alley-oops.
- Left Bumper (LB) / L1: This button is usually used for icon passing.
- Right Bumper (RB) / R1: This is your defensive stance button.
- Left Trigger (LT) / L2: This button is for posting up on offense.
- Right Trigger (RT) / R2: Often used for sprinting with the ball and sometimes for defensive actions.
- Start/Options Button: This opens up the game’s pause menu, where you can change game settings.
- Back/Share Button: Usually for pausing and recording game clips, sometimes for calling timeouts.
Knowing where each button is and what it does is the first step to controlling the game effectively. Remember that some button functions might change depending on the game mode or situation.
Essential Controller Settings for NBA 2K25
Now that we have the basics covered, let’s talk about specific settings that you can change to fit your play style. NBA 2K25 gives you many choices, so it’s good to experiment and see what feels best. Here are some of the important settings you should know about:
Shot Meter
The shot meter is the bar you see when you try to shoot the ball. It shows you how close to perfect your release is. Here are your options for the shot meter:
- On: The shot meter is always visible when you shoot. This is helpful for beginners who want to learn the timing of their shots.
- Off: The shot meter is hidden. Some advanced players who know their shot timings well choose this option for less screen clutter. It can also make the timing of shots slightly more generous.
- Pro Stick Only: The meter appears only when you use the right stick for shooting.
- Free Throws Only: As the name suggests, the meter is only visible while shooting free throws.
The best choice depends on your preference and skill level. If you are just learning, use the “on” option. If you want a more realistic feeling or have mastered your timing, turn it off. Try each option to see what improves your game the most.
Shot Timing
Shot timing settings change how strict the game is about when you release the shoot button. There are a few different choices:
- Timing: This makes you focus on releasing the shoot button at the right time. The meter moves faster and you have to press the release when the needle is in the green area.
- Real Player %: This option uses a mix of shooting and your player’s skill and ratings to decide whether your shot goes in.
- Real Player % (Late): This option focuses on player’s skill and rating but gives the benefit of focusing on when you release the shot.
For many, the “Timing” option is standard, however, it is recommended you try the other two settings. The best choice here also depends on your personal style and the way you like to play. It’s worth trying each one out to see which gives you the best shot success rates.
Pro Stick Function
The pro stick, your right stick, is very important for shooting and dribbling. Here’s a breakdown of its function:
- Default: This is the standard setting where you use the right stick for both shooting and dribbling. Flicking it up will shoot, flicking it right or left will dribble.
- Dribble Moves Only: This means you’ll only perform dribble moves by moving the right stick. Shooting is now assigned to the X button on Xbox or square on PlayStation.
- Shot Only: The right stick is now specifically for shooting. This means that you will have to use a combination of the L or R trigger or bumper to perform dribbling.
Your preference will determine the function of your stick. If you’re used to flicking the right stick for shots, the default or shot only is suitable for you. If you prefer a clearer differentiation of shooting and dribbling, you should choose “Dribble Moves Only.” Choosing this option can make it easier to do complicated dribble moves or shots without getting mixed up.
Defensive Assist with Intensity
This setting helps the computer assist you when you play defense. It can automatically move your player to the right position or make them block shots. Here are the options you have:
- On: The AI will give you the most help it can. This can be very helpful for players who are still learning. The computer will try to position you correctly, help you steal the ball and block shots.
- Off: This means that you will be completely responsible for your player’s movement and defensive actions. This option is ideal for players who want complete control over their defense and have enough experience to do it without computer assistance.
You will need to consider your playing style when choosing. If you find it difficult to defend, set it to “On” for some assistance. If you want full control, turn it off. The best option is to try each and find out which works best for your gameplay.
Camera Settings
The camera angle during gameplay can make a huge difference. Different views can help you see the court differently. Here are the options:
- 2K: This is the default camera view, providing a balanced angle. It shows most of the court in a natural way.
- Broadcast: This view feels more like watching a real TV broadcast, with a lower, closer angle.
- Skybox: A high, wide view of the court, great for seeing the whole game play out.
- Drive: This camera angle sticks closer to your player and follows them. Good if you want to focus on your player’s individual moves.
- Freelance: The camera view will switch based on the current action.
Experiment with these camera views to find the view that helps you the most. For example, “Broadcast” can give you a good sense of realism, while “Skybox” can be useful for beginners who want to see where their teammates are on the court. The ‘Drive’ camera option can help you see your player’s moves up close.
Vibration
Controller vibration can make gameplay more immersive, but it can also be distracting for some. Here are your options:
- On: Your controller vibrates during different actions, such as dribbling, shooting, and collisions. This setting provides feedback that enhances the feel of the game.
- Off: The controller does not vibrate. Turning it off can be helpful if you find the vibration distracting or if you want to save battery life on your controller.
Try playing with vibration on and off to see which one helps you focus best. For some, the vibration is a helpful cue, while for others, it’s a distraction. Your preference is the best way to decide.
Advanced Controller Settings and Customization
If you want to take your settings even further, NBA 2K25 allows for a lot of customization. Here are some of the advanced options to consider:
Button Mapping
This feature allows you to change which button does what. You can swap the pass and shoot buttons or make other adjustments. If you have a specific setup that works for you from another game, you can recreate it here. While the default controls are optimized for general use, custom mapping can benefit players who need more personalized controls for certain playstyles. Try mapping controls to easier-to-reach buttons, or setting up less frequently used functions to the buttons you may often press.
Controller Sensitivity
Controller sensitivity decides how quickly your actions are translated in the game. If you like very precise movement and reactions, you can choose to play at a lower sensitivity. Conversely, if you like to be more reactive, you can change the sensitivity to a higher level.
Dead Zones
Dead zones refer to how far you need to push the controller stick to be recognized by the game. Adjusting your dead zones can help eliminate controller drift. This means that if you slightly move the stick and your player is performing action without you wanting to, you can adjust the dead zone settings so that the game only registers your movements if your stick passes a certain point. Adjusting the dead zone to the right level is useful, especially when your controller is not brand new.
Finding Your Perfect Settings
The most important part of controller settings in NBA 2K25 is finding the setup that is best for you. There’s no one-size-fits-all answer. It takes some practice and adjustments. Here’s how you can find what works best for you:
- Experiment: Don’t be afraid to try out all the different settings. Spend time in the game’s practice mode or just playing different modes, focusing on the different settings.
- Start Simple: If you’re new to NBA 2K25, begin by making small adjustments. Instead of trying everything at once, change one setting and play with it for a while before changing other things.
- Pay Attention to Your Performance: Keep track of how your game changes with each adjustment. Do you shoot better with the meter off? Do you defend better with the assist on or off? Use this information to fine-tune your controls.
- Watch Gameplay Videos: Look at how professional gamers or online streamers play and what settings they use. This can give you an idea of how different settings affect gameplay. Don’t copy their settings directly though, but use them as a suggestion and base your settings around your personal preferences.
- Don’t Be Afraid to Change: Your perfect settings might change as you get better at the game or as the game gets updated. Don’t be afraid to go back and change your setup when you feel like it.
The key is to try, test and see what helps you play your best game. The goal of all controller changes is to help you play at your best with full comfort, so try experimenting and finding out what works best for your playstyle.
Adjusting your controller settings is not a one-time thing. You might need to tweak them over time as you get better or find new techniques. Take time and effort, and you will be much happier in your gameplay experience.
By understanding these different settings, you can take full control of your game and play at your highest potential. Remember, the best controller settings are the ones that make you feel comfortable and give you an edge on the court. Play around, try new things, and you’ll soon find the perfect setup for your NBA 2K25 journey.
BEST SETTINGS, TIPS and TRICKS on NBA 2K25 (NEW SHOT TIMING PROFILE)
Final Thoughts
Fine-tuning your NBA 2K25 controller settings greatly impacts your gameplay. Experiment with sensitivity and vibration feedback until you find your sweet spot for improved control. Adjust button layouts to fit your playstyle, maximizing efficiency on the court.
Finding the right settings is crucial for success. You should consider various aspects such as dribbling, shooting, and defensive movements. Optimized NBA 2K25 controller settings can significantly help your performance.
Personalized controller setups offer a competitive edge. Make adjustments based on your needs, and you’ll notice improvement in your overall gaming experience.

