
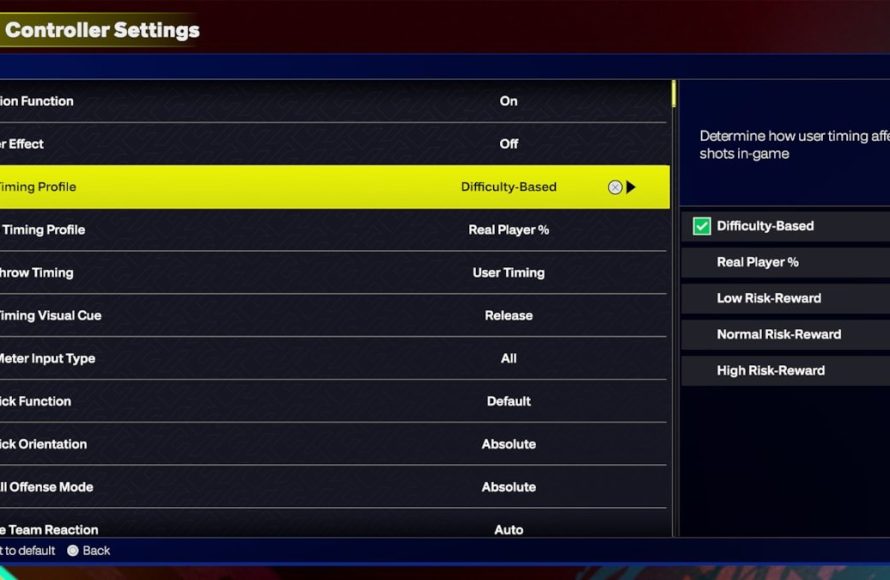
User settings for NBA 2K25 significantly impact gameplay; players should customize controls, difficulty, and camera angles to match their skill and desired experience.
Tuning the gameplay in the latest 2K installment is crucial. NBA 2K25 user setting preferences directly dictate how you experience the game. Finding that sweet spot between challenge and fun comes down to your personal adjustments.
From controller layouts to game sliders, numerous options await your fine-tuning. Don’t jump in without tailoring things to your liking; experimentation is key.

NBA 2K25 User Setting Preferences: Tailoring Your Game for Victory
Getting the most out of NBA 2K25 means more than just knowing your favorite players’ moves. It’s about making the game feel just right for you. The user settings are your personal playground to fine-tune every aspect of the game, from how the controller reacts to how realistic the visuals look. Let’s dive into the key areas and explore how you can shape your perfect NBA 2K25 experience. It’s all about finding what works best for you so you can play at your highest level.
Controller Settings: Making the Game Respond to You
The controller is your direct link to the court, so getting these settings dialed in is essential. NBA 2K25 provides many ways to adjust how your controller feels. Let’s explore some of them:
Shot Meter Preferences
Do you like seeing a meter when you shoot, or do you want to go purely by feel? NBA 2K25 lets you choose. You can pick from different meter types (like a line, a bar, or even none at all!). A visible meter helps show the timing of your shot, while turning it off challenges you to get the timing down just from the player’s animation. Experimenting with different meters helps you to find what makes you most comfortable.
- Meter Type: Choose a line, a bar, a curved meter, or no meter.
- Meter Size: Adjust how big the meter appears.
- Meter Color: Change the color for better visibility.
Vibration Settings
Controller vibrations give you feedback during the game. For example, you might feel a rumble when you make contact with another player. You can adjust how strong these vibrations are, or turn them off completely. Some players love the immersive feel of vibrations; others find them distracting. Adjusting this setting can improve your game performance and comfort.
- Vibration Intensity: Choose from high, medium, low, or off settings.
- Vibration Feedback: Decide if you want feedback for shooting, dribbling or all actions.
Pro Stick Functionality
The pro stick is the right analog stick, and it’s used for a variety of moves. You can set how you want the pro stick to work, whether you want it for shooting, dribbling, or specific moves. This can change how you approach each play, so you might need to spend some time adjusting to your own settings.
- Shooting/Dribbling: Choose between using the stick for shooting or dribbling.
- Specific Moves: Assign specific moves to different stick directions.
Button Mapping
The way the buttons are assigned to different actions can make or break your game. If you find that the default button layout doesn’t quite fit your playing style, you can change it. Swap the buttons you use the most often or rearrange them for quicker access. This is a really valuable tool for personalized comfort and quick actions.
- Custom Layouts: Create personalized button configurations.
- Swap Buttons: Reassign specific actions to different buttons.
Gameplay Settings: Shaping the Game’s Flow
Gameplay settings let you adjust things like difficulty, game speed, and even how often the computer makes certain plays. It’s where you go to personalize the challenge and the overall feel of your games. Let’s take a deeper look.
Difficulty Level
Choose the difficulty level that matches your skill. If you are new to the game, start with an easier setting to get the hang of it. As you improve, you can move up to more challenging difficulties. The different settings determine how smart the AI is and how well the other team plays. This allows you to improve your skills gradually.
- Rookie: Easiest setting for beginners.
- Pro: A good starting point for most players.
- All-Star: A more challenging experience.
- Superstar: Very difficult for experienced players.
- Hall of Fame: The most challenging setting.
Game Speed
Want a faster-paced game, or do you prefer a more deliberate style? Adjust the game speed to your preference. Slowing down the pace gives you more time to think and react, while a faster pace is more action-packed. This adjustment can be a small tweak or a big change to the whole feel of the game.
- Speed Increase: Play faster-paced action.
- Speed Decrease: Play at a slower, more deliberate pace.
Fatigue Settings
How much do you want your players to get tired during a game? You can adjust how quickly players lose stamina. Less fatigue can lead to more non-stop action. More fatigue makes it essential to manage player substitutions and rotations more strategically. The right setting will encourage you to play smart and rotate your players.
- Fatigue Rate: Adjust how quickly players get tired.
- Stamina Effects: Determine the impact of fatigue on player performance.
Game Rules
Want to change the rules of the game? NBA 2K25 lets you make a few adjustments here, like turning on or off particular rules. You could even change how many fouls it takes before a player is out of the game. These modifications can dramatically change your playing style and strategic considerations. For example, playing without traveling calls will be a new experience.
- Foul Settings: Adjust how often fouls are called.
- Rule Variations: Customize rules such as travel, 3 seconds in the key, and more.
Camera Settings: Seeing the Court Your Way
The camera angle is how you view the court, and finding the perfect view is essential. NBA 2K25 provides different camera angles to suit your style and make the game more comfortable to watch and play. Let’s explore some of the camera options:
Camera Presets
Start with the default views, like the ‘2K’ view or ‘Broadcast’ view, to see if one of them suits you. These are a starting point for many players. Each preset offers a different perspective. Test these out to find the view that matches your preference and playstyle. Some players may find that specific views help with dribbling or shooting better.
- 2K Camera: A classic behind-the-player view.
- Broadcast Camera: Simulates a TV broadcast angle.
- Baseline Camera: A lower perspective from the baseline.
- Side Camera: A view from the side of the court.
Custom Camera Settings
If the presets aren’t perfect, you can create your own custom view. You can move the camera further away, closer, or even change its angle. This level of control ensures that you get a view that is perfect for your style of play. You may find that these subtle tweaks can dramatically improve your ability to see the whole court. This is helpful for making quick passes or positioning your player better.
- Height Adjustment: Change the camera’s height above the court.
- Zoom Adjustment: Set how far the camera is from the action.
- Angle Adjustment: Change the camera’s angle.
Camera Zoom and Shake
You can adjust the zoom and how much the camera moves. A little bit of shake may feel more realistic, but too much can be distracting. This will help you dial in a view that is both immersive and functional. The goal here is to see the court clearly, so you can react quickly to everything on the screen.
- Zoom Level: Set how close or far the camera is.
- Shake Intensity: Adjust the camera’s movement during play.
Visual Settings: Fine-Tuning the Graphics
Visual settings let you adjust how good the game looks and how it performs. If you have a really powerful gaming setup, you can turn the graphics all the way up. If you are running the game on an older machine, you may need to reduce some of the visual effects to keep the game running smoothly. Let’s explore the main things you can change.
Resolution
The higher the resolution, the sharper and clearer the image will look, but also, the more power your PC or console needs. If the game is running slowly, try lowering the resolution for smoother gameplay.
- Higher Resolution: Better image quality, but requires more processing power.
- Lower Resolution: Less detail, but runs more smoothly on older hardware.
Graphics Quality
Adjust things like texture quality, shading, and lighting. Higher settings make the game look more detailed, but again, require more power. Try different settings to find the best balance between visual quality and performance for your system.
- Texture Quality: How detailed the surfaces look.
- Shading Quality: How shadows and lighting are displayed.
- Effects Quality: Adjust the quality of visual effects like blur or motion.
Frame Rate
Frame rate is how many times per second the image on the screen is refreshed. A higher frame rate results in smoother gameplay. You can typically choose from 30fps or 60fps, or if you have a monitor that supports it, you may be able to reach 120 or more. A higher rate may improve your game by reducing lag and stuttering.
- 30 FPS: Standard frame rate, may have some lag on faster systems.
- 60 FPS: Smoother gameplay.
- 120+ FPS: If you have the proper equipment, the game will appear very smooth.
HDR Settings
If your monitor or TV supports HDR, you can get better color and contrast. This makes the game look more vibrant and realistic. Not all setups support HDR, but if yours does, experiment to see if you like the way it changes the graphics.
- HDR On/Off: Choose to use the feature.
- HDR Intensity: Adjust how strong the HDR effect is.
Audio Settings: Immersing Yourself in the Game
The sounds of the game can really make the experience feel more immersive. You can adjust how loud the music, sound effects, and commentary are. It’s all about creating a comfortable and enjoyable audio environment. Let’s dive into the available audio adjustments.
Master Volume
This controls the overall volume of the game. It’s like the master volume on a stereo system. You may want to lower this so you don’t get startled by loud noises. Or you can crank it up if you want a very immersive, loud gaming experience.
- Overall Audio Level: Set the general loudness.
Music Volume
You can change how loud the in-game music is. Some players like to have the music playing loudly, while others prefer to turn it all the way down so they can focus on the other sounds of the game. You can choose a level that suits you.
- Adjust the Music: Choose the level for the background tracks.
Sound Effects Volume
The sound effects include things like the ball bouncing, sneakers squeaking, and the crowd cheering. You can adjust the volume of these effects. For a true-to-life effect, make these loud enough to be heard without overpowering the other sounds.
- Adjust the Effects: Set the level for things like ball sounds.
Commentary Volume
Do you like hearing the announcers during the game, or do you prefer to play without them? You can set their volume to your liking. You can choose to hear them in the background, as a prominent voice, or you can even mute them entirely if you want to focus.
- Commentary Level: Choose how loud the announcers are.
Headphone Settings
If you’re using headphones, you may have other options to customize, like stereo or surround sound. These features can enhance your playing experience. Some players may like to have surround sound to better hear where different actions are taking place. Find the settings that match your type of headphones to achieve the optimal audio experience.
- Stereo Output: A standard audio setting.
- Surround Sound: More immersive audio positioning.
Playing NBA 2K25 is more than just jumping into a game; it’s about creating a gaming environment that perfectly matches your needs and preferences. Spend some time exploring these settings and you might be very impressed with how well you’re able to play when everything is dialed in just right.
5 SECRET Settings That You NEED To Use In NBA 2K25
Final Thoughts
Ultimately, tailoring gameplay provides an enhanced experience. Adjusting camera angles, controller settings, and difficulty levels lets players find their ideal setup. NBA 2K25 user setting preferences directly impact how much enjoyment you get from the game.
Experimentation is must. Find what works best for you, whether it’s quicker gameplay, or a more realistic simulation. Customization options allow a personalized experience.

