
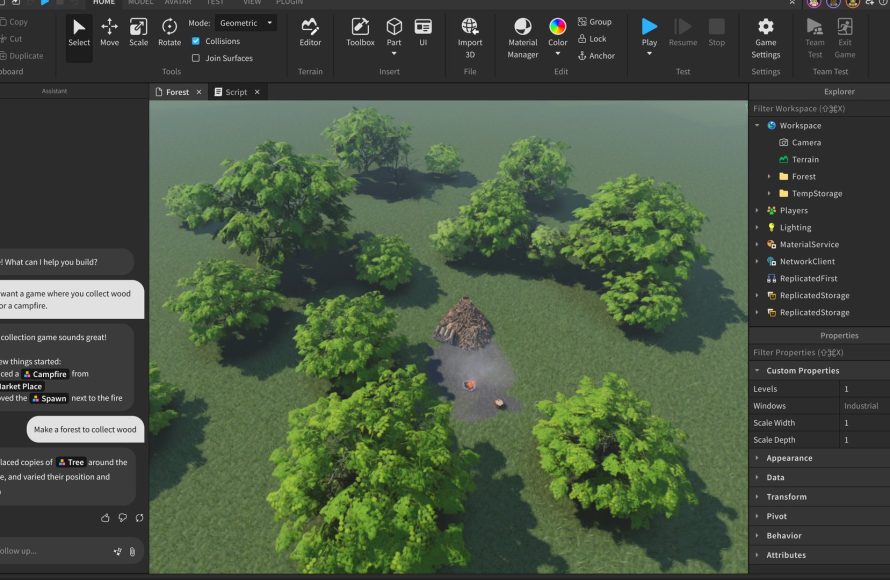
Roblox 3D modeling in virtual worlds allows creators to build custom items, characters, and environments using tools within the Roblox Studio platform.
Ever dreamt of crafting your own digital realm? Imagine creating unique objects that populate your favorite Roblox experiences. Roblox 3D modeling in virtual worlds makes this a reality.
Using the platform’s built-in tools, you can shape and mold virtual assets to your desire. You can express your creativity by designing anything imaginable. It enables players to directly impact the games they love with their own ideas.

Roblox 3D Modeling in Virtual Worlds
What is Roblox 3D Modeling?
Okay, imagine you have a big box of LEGOs. You can build anything you want, right? That’s kind of like 3D modeling in Roblox! Instead of plastic bricks, you use digital tools to create all sorts of cool things. We’re talking about buildings, cars, animals, clothes for your avatar, and even wacky, unique items you’ve never seen before. Basically, if you can dream it, you can try to model it in Roblox. This is how you create custom assets in the Roblox world, allowing you to add your own flair to the games you make or even to sell your creations to other players. It’s a fantastic way to express your creativity and show off your design skills to the entire Roblox community.
Why 3D Modeling in Roblox is So Popular
You might be wondering, “Why is everyone so crazy about this 3D modeling thing in Roblox?” Well, there are several reasons. First, it’s incredibly fun! The ability to create anything you want is empowering and lets your imagination run wild. Second, it lets you have unique items. You don’t have to buy things exactly as everyone else; you can make items that are specifically yours. This gives you a sense of personalization. Thirdly, if you get good at it, you can earn Robux, the in-game currency, by selling your creations to other players. Many creators actually make a living this way. Finally, it helps to build coding and designing skills, which are really helpful, both inside Roblox and in the real world. It’s like playing a game and learning at the same time. There are so many opportunities in Roblox 3D modeling.
Getting Started with Roblox Studio
To start 3D modeling in Roblox, you will need to use Roblox Studio. It’s a free tool that Roblox provides and can be downloaded to your computer (not on a phone or tablet). Think of it as your personal workshop where you create and build your designs. Let’s walk through how to get it:
- Download Roblox Studio: Go to the Roblox website and look for the “Create” button. It will lead you to the page where you can download Studio for your computer.
- Create a Roblox Account: Make sure you have a Roblox account (if you don’t already). This will be what you use to log in to Studio and share your creations.
- Open Roblox Studio: Once installed, open Roblox Studio. You will see a window with different template options. You can choose a “Baseplate” to start with a blank world or select another pre-made template.
- Familiarize Yourself with the Interface: Don’t worry about getting it all right at once. The interface has many tools like the toolbox, which allows you to add parts and models to your workspace. You also have property windows where you can modify the size, color, and other aspects of your parts.
It might seem like a lot to take in, but don’t worry; it gets easier with practice. Just like learning any new game, Roblox Studio needs a bit of time to get comfortable with. There are plenty of tutorials and resources online that can help you along the way. The best way is to just try using different tools and seeing what they do. Keep experimenting and having fun with it.
Basic 3D Modeling Tools and Techniques
Now that you’re in Roblox Studio, let’s talk about some of the essential tools you will use for 3D modeling. These tools are your bread and butter, and they will help you to create your designs from scratch:
- The Parts Tool: This is where you get all the basic shapes like cubes, spheres, cylinders, wedges, and even a corner. You add these parts to your workspace and use them as the building blocks of your model. You can change their size, color, and material.
- The Move Tool: The move tool, represented by four arrows pointing in different directions, allows you to change the position of your model. You can move them up, down, left, or right.
- The Resize Tool: The resize tool, which looks like a box with handles, allows you to make a model bigger or smaller.
- The Rotate Tool: The rotate tool, pictured as a curved arrow, is what you use to spin parts around.
- The Select Tool: This tool, usually shown as an arrow, is your way of selecting a part so you can modify it.
- The Color Palette and Material Settings: These allow you to choose a color for your parts and also select the type of material it looks like (wood, metal, glass, etc.).
These simple tools combined together can create great stuff. When you select a part, you will see these options in the Properties window. This window allows you to change things like the part’s size and appearance. Experiment with all the different settings, and you will quickly get used to them. Remember, practice is crucial in getting better at using these tools. Start with simple projects to master the basics before moving to more complex creations. Keep an eye on the tutorials online as they can often demonstrate how all these tools can be used together.
Advanced Techniques in Roblox 3D Modeling
Once you are comfortable with the basics, it’s time to start learning some more advanced techniques. These techniques can elevate your work and make your models look incredibly professional and detailed. Here are a few to look into:
Using Unions and Negates
Unions and negates are tools in Roblox Studio which allow you to combine different parts to create a unique shape or cut a shape out of another one. A union combines multiple parts into one solid object. A negate acts like a cookie cutter, where you cut out one shape from another one. Using these tools gives you the ability to form more complex shapes that the standard basic parts cannot achieve. They’re like magic for Roblox modelers. For example, to make a hole in the wall you would add a block to act like a cutter. Then combine these two shapes using the subtract feature (negate). With these two tools you will be able to create complex details and features in your models.
Working with Meshes
Meshes are 3D models created outside Roblox Studio in modeling software such as Blender. You can import these models into Roblox Studio. Meshes can be far more complex than the parts we just talked about. They are perfect for detailed items like characters, detailed pieces of furniture, or very intricate architecture. When working with meshes, you’ll often need to pay attention to details such as the number of triangles they are made of, to make sure your games run smoothly. Learning how to create and use mesh models really gives you flexibility. You can either create mesh models yourself with 3rd party software or use models created by other users.
Textures and Decals
Textures and decals are basically images that are added to the surface of a part or mesh. They allow you to add details like wood grain on a floor, metal plating on a car, or even a cool logo on a t-shirt. Textures can wrap around a shape, whereas decals are flat and usually applied to a specific part of the model. They are used to make your model more realistic and visually pleasing. There are many free textures available on the internet that you can use. You also can create your own with image editing software, like Photoshop or GIMP.
Scripting and Interactivity
While modeling is about creating the visual elements, scripts bring your models to life. Scripting is done in Lua programming language and allows you to add logic and interactions to your models. With scripts, you can make your models move, react to player input, and generally make your virtual world feel alive. You can use scripts to make buttons that open doors, cars that drive, and even create special effects. Learning to use scripts alongside modeling will make your creations even more interactive and engaging.
Learning all the advanced modeling techniques will definitely require time and dedication. Don’t be discouraged if things don’t look perfect right away. The process of learning these techniques requires experimentation. Keep trying and you will get better over time.
Optimizing Your 3D Models for Roblox
It is important to make sure that your models run smoothly within Roblox. Optimizing your 3D models means making them work efficiently so they don’t slow down a game and make it lag. Here’s why it’s so important:
- Performance: Poorly optimized models can cause games to run slowly, especially on lower-end devices. It can make a game frustrating for others to play.
- Resource Usage: Complex models with a lot of detail require more computer resources, which can make the game slow down and freeze.
- Smooth Gameplay: Optimized models make the game more fun to play. Players don’t get frustrated with lag or crashes.
So, how do you make sure your models run well? Here are some key things to keep in mind:
Triangle Count
Every 3D model is made up of triangles. The more triangles a model has, the more work your computer has to do to render it. High-detail models have more triangles. To help your game run well, you will want to make sure the models do not have too many. Try using fewer triangles if your game starts to get slow. You can also consider simplifying parts of your models. If your model has a very detailed design where the player will never see it, you can use a basic form there.
Use of LOD (Level of Detail)
LOD means showing less detailed version of models when they are far away. This helps the game run faster because the computer is not rendering all the details when they are not needed. You can set your models to change the level of detail, depending on how far away the player is.
Texture Optimization
Large, high-resolution textures can also slow down games. You should optimize your texture images to a size that works for your model and the game. Textures should not be too large, and avoid using too many layers on your model. If possible, you can reuse the same texture on multiple parts of your models. That can reduce the amount of memory it needs.
Group and Organize Models
Good organizational skills can make a big difference when working with many models in a game. Make sure you give names to each part of your model, and try to put each individual models in folders and subgroups. You can also group all your model parts together. This is not just for better organization, but it also makes your models easier to manage and manipulate within the game. It will also make your models cleaner and makes it easy for other people to use your models.
Optimizing your models is an important part of 3D modeling. If you can keep all these things in mind when creating your models, it will make your games much more enjoyable to play. With practice you will get better at balancing the level of detail and the model performance.
Sharing and Selling Your Roblox 3D Models
Once you are done creating your 3D models, you can share them with the world. There are two main ways you can do this: sharing them in games or selling them on the Roblox Marketplace. Sharing allows others to enjoy your creations, and selling gives you the opportunity to earn Robux.
Sharing your models in Games
When making your own game in Roblox Studio, you can use all the models you created. By placing your model into your game, it becomes part of the gameplay. You can share these games with your friends, or make them available to everyone on the Roblox platform. If people like the game, they get a chance to enjoy your creations. This is a very good way to show the world what you have made, and get valuable feedback from other players.
Selling Your Models on the Marketplace
If you’ve created a really cool 3D model that you think other people would want, you can sell it on the Roblox Marketplace. Once your model is on the Marketplace, other users will be able to search and purchase it. It allows you to earn Robux for your work. This can be a fun way to make a bit of pocket money from all the hours you put into designing. Before selling on the marketplace, you will have to follow some guidelines that Roblox sets. Make sure that your model is original and of good quality to get sales. Make sure you provide a clear description of the model to help people understand what it is. Try to make sure that your image is appealing and will grab the user’s attention.
Participating in the Roblox Community
There is also another way to get your models out there by sharing them with the community. There are many Roblox forums and groups where you can share your work, get helpful feedback, and find inspiration. This is a great way to learn from other modelers. It is also a great way to show off your own skills to a wider audience. By participating in the Roblox community, you can grow as a 3D modeler and learn a lot of new things.
Tips and Tricks for Success in Roblox Modeling
Modeling in Roblox can be challenging, but also very rewarding. Here are some tips and tricks to help you be successful:
- Practice Regularly: Like any skill, modeling gets better with consistent practice. The more you create, the better you become. Start with simple projects and gradually move to more complex creations.
- Watch Tutorials: YouTube and other online platforms have tons of great tutorials for Roblox modeling. These can show you a variety of techniques, help you with troubleshooting, and give you new ideas.
- Learn from Others: Check out what other modelers are doing. Observe how they use different tools and techniques. Pay close attention to both good designs and designs that could use some improvements.
- Be Patient: 3D modeling takes time and effort. You might make mistakes at the start. It’s all part of learning. Don’t get discouraged if your creations don’t look perfect right away. Just keep trying.
- Experiment and Have Fun: Don’t be afraid to experiment with different tools, techniques, and ideas. The best creations often come from trying new things. Remember that this is supposed to be fun!
- Ask for Feedback: Share your creations with others and ask for their opinions. Other people’s perspectives can give you helpful insights and help you improve your designs.
- Use Shortcuts: Learn the keyboard shortcuts in Roblox Studio. This can make your workflow faster and more efficient.
By using these tips, you will be able to improve your modeling skills and get closer to realizing your vision.
The Future of Roblox 3D Modeling
The world of Roblox is always changing. 3D modeling is always getting better, with new tools and features being added regularly. It’s becoming more and more like a real-world design platform. This means more chances to be creative and new ways to make amazing games. There is also a growing community of modelers, which means more resources available to learn and improve your skills. We’re even starting to see Roblox models being used in other virtual world and metaverse platforms. This means the skills that you develop in Roblox modeling are becoming more valuable. As technology advances, expect that 3D modeling in Roblox will become even more sophisticated, more accessible, and it will provide more opportunities for you to create.
Roblox 3D modeling offers an incredible way for you to express yourself, create amazing virtual worlds, and even earn some Robux. It’s a constantly growing field with opportunities for creativity, learning, and personal growth. So dive in, explore, and see what amazing things you can build. The only limit is your imagination!
Roblox Developer tries making a REAL GAME…
Final Thoughts
Creating objects in Roblox offers incredible possibilities. Users can build complex structures within the virtual space. This allows for personal expression and unique gameplay elements.
The process of making roblox 3d modeling in virtual worlds, is very rewarding. Players use their designs to enhance their experiences and others. It provides an accessible way to learn 3D creation basics.

