
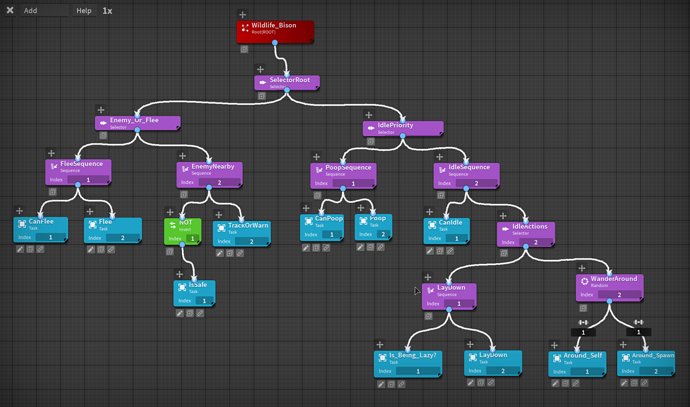
The core of a Roblox behavior tree implementation involves creating a hierarchical structure of nodes that dictate an agent’s actions based on predefined conditions and results.
Have you ever wondered how NPCs in your favorite Roblox games seem to make intelligent decisions? Well, a big part of that is the clever use of behavior trees. The Roblox behavior tree implementation allows developers to create complex, yet manageable, AI for their games. This approach gives a structure to the decision-making process of the NPCs.
Essentially, you build a tree-like structure with different nodes for actions, conditions, and control flow. This tree then allows game characters to react to the environment around them. You create engaging gameplay through this well-defined, predictable system.

Roblox Behavior Tree Implementation: Bringing Your NPCs to Life
Okay, so you’ve built an awesome world in Roblox, filled with cool places and interesting characters. But what if those characters just stood there like statues? Not very exciting, right? That’s where behavior trees come in! They are like the brains behind your non-player characters (NPCs), telling them what to do and when to do it. We’re going to dive deep into how you can use these clever tools to make your Roblox creations much more interactive and fun.
Understanding the Basics of Behavior Trees
Think of a behavior tree as a flowchart, but instead of showing how a program works, it shows how an NPC behaves. Each box in the flowchart, called a node, represents a specific action or decision the NPC might take. These nodes are connected in a tree-like structure, hence the name “behavior tree.” The tree starts at a single point, called the root, and branches out into different paths of behavior.
Key Components of a Behavior Tree
Let’s explore the crucial components that make up a behavior tree:
- Root Node: This is the starting point of the behavior tree. The NPC’s “thought process” begins here. Imagine it as the NPC’s “first thought”.
- Composite Nodes: These nodes control the flow of the tree. They decide which of their child nodes should be executed. Some common composite nodes are:
- Sequence Node: It executes its child nodes one after another, from left to right. If one child fails, the whole sequence fails. Think of it like a recipe – if you miss a step, the whole dish might not turn out right.
- Selector Node: It executes its child nodes one after another, from left to right. But, as soon as one child succeeds, the selector stops. It’s like choosing from a list – once you find something that works, you don’t keep looking.
- Parallel Node: It runs all its child nodes at the same time. It’s like juggling – several actions happening at once. This one needs to be used carefully and not very often!
- Decorator Nodes: These nodes modify the behavior of their single child node. They don’t directly do anything themselves, but rather act like rules on how their child should be executed. Examples include:
- Inverter Node: Reverses the success or failure of its child. If the child succeeds, the inverter node fails, and vice versa. This is helpful when checking conditions. For example, “is not visible” could be the condition.
- Repeater Node: Executes its child node multiple times or until a certain condition is met. This is great for behaviors that need to repeat, like patrolling an area.
- Limit Node: It runs its child node only a limited number of times.
- Action Nodes: These nodes represent the actual actions an NPC performs, such as moving, attacking, or interacting with the environment.
- Condition Nodes: These nodes check specific conditions in the game world, such as whether the player is nearby or if the NPC has enough health. They either return success or failure.
Why Behavior Trees are Great for Roblox
Why use behavior trees in Roblox? Because they make creating smart and adaptable NPCs so much simpler! Here’s why they are a fantastic choice:
- Organization: Behavior trees structure the code in a logical way. This is important because if you write code without any structure, it becomes too hard to read and modify it.
- Flexibility: It’s easy to add, change, or remove behaviors from your NPCs without messing up the whole system. You can test different actions and conditions without changing other parts of the tree.
- Reusability: You can reuse parts of the tree for different NPCs. For example, you could have a basic patrolling behavior tree and add extra attack behaviors for a guard or merchant.
- Complex Behaviors: Behavior trees handle very complex behaviors with multiple conditions and actions without making a huge mess of code. Imagine building an NPC that patrols, runs when it sees an enemy, attacks, and then goes back to patrolling – behavior trees handle this easily.
- Easy to Understand: Behavior trees, once you get the idea, are pretty easy to read and understand, even for non-coders.
Implementing Behavior Trees in Roblox: A Step-by-Step Guide
Let’s get our hands dirty and start building a simple behavior tree in Roblox. We’ll use Lua, the programming language Roblox uses.
Setting Up the Basic Structure
First, we need a way to create and use behavior tree nodes. Here’s a basic code snippet that sets up our nodes:
-- Base Node Class
local Node = {}
Node.__index = Node

function Node.new(name)
    local self = setmetatable({}, Node)
    self.name = name
    return self
end

function Node:execute()
    -- This function will be implemented by the child nodes.
end

-- Composite Node Class
local CompositeNode = {}
CompositeNode.__index = CompositeNode
setmetatable(CompositeNode, Node)

function CompositeNode.new(name)
   local self = setmetatable({}, CompositeNode)
    self.children = {}
    self.name = name
    return self
end

function CompositeNode:addChild(node)
  table.insert(self.children, node)
end


-- Sequence Node Class
local SequenceNode = {}
SequenceNode.__index = SequenceNode
setmetatable(SequenceNode, CompositeNode)


function SequenceNode:execute()
    for _, child in ipairs(self.children) do
      if child:execute() == false then
          return false --Sequence fails if any child fails
      end
    end
    return true
end


-- Selector Node Class
local SelectorNode = {}
SelectorNode.__index = SelectorNode
setmetatable(SelectorNode, CompositeNode)

function SelectorNode:execute()
  for _, child in ipairs(self.children) do
    if child:execute() == true then
        return true --Selector succeeds if any child succeeds
    end
  end
  return false
end


-- Action Node Class
local ActionNode = {}
ActionNode.__index = ActionNode
setmetatable(ActionNode, Node)


function ActionNode.new(name, actionFunction)
  local self = setmetatable({}, ActionNode)
    self.name = name
    self.actionFunction = actionFunction
    return self
end

function ActionNode:execute()
  return self.actionFunction()
end

-- Condition Node Class
local ConditionNode = {}
ConditionNode.__index = ConditionNode
setmetatable(ConditionNode, Node)

function ConditionNode.new(name, conditionFunction)
  local self = setmetatable({}, ConditionNode)
    self.name = name
    self.conditionFunction = conditionFunction
    return self
end

function ConditionNode:execute()
    return self.conditionFunction()
end


-- Create a simple root node
local root = SequenceNode.new("Root Node")


-- Function to make character jump
local function jumpAction()
   print("Jump Action Called")
  --Add your jump logic here
  return true;
end
--Function to check is player nearby
local function isPlayerNear()
    -- Implement your logic for checking if the player is near
    -- For demonstration, let's assume player is always near for now
     print("Check Player Near")
    return true
end

-- Create Action and Condition nodes
local jumpNode = ActionNode.new("Jump", jumpAction)
local isNearNode = ConditionNode.new("Is Near",isPlayerNear)

-- Add childs to root node
root:addChild(isNearNode)
root:addChild(jumpNode)

-- execute root node
root:execute()
In this code, we create base Node class from which all other nodes will inherit properties from. We have the CompositeNode, which creates Sequence and Selector classes, and then we create the ActionNode and ConditionNode. Finally, we set up a simple behavior tree to show you how to put things together.
Creating an Action Node: Making Your NPC Move
An action node performs a specific action. For example, let’s make our NPC move towards the player. Here’s how we can do it:
--In the Action Node Class you can use the character parameter to control the character

function ActionNode.new(name, actionFunction,character)
    local self = setmetatable({}, ActionNode)
      self.name = name
      self.actionFunction = actionFunction
      self.character = character
      return self
  end

function ActionNode:execute()
  return self.actionFunction(self.character)
end

local function moveToPlayer(character)
    local player = game.Players:GetPlayers()[1]
    if player then
       local playerPosition = player.Character.HumanoidRootPart.Position
       local npcPosition = character.HumanoidRootPart.Position
        local direction = (playerPosition - npcPosition).Unit
        local moveVector = direction  5
        character.Humanoid:Move(moveVector)
        print("Move to Player Action Called")
    end

     return true
end
local character = workspace:WaitForChild("Dummy") -- Replace "Dummy" with your npc's name.
local moveNode = ActionNode.new("Move", moveToPlayer,character)

root:addChild(moveNode)
Here, the moveToPlayer function handles the movement. It first gets the player’s location and then moves the NPC towards it. This function is then passed to action node.
Creating a Condition Node: Checking for Conditions
A condition node checks if a certain condition is met. Let’s create a condition node that checks if the player is within a certain range of the NPC.
--Modify your condition class like this
function ConditionNode.new(name, conditionFunction, character)
    local self = setmetatable({}, ConditionNode)
      self.name = name
      self.conditionFunction = conditionFunction
      self.character = character
      return self
  end


function ConditionNode:execute()
    return self.conditionFunction(self.character)
end


-- Add distance parameter to the condition, and pass the npc's character
local function isPlayerWithinRange(character,range)

    local player = game.Players:GetPlayers()[1]
    if player and player.Character and character and character.PrimaryPart then
         local playerPosition = player.Character.HumanoidRootPart.Position
         local npcPosition = character.PrimaryPart.Position
        local distance = (playerPosition - npcPosition).Magnitude

        if distance <= range then
          print("Player within range")
           return true
        else
          return false
        end
    end
    return false
end


local distanceRange = 10
local isNearNode = ConditionNode.new("Is Within Range",isPlayerWithinRange,character,distanceRange)
Now the condition checks if the player is close enough for the NPC to move towards them.
Putting it all Together: Combining Nodes
Let's combine our nodes to create a simple behavior tree. We'll use a sequence node to first check the condition and then perform the action:
   -- Create a Sequence to check for player distance, and then move towards player
   local root = SequenceNode.new("Root Node")
    root:addChild(isNearNode)
    root:addChild(moveNode)
Now, your NPC will only move towards the player if the player is within range.
Improving Your Behavior Tree: Using Decorators
Decorators give you more control over your tree. Let's use a repeater node to make the NPC continuously check for the player and move:
    local RepeaterNode = {}
     RepeaterNode.__index = RepeaterNode
    setmetatable(RepeaterNode, Node)

  function RepeaterNode.new(name,child,repeatTimes)
        local self = setmetatable({}, RepeaterNode)
        self.name = name
        self.child = child
        self.repeatTimes = repeatTimes
        return self
    end
  function RepeaterNode:execute()
    if self.repeatTimes then
      for i = 1,self.repeatTimes do
          self.child:execute()
      end
      return true
     else
        while true do
        self.child:execute()
      end
    end

  end

  local repeatRoot = RepeaterNode.new("Repeater",root)
  -- To call execute function for root
  repeatRoot:execute()
The repeater will continuously repeat the behaviour of finding the player and moving toward them.
Advanced Techniques for Behavior Tree Implementations
Once you've mastered the basics, you can explore more advanced behavior tree techniques. These can make your NPCs even more realistic and interesting.
Using Blackboard
A blackboard is a shared memory space where nodes can store and access information. This makes it easier for different parts of the tree to communicate. For example, a condition node can store whether a player is in sight on the blackboard, and an action node can use that information to decide whether to attack.
Here's a basic example of how you can use it:
  local Blackboard = {}
  Blackboard.__index = Blackboard

    function Blackboard.new()
      local self = setmetatable({}, Blackboard)
        self.data = {}
      return self
    end

  function Blackboard:setData(key,value)
      self.data[key] = value
  end

  function Blackboard:getData(key)
    return self.data[key]
  end

  --create blackboard instance
  local blackboard = Blackboard.new()

  --pass blackboard into condition node and action node
    function ConditionNode.new(name, conditionFunction, character,blackboard)
       local self = setmetatable({}, ConditionNode)
          self.name = name
          self.conditionFunction = conditionFunction
          self.character = character
         self.blackboard = blackboard
         return self
     end


    function ConditionNode:execute()
       return self.conditionFunction(self.character,self.blackboard)
   end


    function ActionNode.new(name, actionFunction,character,blackboard)
         local self = setmetatable({}, ActionNode)
           self.name = name
           self.actionFunction = actionFunction
            self.character = character
             self.blackboard = blackboard
            return self
     end


  function ActionNode:execute()
   return self.actionFunction(self.character,self.blackboard)
  end


  local function isPlayerVisible(character,blackboard)
   local player = game.Players:GetPlayers()[1]
    if player then
        local playerPosition = player.Character.HumanoidRootPart.Position
        local npcPosition = character.HumanoidRootPart.Position
          local direction = (playerPosition - npcPosition).Unit
        -- Here you will add a check to see if player is in line of sight
        local playerVisible = true
        blackboard:setData("IsPlayerVisible",playerVisible)
      print("Check Player Visible")
         return playerVisible
   end
  end

  local function attackPlayer(character,blackboard)
   if blackboard:getData("IsPlayerVisible") == true then
         --Implement attack logic
      print("Attack Player")
         return true
     else
     return false
   end
  end

 local isVisibleNode = ConditionNode.new("Is Visible",isPlayerVisible,character,blackboard)
  local attackNode = ActionNode.new("Attack Player",attackPlayer,character,blackboard)

  local root = SequenceNode.new("Root Node")
    root:addChild(isVisibleNode)
    root:addChild(attackNode)
In this example, the condition node checks if the player is visible and stores this in the blackboard and the attack node uses this information.
Handling NPC States
Many games need NPCs to change behaviors based on their state. For instance, an NPC might patrol when it is calm but switch to attack mode when it sees an enemy. Behavior trees are good for this, as you can switch to different behavior trees based on an NPC's state.
Using Coroutines
In some cases, you may need an action to run over multiple frames. For example, moving an NPC takes time. To manage long-running action, you can use coroutines. Coroutines let you pause and resume a function, so your NPC is not stuck on only one action and can change behavior based on the game state.
Debugging Your Behavior Trees
Debugging is very important to identify and fix issues in your code. Here are a few tips to help you debug your trees:
- Print Statements: Add print statements to key nodes, so you know the path that your tree took.
- Visual Debugging: If you can, create a visual display of your behavior tree. This will help you see the flow of actions and easily understand where your tree is going.
- Test Cases: Test each node in isolation to make sure it works correctly. For example, test your condition nodes to make sure they return the correct results, and test action nodes to make sure they execute actions as intended.
Example Scenarios Using Behavior Trees
Let's consider a few specific scenarios where behavior trees can really shine in your Roblox games:
A Guard NPC
Imagine a guard who patrols an area, but will chase the player when spotted. Here is how you can create a behavior tree for that:
- Selector Node:
- Sequence Node (Chase):
- Condition Node: Checks if the player is within sight.
- Action Node: Moves towards the player.
- Sequence Node (Patrol):
- Action Node: Move to the next patrol point.
- Sequence Node (Chase):
This structure allows the guard to patrol until it spots a player, and then it switches to chasing behavior.
A Merchant NPC
A merchant should wait for players and display the shop UI when they are nearby. This tree can be described like this:
- Sequence Node:
- Condition Node: Checks if the player is close enough to trigger the shop UI.
- Action Node: Displays the shop UI.
- Action Node: Wait for players or idle around the shop.
In this case, it will show the UI if the player is near otherwise, it will wait for the player.
Complex Enemy AI
Enemies can have more complex behaviors, such as attacking, retreating, using different abilities, or even working in a group. You can structure your behavior trees like this:
- Selector Node:
- Sequence Node (Attack):
- Condition Node: Checks if the enemy is within attack range.
- Action Node: Executes the attack.
- Sequence Node (Retreat):
- Condition Node: Checks if health is low.
- Action Node: Moves away from the player.
- Sequence Node (Follow):
- Condition Node: Checks if a player is nearby.
- Action Node: Follows the player.
- Sequence Node (Idle):
- Action Node: Idles around the area.
- Sequence Node (Attack):
This way, the enemy can handle various situations without having to write complex code. The enemy will attack if the player is near, retreat if their health is low, otherwise follow the player or idle around.
Best Practices for Behavior Tree Implementations
Here are some best practices to ensure your behavior trees are well-designed and efficient:
- Keep it Simple: Start with simple trees and gradually make them complex as needed. Don't over complicate the design too early.
- Modular Design: Create reusable pieces for your tree that you can easily swap around. Make sure they are easy to use and easy to change.
- Performance Optimization: Make sure that your tree doesn’t consume too many resources, which will slow down your game, if it does, try to optimise it.
- Clear Naming Conventions: Give your nodes descriptive names, so it is easier to read and debug.
- Documentation: Write notes or comments, so it is easy to understand what it does. This is especially helpful if someone else is using your code.
Behavior Trees For AI! | Roblox Studio BehaviorTrees3 Tutorial
Final Thoughts
In summary, effectively implementing behavior trees in Roblox provides a structured method for controlling non-player character actions. The hierarchical nature allows for complex decision making via simple nodes. Careful planning of your tree and node behaviors is key to smooth functioning.
Utilizing behavior trees simplifies AI development processes. The modularity of the system enables easy modification and expansion of behaviors. Consider the benefits of a well-structured 'roblox behavior tree implementation,' for your project's success.

