
Creating successful Roblox clothing designs involves using a template, understanding layering, paying attention to detail like shading and texture, and studying popular trends on the platform.
Want to make amazing outfits for your Roblox avatar? Many players enjoy creating their own unique clothing, it’s part of what makes the game so engaging. Learning about good Roblox clothing design tips is the key to standing out and even making some Robux from your creations.
Good designs require attention to detail and understanding of how the platform works. By exploring different techniques and putting in practice, you will find your design skills rapidly improve and create some very cool looking clothes.

Roblox Clothing Design Tips: Your Guide to Creating Awesome Outfits
So, you want to make cool clothes on Roblox? That’s awesome! Designing clothes is a super fun way to express yourself and even make some Robux. But where do you start? Don’t worry, we’re here to guide you through it all. This guide will provide you with all the necessary Roblox clothing design tips and tricks so you can start making awesome outfits.
Getting Started: The Basics of Roblox Clothing Design
Before you start designing your dream outfit, you need to know a few things. It’s not just about drawing pretty pictures; it’s about understanding how Roblox uses templates and how those templates will appear on your avatar. Here’s a breakdown:
Understanding the Roblox Template
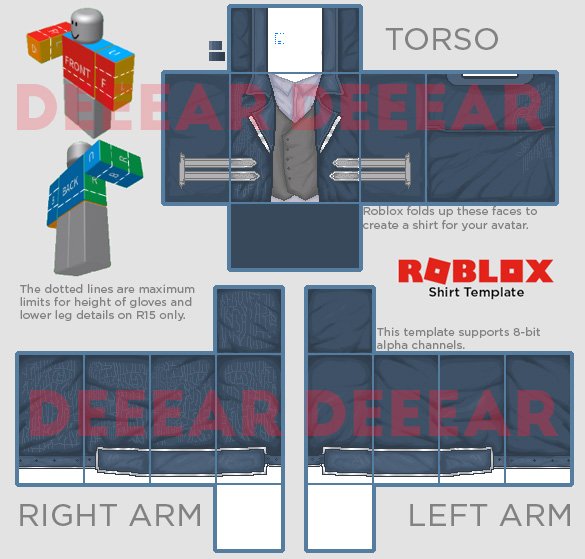
Roblox clothing uses specific image templates. Think of it like a coloring book page for your avatar. The most common templates are for shirts and pants. You’ll need to download these templates to get started. Here is how it works:
- The Template: The template looks like a flat, unfolded version of your avatar’s body. It has sections for the front, back, sides, and arms.
- The UV Map: This template is a UV map. It’s like a guide showing where your design will wrap around your character. When you draw on a specific area of the template, that area will appear at that same spot on your avatar in the game.
- Free to Grab: Roblox provides these templates for free. You can find them in the Developer section of the Roblox website. You can also get them from various online resources created by other users.
Choosing the Right Software
You don’t need super fancy software to design Roblox clothes. Several free and easy-to-use options will work wonders:
- Paint.net: A free and popular choice, especially for beginners. It’s easy to pick up and offers many helpful tools.
- GIMP (GNU Image Manipulation Program): Another free program, a bit more powerful than Paint.net, with more advanced features.
- Pixlr: An online photo editor that doesn’t require downloading anything. Great for working on the go.
- Krita: A free, open-source painting program with more advanced features suitable for complex clothing designs.
- MediBang Paint: A versatile program that works on various devices including phones and tablets.
Even if you have more robust programs like Photoshop, these programs are easier to start with. You’ll be making awesome clothes in no time!
Essential Design Techniques
Once you have your templates and software ready, it’s time to dive into design. Here are some essential techniques to help you create amazing clothing:
Color Choice and Harmony
Colors can make or break your design. Here are a few tips:
- Use Color Palettes: Instead of just picking random colors, find color palettes online or create your own. Palettes help you select colors that go well together.
- Consider Contrast: Use contrasting colors to make elements stand out. Light colors on dark backgrounds, or vice-versa, works really well.
- Think About the Theme: Is your design for a scary zombie, a cute character, or something else? Match your colors to the mood you are going for.
Shading and Highlights
Shading and highlights make your designs look more realistic and three-dimensional. Here’s how it works:
- Shadows: Add darker shades to the areas that would be in shadow, like under arms, below the neck, or where fabric folds.
- Highlights: Add lighter shades or white to areas that would catch the light, like the tops of shoulders, the center of the chest, or the edges of sleeves.
- Use Soft Brushes: Use soft brushes with low opacity for shading and highlights. This will help blend the tones and get a more natural look.
Creating Patterns and Textures
Patterns and textures add interest to your clothing. Here’s how to make them:
- Repeating Patterns: Create a small design and repeat it across the fabric. This works great for things like stripes, polka dots, or geometric patterns.
- Use Textures: Use textures to make your design look like it’s made of a specific material. You can find pre-made textures online, or create your own. Think about making your clothes look like they are made of fabric, leather, or even metal.
- Combine Patterns and Textures: Experiment with combining different patterns and textures to create unique clothing.
Working with Layers
Layers are a vital part of image editing and are very helpful in clothing design. Here’s how:
- Separate Design Elements: Use separate layers for different elements like colors, patterns, shading, and details. This makes editing much easier.
- Adjust and Edit: You can change the opacity or other aspects of a layer without affecting the other layers. It is so useful!
- Organize Layers: Label your layers so that you can find them more easily.
Advanced Roblox Clothing Design Tips
Now that you have the basics down, let’s look at some tips that can give your designs an extra edge. These methods will help you create some of the very best clothing on Roblox!
Custom Necklines and Collars
Don’t just stick to the basic template; get creative with necklines and collars! Here are ideas:
- V-Necks: Make a V-shape at the neck for a different look.
- Scoop Necks: Create a curved neckline for a more casual look.
- Collars: Design different types of collars, like turtlenecks, shirt collars, or even big, fancy collars.
- Experimenting: Do try different shapes and sizes. See what cool combinations you can make!
Adding Details and Accessories
Small details can make a big difference. Here are some examples:
- Pockets: Add pockets to shirts and pants.
- Buttons: Draw buttons on your shirts or jackets.
- Belts: Add belts around the waist.
- Zippers: Make zippers for jackets and other clothing.
- Jewelry: Incorporate necklaces, bracelets, or even small accessories on the clothing.
Creating Realistic Folds and Wrinkles
Clothes naturally have folds and wrinkles. Make your designs look more realistic by adding these:
- Lightly Shaded Lines: Add thin, lightly shaded lines where fabric would naturally crease, like near the elbows, waist, and knees.
- Varying Opacity: Vary the opacity of your lines so that they aren’t too dark. This creates a natural look.
- Use Reference Images: Look at real clothing to see how it folds and wrinkles, and try to reproduce those patterns on your designs.
Designing for Different Body Types
Roblox avatars come in many shapes and sizes, and it’s important to think about how your clothes will look on different ones. Here are some things to remember:
- Test Your Designs: Always test your designs on different avatar sizes. Create a test group in Roblox and ask friends to try your designs.
- Consider Proportions: Adjust your designs to look good on different avatars. Some details will need to be scaled up or down for different sizes.
- Flexibility: Make designs that can be adjusted and fit different body types.
Avoiding Common Mistakes
Even seasoned designers make mistakes sometimes. Here are some common problems and how to avoid them:
Pixelation Issues
Pixelation happens when your design is blurry or blocky, and it isn’t a good look. Here are tips to keep your designs crisp:
- Work with High Resolution: Start with a high-resolution template. It might be big, but you will need that resolution for editing and scaling down.
- Avoid Over-Scaling: Don’t stretch or enlarge your design too much. This will cause it to pixelate. If you need to enlarge an area, try to use interpolation to maintain clarity.
- Export Properly: Make sure to export your image in a format that preserves its clarity, like PNG.
Misaligned Designs
It’s important to make sure your clothing pieces line up correctly. Here’s how:
- Use the Template: Follow the template closely. If your lines don’t line up correctly, the clothes will not look right. Use lines as guides and refer to them often.
- Test Often: Always test your design in Roblox. It will help catch any alignment issues early.
- Adjust and Correct: If your design is misaligned, use the selection and transformation tools in your software to fix it.
Over-Complicated Designs
Sometimes, less is more. Over-complicating your designs can make them look cluttered and messy:
- Focus on Key Elements: Choose a few important elements and focus on those. Don’t try to add too much to one outfit.
- Keep It Simple: Simple designs can often be very effective. Don’t feel you always need to make complex outfits.
- Use Clean Lines: Clean, clear lines will always look better than a cluttered, messy design.
Ignoring User Feedback
Getting feedback is super helpful! When people tell you something, listen to them:
- Ask for Opinions: Before you upload your design, ask friends or other Roblox players for their feedback.
- Be Open to Changes: Don’t be afraid to change or improve your designs based on the comments you get.
- Learn from Criticism: Use the criticism to help you become a better designer.
Getting Your Designs Uploaded to Roblox
Okay, you’ve designed something awesome! Now, let’s get it into the game.
Joining the Roblox Premium Program
To upload clothes to Roblox, you usually need to be a member of the Roblox Premium Program. This program gives you special benefits, including the ability to create and sell clothes. Here’s why it’s important:
- Required to Upload: Premium membership is necessary to upload and sell your creations.
- Benefits: Besides clothing creation, you get other cool benefits, like a monthly Robux stipend and other exclusive perks.
- Check Costs: Keep up to date with the current subscription costs.
Uploading Your Designs
Once you have Premium membership, you can start uploading your designs. Here are the steps:
- Go to Create: Log into your Roblox account and go to the “Create” page. You’ll find it in the top menu.
- Select Clothing: Choose the type of clothing you are uploading. It can be a shirt, pants, or other item.
- Upload Your Template: Upload your finished image template.
- Name and Describe: Give your clothing design a name and a description. Be clear so people know what you’re selling.
- Set the Price: Decide how much Robux you’ll charge for your clothing.
- Confirm and Upload: Confirm your details and upload your clothing to the catalog.
Pricing Your Clothing
Setting the right price for your clothes can be tricky. Here are some pointers:
- Check the Market: Look at what other designers are charging for similar items.
- Consider the Time and Effort: Think about how much time and effort you put into creating your design, and price accordingly.
- Experiment with Prices: Try different price points to see what works best for you.
Promoting Your Clothing
Once you have uploaded your clothes, you need to promote them so that people will buy them. Here are some helpful things to do:
- Share on Social Media: Post your creations on your social media and ask people to go check them out on Roblox.
- Roblox Groups: Share your clothing in relevant Roblox groups. Look for groups related to clothing design.
- Run Ads: Consider running a small Roblox ad campaign to help get your clothing noticed.
By using these tips, you’ll be able to create impressive clothing that people will love to wear. Be patient, keep practicing, and never stop learning and experimenting. You can become a very skilled Roblox clothing designer!
Designing clothes on Roblox is a skill that gets better with practice. Don’t feel discouraged if your first few designs aren’t perfect. The key is to keep experimenting, learning from your mistakes, and always trying to improve. With these tips and techniques, you’ll create incredible outfits and contribute to the vibrant Roblox fashion community in no time. Have fun designing and keep on creating!
how to make ROBUX from DESIGNING CLOTHES | roblox designing tutorial (2024)
Final Thoughts
In short, start with clean templates. Use layers effectively to create depth. Color palettes should be planned ahead. Consider how the clothing will move on the avatar.
Experimentation is crucial for developing your style. Don’t be afraid to try new techniques. Pay close attention to detail. These will improve your overall design.
Finally, practicing regularly will hone your skills. These roblox clothing design tips will aid your journey. Use community feedback for further improvements.

