
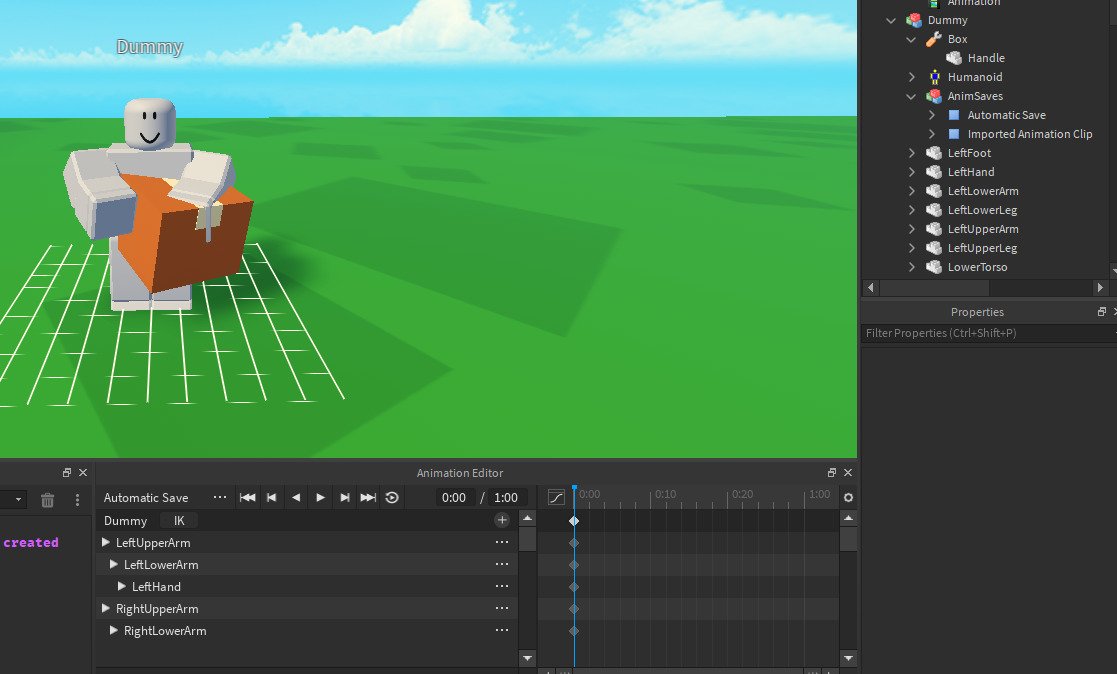
Creating Roblox custom animation involves using the Roblox animation editor to rig a character, pose it across keyframes, and then export the animation for use in your games.
Have you ever wanted to make your Roblox avatar move in a unique way? The standard animations are fine, but what if you want something more expressive and personalized? The world of roblox custom animation creation offers that exact possibility. You can bring your wildest ideas to life, from specific dance moves to unique combat sequences.
This process lets you craft truly memorable moments for players in your games. Learning to animate is an amazing skill, and it becomes a powerful tool for game development. It will improve the overall experience that users will have when playing your games, which is super awesome.

Roblox Custom Animation Creation: Bringing Your Characters to Life
Ever watched a Roblox game and thought, “Wow, that character moves so cool!”? That might be because the game developers used custom animations! Instead of just relying on the standard Roblox character movements, they designed their own special motions. You can do this too! Making your own animations lets your characters have unique personalities and actions. It’s like giving them their own special dance or a super cool way to run. This guide will take you on a journey into the fun world of custom animation creation in Roblox.
Why Create Custom Animations?
Why go to the effort of creating custom animations when Roblox already provides default ones? Well, there are lots of awesome reasons!
- Unique Characters: Custom animations make your game characters stand out. They won’t look like every other avatar.
- Enhanced Gameplay: You can make animations that fit the specific actions of your game. Think a special sword swing for a fighting game, or a funny wobble for a silly game.
- Storytelling: Animations can help you tell a story through character movement. Is your character happy? Sad? Scared? Their body language can show it!
- Professional Polish: Custom animations give your game a more professional and polished look. It shows players that you really care about the details.
- Creativity: It’s a fun way to be creative and see your imagination come to life!
Tools You’ll Need for Animation Creation
Before we get started, let’s gather the tools we’ll need. The most important tool is Roblox Studio! This is where all the animation magic happens. Here’s a more detailed look:
Roblox Studio: Your Animation Workshop
Roblox Studio is the free program that lets you build and create within the Roblox ecosystem. Think of it as your digital art studio. It includes all the tools you need to make games, including an animation editor. To get it, just go to the Roblox website and follow the download instructions. It’s like getting your very own set of art supplies, just for video games!
The Animation Editor: Where the Magic Happens
Inside Roblox Studio, there’s a special tool called the Animation Editor. It’s like a digital puppet studio where you control how your character moves. You can find the Animation Editor by going to the “Plugins” tab at the top of Roblox Studio, then click on “Animation Editor.” This brings up a window where you’ll see a timeline, a character model, and different tools to manipulate it. You can move the character’s limbs, rotate the body, and even change the position of its head! This is where you’ll bring your character to life.
Understanding the Character Model
Before you start animating, you need to understand the model you’ll be using. Most commonly, you’ll be working with the standard Roblox R15 or R6 model. R15 characters have more joints and allow for smoother, more complex animations. R6 characters are simpler and have fewer joints. It’s like the difference between a posable action figure with lots of movement and one that’s more basic. Knowing the joints and how they move will help you create more natural looking animations.
Keyframes: The Building Blocks of Animation
Keyframes are like snapshots of your character at different moments in time. When you make an animation, you move the character and record that position as a keyframe. The computer then fills in the gaps between the keyframes, creating the illusion of movement. Think of it like drawing a flipbook. You draw a series of images and when you flip through them, it looks like they are moving!
Timeline: Sequencing Your Animation
The timeline in the Animation Editor shows the sequence of your keyframes. It’s like a map that shows how your animation unfolds over time. You move the playhead (a little line on the timeline) to see different points in your animation, and you can add keyframes to create the movements you want. You can adjust the timing, and see how long the animation goes by changing the time length of it. This helps you control the pacing of the animation.
Animation Properties
Understanding the different properties of an animation is important. These include:
- Position: Where a part of the character is located in space.
- Rotation: How a part is turned or angled.
- Scaling: How large or small a part is. While less used in typical animation, you can use scaling to create some interesting effects.
Starting Your First Animation
Now that you know the tools, it’s time to get animating! Here’s a simple example to get you going.
Creating a Simple Wave Animation
Let’s start with a very simple animation, a wave. Here are the steps:
- Open Roblox Studio: Launch Roblox Studio and create a new game or open a game you are already working on.
- Add a Character: Insert a character model into your workspace. You can use the Play button (the little triangle) to load a character.
- Open the Animation Editor: Go to the “Plugins” tab and click on “Animation Editor.”
- Select Your Character: The Animation Editor will ask you to select which model you want to animate. Click on your character to begin.
- Create the First Keyframe: The first keyframe is usually the character’s starting pose. You do not have to do anything for this keyframe, as it automatically takes the model’s starting position.
- Move the Playhead: Move the playhead to a different time on the timeline (like 0.5 seconds). This is where the wave will begin to form.
- Move the Arm: Click on your character’s arm. You’ll see arrows and circles appear on it. Use the circles to rotate the arm up, like the character is starting to wave. A new keyframe will be automatically created.
- Move the Playhead Again: Move the playhead forward again (like 1 second).
- Move the Arm Back Down: Rotate the arm down, and the hand down to finish the wave. A new keyframe will be made.
- Preview Your Animation: Press the Play button at the bottom of the Animation Editor to see your wave animation!
- Save Your Animation: After you are done with the animation, click on the “…” next to the animation name, and choose “Save.” This saves the animation to your Roblox game.
Congratulations, you’ve just created a simple custom animation! The key is to experiment and have fun. You can keep adding keyframes and moving the arm in different directions to create more complex waving movements, such as a loop. You are now on your way to making more and more complex animations!
Making Animations Smoother
Sometimes, animations can look jerky or stiff. That’s not what we want. How do you make the movements look smoother and more natural? Here are some tips.
Easing
Easing is a technique that helps make the transitions between keyframes smoother. Instead of an arm jumping directly from one position to another, easing makes the arm smoothly accelerate or decelerate into that position. It’s like making sure a car doesn’t go from 0 to 60 mph instantly. Instead, it gradually picks up speed. There are different types of easing, like “ease in” (slow start), “ease out” (slow end), and “ease in and out” (slow start and slow end). Experiment with them to see which one works best for your animation. You can see these options when you are editing a keyframe in the animation editor.
Overlapping Actions
In real life, different parts of your body don’t move at exactly the same time. For instance, when you wave, your arm starts moving before your hand does, and your fingers might lag a little bit behind. This concept is called overlapping actions. To add this to your animation, you should offset the keyframes for different body parts. Make a keyframe where the arm starts moving, and then slightly offset the keyframes for the hand and fingers so they don’t move exactly at the same time as the arm. It will make the animation feel much more natural and life-like!
Using Arcs
When we move, our body parts usually move in arcs rather than straight lines. Think about the path your hand takes when you swing it, it’s a curved path, not a straight line. To make your animations look better, try to move your character’s limbs in a curved path. When creating your keyframes, make sure you make small incremental movements, rather than making the limbs move in a straight path, this will help make the motion appear more natural.
Practice
Like all things, it takes time to improve, so don’t get discouraged if your first animations aren’t perfect. The more you practice and experiment, the better you will get. Try recreating real-life movements, such as running, walking, or jumping, or try to recreate animations from other games. This can help you better understand how to create smooth and natural animations.
Advanced Animation Techniques
Once you get the hang of the basics, you can start experimenting with more advanced animation techniques. Let’s take a look.
Working with Loops
Many animations need to repeat, like a walk cycle or an idle animation. These are called looping animations. Instead of manually making each repetition, you can create a loop. When you save your animation, you can select it to be looped. By carefully arranging your keyframes, you can make sure the beginning and end of your animation blend together seamlessly. This way, your animations can loop flawlessly. Imagine if you had to make a person take every single step of every walk cycle manually, it would take an eternity! Looping animations will save you so much time.
Layering Animations
In some games, you might want to combine multiple animations together. For example, you might have a character walk and talk at the same time. This is where layering animations comes in. Roblox allows you to play multiple animations on top of each other. This way you can add secondary animations that go with a base animation. When playing multiple animations at the same time, you will want to make sure to prioritize specific animations so that they override other animations when they are needed.
Using Custom Animation Scripts
While the Animation Editor is great, sometimes you need scripts to control animations in more complex ways. For example, you might want an animation to play only when a character is holding a specific tool or only after a certain amount of time. You can do this by writing code in Lua to control when animations start, stop, or blend with each other. It might seem intimidating, but there are tons of tutorials online that can help you learn Lua scripting.
Inverse Kinematics (IK)
Inverse Kinematics, or IK, is a technique that can make the animation of your character’s limbs much easier. Instead of moving each joint individually, you can move the character’s hand or foot, and the rest of the arm or leg will adjust automatically. This makes it easy to create more natural and fluid movements without manually adjusting every joint. While not available within the standard animation editor, you can use plugins that provide IK functionality. This allows you to create more complex animations. IK is very popular among professional animators, and will be great to add to your animation knowledge.
Optimizing Your Animations
Creating good animations is great, but it’s also important to make sure they run smoothly in your game. Here are some tips to optimize your animations.
Reducing Keyframe Counts
The more keyframes an animation has, the more work your computer has to do to calculate the movement. If you have a huge number of keyframes, it can slow down your game. Try to reduce the number of keyframes without sacrificing the quality of the animation. Sometimes it’s better to rely on easing to smooth out movements rather than using many keyframes.
Avoid Unnecessary Complexity
Complex animations may look cool, but they can also be resource-intensive. Try to find a balance between visual appeal and performance. If you can achieve a similar result with a less complex animation, that’s often the better choice. Less is sometimes more when it comes to game optimization.
Testing Performance
Always test your animations on different devices. Sometimes an animation that runs perfectly on a powerful computer might struggle on a phone or a less powerful device. This is very important if you want a wide audience to play your games. Make sure your animations run smoothly on all devices to make your game enjoyable for all players.
Tips and Tricks for Better Animations
Here are a few extra tips that can help you improve your animation skills:
- Observe real life: Pay attention to how people move in real life. Watch how they walk, jump, and interact with objects. This can give you great ideas for animations.
- Study professional animation: Watch movies, video games, and cartoons to see how the pros do it. Learn from their techniques and try to recreate them in your own way.
- Use references: Use videos or images as references to make sure you get your animations accurate and natural.
- Join the Roblox community: Join online Roblox communities and forums where you can share your work, get feedback, and learn from other animators.
- Don’t give up: Animation takes time and practice. Don’t get discouraged if you don’t see the results right away, just keep working and you will improve over time.
Creating custom animations in Roblox is an exciting process that can really make your games stand out. It’s like being a digital puppeteer and bringing your own characters to life. Remember to start with the basics, experiment often, and don’t be afraid to make mistakes. With time and dedication, you’ll be animating like a pro!
The ULTIMATE Beginner's Guide to Animating in Roblox Studio
Final Thoughts
Creating custom animations in Roblox empowers players. It provides unique character expressions and movements. This process enhances game immersion and personalizes experiences.
Roblox custom animation creation allows for truly bespoke avatars. You can design movements tailored to your game’s specific needs. This increases creative possibilities for developers.
The power to animate directly influences player engagement and enjoyment. By investing in learning custom animation techniques, creators enrich their Roblox worlds significantly.

