
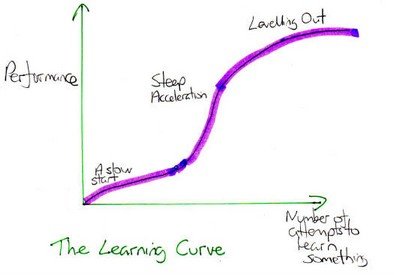
Designing a smooth Roblox difficulty curve involves gradually increasing challenge, introducing new mechanics step-by-step, and providing clear feedback to players.
Creating engaging games on Roblox requires careful planning, especially when it comes to difficulty. A poorly designed experience can quickly frustrate players, causing them to leave. The nuances of roblox difficulty curve design are crucial for player retention.
Balancing challenge and accessibility is vital. Start with easy tasks, then introduce new elements slowly. Provide tutorials and helpful tips as you go. Players need to feel challenged but not overwhelmed.
Finally, monitoring player feedback will allow for tweaks and refinements. Analyze data to ensure you’re maintaining a satisfying roblox difficulty curve design.

Roblox Difficulty Curve Design
Designing a good difficulty curve in Roblox is super important for making a game fun and engaging. Think of it like a roller coaster – you want some ups and downs, but you don’t want it to be so scary that people get off right away, and you also don’t want it to be so boring that they fall asleep. A good difficulty curve gradually introduces challenges, keeps players interested, and makes them feel accomplished. This means carefully planning when to introduce new obstacles, enemies, or puzzles so that players feel like they’re always learning and improving, and aren’t stuck with frustrating tasks without any help. Let’s dive deep into what it takes to create that perfectly balanced Roblox experience.
Understanding the Basics of Difficulty Curves
Before we get into the nitty-gritty of creating a difficulty curve in Roblox, it’s essential to understand what a difficulty curve actually is. Imagine a graph where the horizontal line represents time or player progression, and the vertical line shows the game’s difficulty level. A difficulty curve is the line that represents how the game’s difficulty changes over time. A well-designed curve starts low and gradually increases as players gain experience and skills. Think about learning a new song on the piano. You wouldn’t start with a super complicated piece, right? You’d start with something easy, learn the basics, and then move on to harder things. This is the same idea behind a good game difficulty curve.
Linear vs. Exponential Difficulty Curves
There are generally two types of difficulty curve structures – linear and exponential.
Linear Difficulty Curve: This is a steady climb. Imagine climbing a hill that slowly gets steeper. In a game, this means the challenge increases at a consistent rate. Each level or stage is just a little bit harder than the last. It’s predictable and easy for players to anticipate. This type of curve works well for games where consistency is key.
Exponential Difficulty Curve: This is like a rocket taking off. The difficulty ramps up quickly. In the game world, this means the game starts easy, but the challenges get hard very fast. This type is often used in action games, where the game wants to test the player’s skills and give them a real challenge. However, it’s important to be careful. An exponential curve that increases too quickly can turn players away.
Choosing the right type depends on your game’s genre and the experience you want to give your players. For most Roblox games, a blend of linear and exponential progression often works best. Start with a linear curve in the very beginning, then introduce a more exponential curve as the players progress into the mid and late game.
Why is a Good Curve So Important?
A poorly designed difficulty curve can ruin a game. Here’s why it’s so important to get it right:
Engagement: A well-paced curve keeps players engaged and coming back for more. If the game is too easy, they’ll get bored. If it’s too hard, they’ll get frustrated and leave.
Learning: A gentle curve allows players to learn game mechanics at their own pace. It introduces new challenges that build upon previous ones. This helps them feel in control of their progress and increases a feeling of accomplishment.
Retention: A satisfying difficulty curve leads to better retention. Players feel like they’re getting better at the game and are motivated to keep playing. When a player feels the progress, they are more willing to keep trying and investing time in the game.
Positive Experience: Ultimately, a good difficulty curve makes the game more fun and rewarding. It creates a positive player experience. A positive experience means more players will recommend it to others.
Key Elements in Roblox Difficulty Curve Design
Designing a perfect difficulty curve is more than just making enemies stronger each level. Several key components contribute to a balanced and enjoyable experience. Let’s explore these:
Progressive Skill Introduction
Don’t throw all the game mechanics at players at once. Instead, introduce them gradually, each building on what they’ve previously learned. Think of a tutorial – it’s not meant to show everything all at once. It begins with the basics. A well-paced curve allows players to master each new game mechanic before adding another level of complication. For example, in a fighting game, players may begin with basic attacks, then learn special moves, combos, and then defense techniques, one after the other.
Challenge Variation
Variety is the spice of gaming! Don’t rely on just one type of challenge. Mix it up with different types of enemies, puzzles, obstacles, or level designs. If a game only has stronger and stronger enemies, it can get boring. Introduce elements that require different skills or strategies. A game with multiple types of challenges makes the gameplay feel much more interesting.
Here are a few examples of how to vary challenges in a Roblox game:
Enemy Variety: Introduce enemies with different attack patterns, speeds, or strengths. Some enemies might be fast, some might be strong, and others might require players to use specific tactics to beat them.
Puzzle Elements: Include puzzles that players need to solve to proceed. Puzzles can test a different type of skill and offer a welcome break from combat or fast paced action.
Obstacle Courses: Use obstacle courses that require platforming or navigating complex paths. These test different skills and encourage the player to try out new moves.
Environmental Challenges: Use the environment as a challenge. Some areas might be very dark, others might have slippery floors, and so on.
Resource Management
Resource management can add another layer of difficulty. Make players think about how they use limited resources like health potions, ammo, or building materials. Gradually increase the stakes as the game progresses. This forces players to learn to manage their resources properly to avoid running out when they need it most. Early in the game, resources may be plentiful, but later on, players must learn to collect and spend them carefully.
Feedback and Learning Opportunities
Players need to understand what they’re doing right or wrong. Provide clear feedback when they succeed and when they fail. This could include things like:
Visual Feedback: Display how much damage they’re doing to enemies, if they are hitting the targets, and effects when they get hit.
Audio Feedback: Play different sounds depending on their actions and their progress.
Tips and Hints: Give players hints if they’re stuck. But don’t just give it to them outright. Make them explore before revealing the answer.
Learning from mistakes is an important part of the process. Make sure that players can easily try again when they fail. Try to add ways to practice a skill or specific area without the need to redo the entire level from the very beginning.
Testing and Iteration
Never assume your initial curve is perfect. Testing is very important. Get feedback from players and adjust based on their experience. This is where playtesting comes in handy. Watch how players interact with your game and note where they struggle or get bored. Iterate on your design based on this feedback. The best difficulty curves are often the ones that have been refined over time. The playtesting phase can help you see the areas where the game feels too easy or too difficult for a player.
Practical Steps for Designing a Roblox Difficulty Curve
Now that we know about all the basics and the key elements, let’s put them into practice. Here are some practical steps to follow:
Step 1: Define Your Game’s Scope and Target Audience
Before you start designing the difficulty curve, be clear on:
Game Genre: Is it an action game, a puzzle game, an RPG, or something else? Each genre has its own expectations for difficulty.
Target Audience: Who are you making this game for? Are they experienced Roblox players, newcomers, or kids? What level of challenge are they comfortable with?
Desired Player Experience: What do you want players to feel when playing? Do you want them to feel excited, challenged, relaxed, or something else?
Knowing your game and its audience will help you make better design choices. A game made for younger audiences will likely require a gentler difficulty curve than one designed for experienced players.
Step 2: Map Out the Core Progression
Decide how players will progress through the game. This will be your framework for the difficulty curve.
Levels or Stages: Divide your game into levels, stages, or areas.
Key Milestones: Identify milestones, like boss fights, new skills or mechanics, or major story points.
Progression System: Determine how players will progress (e.g., leveling up, gaining new items, completing quests).
Here’s a simple example using a level-based system:
| Level/Stage | Key Focus | Difficulty Level |
| :———- | :————————- | :————— |
| Level 1 | Basic movement and actions | Very Easy |
| Level 2 | First simple challenge | Easy |
| Level 3-5 | Gradual introduction of new enemies and mechanics | Medium |
| Level 6-8 | Introduction of harder puzzles and challenges | Medium – Hard |
| Level 9-10 | Mid-game boss fight | Hard |
| Level 11+ | Advanced challenges and new mechanics | Very Hard |
Step 3: Implement a Scalable System
Create a system that allows you to easily adjust the game’s difficulty. Avoid hard-coding specific values. Using variables to define things like enemy health, damage, and speed will allow you to scale the difficulty as needed. If you want the game to be easier or harder, you just change the value of that variable.
Here are some good example systems to work with:
Enemy Stats: Make enemy health, damage, and speed adjustable through a single variable.
Resource Drops: Control the frequency and amount of resource drops using a variable.
Challenge Frequency: Control the frequency at which new challenges appear throughout the level.
Puzzle Complexity: Use a variable to increase the number of steps needed to solve a puzzle as the player progresses.
Step 4: Introduce New Elements Gradually
Don’t throw too much at players at once. Space out the introduction of new enemies, mechanics, and challenges. This way, the game will never feel too overwhelming. Start with the basics, then build on them.
For example, in a platformer, you could start with simple jumps, then introduce moving platforms, then timed jumps, and so on. For an RPG, you could start with basic combat, then introduce special abilities, and then tactical combat options.
Step 5: Test, Analyze, and Iterate
Testing and getting feedback are really important. After implementing a difficulty curve, try these things:
Playtest: Have different people of varying skills play your game and give feedback.
Observe: Watch how players interact with the game. Where do they struggle? Where do they excel?
Collect Data: Record data like the time to complete a level, the number of deaths, and so on. This data can help you find places where the difficulty is not balanced.
Analyze: Look at the playtesting and data you’ve collected. Analyze it and figure out if there are any changes you need to make.
Adjust: Make changes as needed based on the feedback and data. Don’t be afraid to tweak the difficulty values.
Repeat: Keep testing, analyzing, and adjusting. The best difficulty curves are often achieved through a cycle of play, observe and improve.
Step 6: Monitor Player Feedback after Launch
Once your game is launched, monitor player reviews and comments. Are they saying it’s too easy, too hard, or just right? Pay close attention to feedback, and be ready to tweak your difficulty curve. Listen to what players say and use that info to make improvements.
Specific Examples in Roblox
Let’s look at how these principles can be applied to different types of Roblox games:
Tycoon Games
In tycoon games, the difficulty curve is often tied to the player’s ability to produce and manage resources.
Early Game: Start with a basic setup and easily acquired resources. The initial goals should be straightforward and easy to achieve.
Mid Game: Introduce more complex production chains and higher resource requirements. Players should start having to optimize their setup.
Late Game: Introduce expensive upgrades and challenges that require complex resource management. Players might start optimizing production and look for ways to become more efficient.
Simulator Games
Simulator games often rely on repetition with a gentle progression system.
Early Game: Start with very simple tasks and rewards. Players will quickly get a feel for how the game works.
Mid Game: Introduce more varied tasks, higher level areas, and new skills. Players will now have to adapt to the new changes that come in the mid-game.
Late Game: Introduce very high-level challenges and rewards. The game becomes all about optimizing and achieving maximum levels.
Adventure/RPG Games
Adventure and RPG games often rely on storytelling and varied challenges.
Early Game: Introduce easy combat and puzzles. The story and the basic mechanics of the game are introduced at this point.
Mid Game: Introduce harder enemies and more complex puzzles. The challenges and rewards will be greatly increased.
Late Game: Introduce difficult boss fights and challenges that require specific strategies. The game now requires more planning and focus from the player.
Fighting Games
Fighting games need to have a learning curve that slowly introduces players to advanced moves.
Early Game: Players start with basic attacks and movement.
Mid Game: Introduce special moves and combos. Players should now begin to use more than just simple attacks.
Late Game: Introduce more advanced techniques and strategies, like advanced combos and mind games.
Designing a good difficulty curve for Roblox games is definitely challenging, but it’s also very rewarding. Players will have a better and more satisfying gaming experience. When players have a good experience, they are more likely to tell their friends about the game and keep playing it for longer.
By understanding the key principles, focusing on gradual progression, varying challenges, and carefully testing, you can create games that players love and continue to play again and again. Creating and maintaining a great difficulty curve takes time and effort, but it’s important for making your game shine.
This should provide a comprehensive look at Roblox difficulty curve design and help you create amazing experiences for your players.
Best Roblox Studio Plugins! #shorts
Final Thoughts
Effective Roblox difficulty curve design requires careful planning. Designers must gradually introduce mechanics and challenges. A smooth progression prevents player frustration.
Balancing difficulty involves considering various player skills. Developers should test their designs thoroughly. This helps fine-tune the experience.
Ultimately, thoughtful roblox difficulty curve design is crucial for player engagement. This can be tricky but ultimately a rewarding process.

