For the best visuals and performance on a high-end PC in Starfield, prioritize setting graphics to ‘Ultra’ for most options, but consider lowering ‘Shadow Quality’ and ‘Indirect Lighting’ to ‘High’ for increased framerates without significant visual loss.
Struggling to get the most out of Starfield on your powerful rig? You’re not alone, many players are fine-tuning their game. Finding the optimal balance of visual fidelity and performance can feel like a mission itself. This guide aims to help with determining ‘Starfield best settings for high end pc’.
We understand that a top-tier setup deserves the best experience. We will address settings that might cause unnecessary stress to your PC.

Starfield Best Settings for High End PC
Alright, space explorers! You’ve got a beast of a gaming rig, a high-end PC ready to take on the vast universe of Starfield. But even the most powerful machines need a little guidance to make the game look and run its absolute best. It’s not just about cranking everything to “Ultra” and hoping for the best. Optimizing your settings can make a huge difference between a smooth, immersive experience and a slideshow in the stars. Let’s dive in and figure out how to make Starfield shine on your powerful PC.
Understanding Starfield’s Graphics Options
Starfield’s graphics menu has a lot of options, which can feel overwhelming at first. But don’t worry, we’ll break them down step by step. Think of these settings as different levers, each one controlling a different aspect of how the game looks and how hard it works your PC. Some have a big impact on performance, while others have a more subtle effect. Knowing which settings to adjust is key to achieving that sweet spot between amazing visuals and silky-smooth gameplay.
The Crucial Graphics Settings
Let’s explore the settings that make a significant difference in Starfield’s performance and visual fidelity. These are the dials you’ll want to carefully adjust, especially if you’re trying to find the best balance for your high-end PC.
Shadow Quality
Shadows add depth and realism to any game, and Starfield is no exception. However, they also place a considerable load on your GPU. Here’s how to approach Shadow Quality:
- Ultra: This setting gives you the most detailed and accurate shadows, casting shadows from even the smallest objects. It looks fantastic, but it can be very demanding. If your PC is truly high-end, and you aren’t experiencing performance drops, go for it.
- High: High provides shadows that still look great, but with slightly less detail than Ultra. You might not even notice much of a difference, but it can save some performance. This is a good starting point for many high-end PCs.
- Medium and Low: These options reduce shadow detail further, which can lead to better performance on lower-end machines. However, the loss in visual fidelity might be noticeable, especially on a high-end PC, which is why we might not want to explore them much here.
Recommendation: Start with High for Shadow Quality. If you’re still getting great performance, try Ultra. If you’re experiencing any dips in performance, switch back to High. On a high-end PC, you can usually run high without any problems, but it’s best to test it out.
Indirect Lighting
Indirect lighting (also sometimes called ambient occlusion) affects how light bounces around a scene, creating more realistic shadows and depth, especially in corners and crevices. This can make a big difference in how immersive a game looks. Here’s the breakdown:
- Ultra: Provides the most accurate and detailed indirect lighting, making the game world feel more natural and realistic. But it can be taxing on even high-end GPUs.
- High: Offers a good balance of quality and performance. Most users might find this to be a sweet spot on a powerful PC.
- Medium and Low: These settings reduce the quality of indirect lighting and may result in a flatter looking image. Avoid these options if you’re running a high-end setup.
Recommendation: On a high-end PC, High is usually the best place to start. Test Ultra and see if you notice any performance hits. If you are not sure, stick with High.
Reflections
Reflections add a whole new dimension to the visuals in the game, especially on reflective surfaces like metal and water. It can make a significant difference in the look and feel of the world. Here’s what you need to know:
- Ultra: Provides the most accurate and high-quality reflections. This setting is demanding but looks incredible.
- High: Offers excellent quality reflections with a little less detail, providing better performance than Ultra.
- Medium and Low: These options significantly reduce reflection quality and can make surfaces look unrealistic. If you are using a high-end PC, it’s better to avoid these settings.
Recommendation: High is a safe choice for most high-end PCs. If your PC is really top-of-the-line and you’re not seeing any issues, try Ultra. If you’re experiencing any stutters, reduce it to High.
Particle Quality
Particle effects are all over Starfield, from weapon fire to spaceship engines. They bring the game to life, but a lot of particles at once can push your CPU and GPU to their limits. Let’s see what options you have:
- Ultra: Shows the most detailed and complex particle effects. Great for immersion, but it can be demanding.
- High: Offers high quality and detail, but it simplifies the particles a little to help with performance. It’s a good balance for most high-end PCs.
- Medium and Low: Reduces the number and complexity of particle effects to improve performance on lower-end machines. It can significantly affect the visual experience.
Recommendation: Start with High. If you don’t see a performance hit, try Ultra. If you get any lag, switch back to High. Particles can quickly become too much for some systems, so it’s important to find the right balance.
Texture Quality
Texture quality dictates how sharp and detailed the surfaces look in the game. This is one setting where most high-end PCs can flex their muscles. Here’s the breakdown:
- Ultra: Provides the highest resolution textures, giving you the crispest and most detailed look. This is usually not an issue for high-end PCs as modern GPUs have more than enough video memory for that.
- High: Offers high quality textures, but not as detailed as Ultra. There is usually not that much visible difference. This will free a little bit of video memory for other tasks.
- Medium and Low: Reduce the resolution and detail of textures. This makes the game appear blurry, especially on a higher resolution display. Avoid these settings on a high-end PC.
Recommendation: For high-end PCs, Ultra is generally the way to go. If you do notice any performance issues, switching to High might provide some very little boost but usually it is not necessary to do so.
Volumetric Lighting
Volumetric lighting, sometimes called god rays, creates a dramatic sense of light and atmosphere in the game, especially in areas with dust or fog. Here’s what you need to know:
- Ultra: Provides the most detailed and dramatic volumetric lighting, adding a lot to the visual experience. However, it can be quite resource-intensive.
- High: Offers good quality volumetric lighting but with a bit less complexity, giving better performance than the Ultra setting.
- Medium and Low: Reduces the quality and detail of volumetric lighting. This reduces performance load, but affects the appearance of scenes. If you are using a high-end PC, you should avoid using these settings.
Recommendation: High provides a good balance between visual quality and performance on a high-end setup. If you have an exceptionally powerful system, test Ultra to see if it causes any issues. If it is the case, then go back to high.
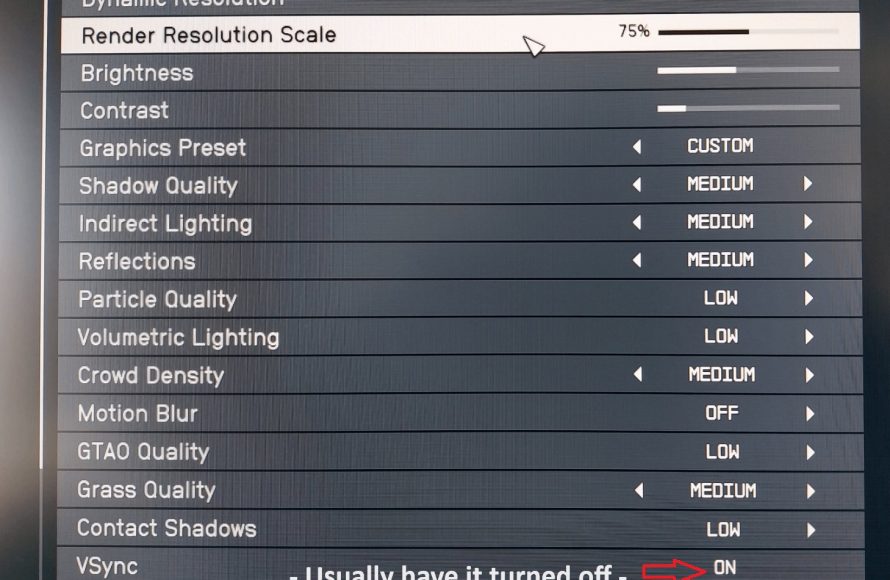
Render Resolution
Render resolution is how many pixels your game is actually rendered at before it’s upscaled to your display resolution. A higher render resolution means more detail, but it also means more work for your PC. Here’s how it works:
- 100%: This means the game is rendered at the same resolution as your monitor (e.g., 1920×1080 for a 1080p display, 3840×2160 for a 4K display). This gives you the sharpest image possible and is the best option for a high-end PC.
- Lower percentages: Reduces the rendering resolution and then upscales to your monitor resolution. This can help a lot if you’re struggling to maintain a stable framerate. However, it will make the game look blurrier. You should avoid this as far as you can on a high-end PC.
Recommendation: Always keep this at 100% on a high-end PC. If you need to lower it, you probably have other bottlenecks in the system or your PC is not a high end one.
Motion Blur
Motion blur creates the illusion of movement by blurring fast moving objects. It might be the best for some players, while others hate it. Here is what you need to know:
- On: The game will add motion blur, which can feel more immersive, but can also make the game less clear if you are not used to it.
- Off: Disables the motion blur, so the game will be more clear. Some people prefer this because of clarity.
Recommendation: It’s really just a matter of personal preference. Try it out and see if you like it. You will lose no performance by turning it off, but it can sometimes help some people to get more immersed.
Film Grain
Film Grain adds a noise effect over the game which can make the game feel more cinematic for some people and less clear for others.
- On: Adds the film grain effect.
- Off: Turns the effect off.
Recommendation: Similar to the motion blur, this is a matter of taste. Try it out and see if you like it. It doesn’t affect the performance of the game.
Upscaling
Upscaling is used to reduce the rendering resolution to then upscale the image to your screen resolution. This helps to improve performance, but at a cost of image quality. The options here are:
- FSR2: This upscaling technique is developed by AMD and provides good image quality with an increase in performance.
- DLAA: Nvidia’s Deep Learning Anti-Aliasing. This makes the image clearer. This setting is great on high-end PCs.
- Off: No upscaling is applied. The game will render at your set resolution. This is best for the highest image quality, but it requires more resources.
Recommendation: If you have an Nvidia card and your PC is really powerful, then use DLAA. If not or if you are using an AMD GPU, then use FSR2. It’s best to only turn this setting off if you have an incredibly powerful setup.
Optimizing Your Settings for Specific Hardware
While the settings described above are applicable to almost every high-end PC, sometimes, some specific components might need some extra attention. Let’s discuss some adjustments you might need to make based on your components.
CPU Considerations
Starfield can be quite CPU-intensive, especially in densely populated areas or when you’re traveling between planets. Here’s how to fine-tune settings if your CPU is being pushed to its limit:
- Reduce NPC Count: If you are still experiencing performance hits with good GPU, then it might be time to look at the CPU utilization. Reduce the number of NPC characters or details in settlements, this should greatly reduce the CPU load.
- Reduce Physics: If you are experiencing performance drops especially when exploring complex areas with many objects. Then it might help to reduce some of the game physics, such as the number of physical objects and details.
If you’re using a processor with fewer cores or lower clock speeds, consider lowering some of the CPU-intensive graphical settings like volumetric lighting or particle quality. These effects rely heavily on your CPU.
GPU Considerations
Your graphics card is the workhorse for most of Starfield’s graphical load. It renders everything you see, which makes it one of the most crucial components for Starfield performance. Here’s some advice:
- Check VRAM Usage: Keep an eye on your VRAM usage, especially if you are using a card with less than 10GB of video memory. Reduce Texture Quality if your VRAM usage is too high.
- Monitor GPU Load: If your GPU is running hot or at near 100% load, try reducing some of the demanding settings like reflections or shadows.
If you have a powerful GPU with lots of video memory, you can crank up texture quality, reflections, and shadow details. But keep an eye on your FPS and temperatures. If your GPU is struggling, reduce some of the settings mentioned earlier.
RAM Considerations
Having enough RAM is crucial for a smooth gaming experience. Starfield is a memory-heavy game and requires a lot of RAM. Here are a few tips:
- 16 GB of RAM: This is considered the bare minimum nowadays for gaming. It will run the game well enough, but the experience can be much better with a higher amount of RAM.
- 32 GB of RAM: The recommended amount of RAM for Starfield, especially for higher resolutions like 1440p and 4K. This amount of memory will ensure a stutter-free experience and is a highly recommended option.
- 64+ GB of RAM: This amount of RAM might not be necessary at the moment, but if you are planning to mod your game or just want to go above the standard, then it will be beneficial.
If you notice high RAM usage while playing, try closing unnecessary programs running in the background. Having enough RAM will ensure that the game runs smoothly, without any unexpected performance dips.
Advanced Tweaking: Configuration Files
For the tech-savvy users out there, you can get even more control over Starfield’s performance by tweaking its configuration files. This is an advanced technique, so proceed with caution. We might be able to adjust settings that are not available in the game menu, but that also means that there is a risk of breaking the game. Do this at your own risk.
Finding the Configuration Files
Starfield’s configuration files are usually located in your “Documents\My Games\Starfield” folder. Within this folder, you’ll find various INI files, like “StarfieldPrefs.ini” and “StarfieldCustom.ini”.
Useful Tweaks
Here are some specific tweaks that can impact the game’s performance:
- FidelityFX Sharpening: You can adjust the level of sharpening using the “fSharpen” variable in the INI file. This can help make the game look clearer if you find it too blurry. Values above 1 can make it too sharp and unrealistic. Start with small changes between 0.1 and 0.5 to find the perfect sweet spot.
- Disable God Rays: If you want to completely turn off volumetric lighting (God Rays), you can use the “bVolumetricLightingEnable=0” option in the configuration file. This can be helpful if you are running a weaker CPU.
Remember, always back up your original configuration files before making any changes. If something goes wrong, you can always revert back to the original settings.
Testing and Fine-Tuning
The best settings for Starfield on your high-end PC are the ones that work best for you. That means you need to test and fine-tune your settings. Here’s how:
- Start with a Baseline: Begin with the recommended settings we’ve outlined. Then, take the game into an area that you think it is the most demanding. It can be a city or an open area with many objects, like a battle. This will show you the worst case performance scenarios.
- Make Small Changes: Adjust one setting at a time and monitor its impact on performance. Making a change to a single setting will show you if that setting is causing a performance hit or not.
- Monitor Performance: Use monitoring software to keep an eye on your CPU and GPU temperatures, utilization, and framerate. This will help you see what’s happening inside of your machine and how the settings affect the performance.
- Don’t Be Afraid to Experiment: Try different combinations of settings to find the perfect balance between visuals and performance. Everyone has their own opinion, and there is no one way to play the game.
Remember that every system is a little bit different, so what works perfectly for one setup might need slight tweaks to work best on yours. The key is to be patient, test, and adjust until you find the sweet spot.
And that’s it! You’re now well-equipped to fine-tune Starfield’s graphics settings on your high-end PC. Remember, achieving the perfect balance is about understanding how each setting impacts both performance and visual fidelity. By carefully adjusting these settings and doing some experimenting, you can ensure that your journey through the stars is as smooth and beautiful as possible.
Starfield – Massive FPS BOOST Changing This Single Setting
Final Thoughts
For optimal visuals and performance on high-end PCs, prioritize ultra settings and enable features like dynamic resolution. Reduce unnecessary background processes for smoother gameplay. Fine-tuning shadows and reflections can also provide a visual boost without significant performance cost.
Experiment with these adjustments to achieve your personal preference. Find the sweet spot for gameplay and visual fidelity by testing various combinations. Remember, the ‘Starfield best settings for high end pc’ configuration can vary based on specific hardware. Consider your unique setup and make alterations accordingly.

