
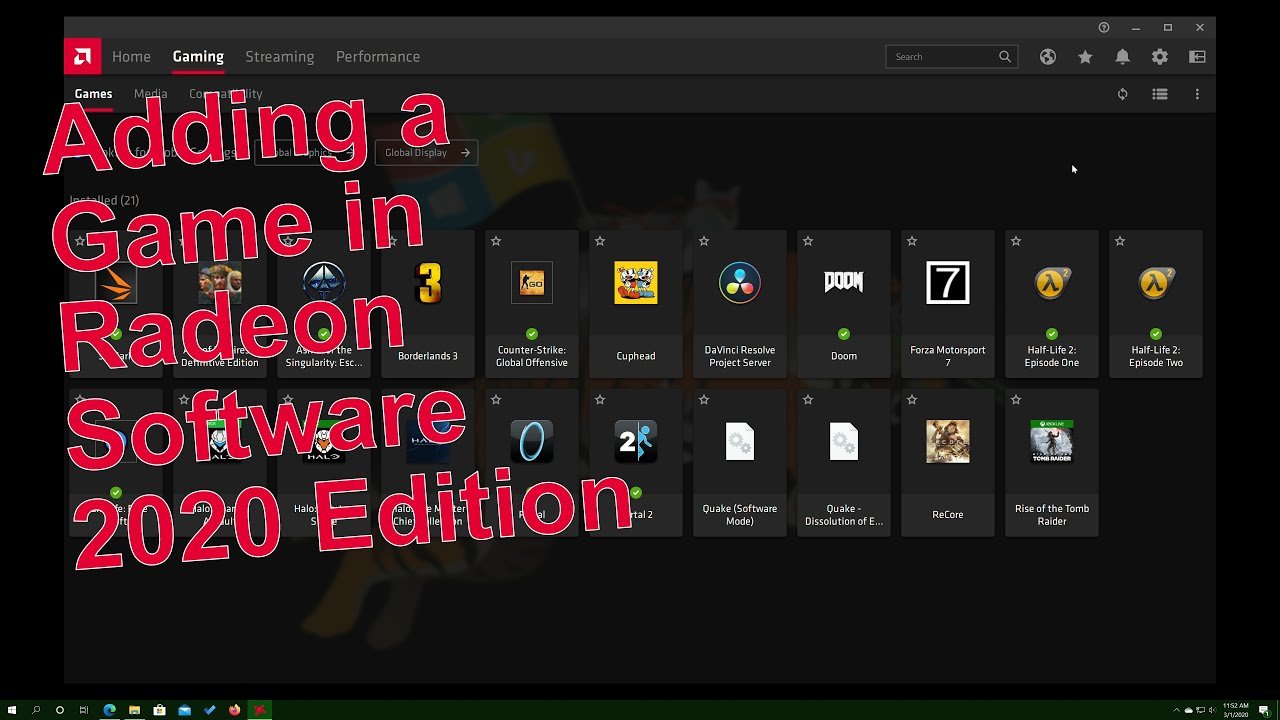
To add a game to AMD Radeon Software, click the “Gaming” tab, then “Add a Game,” and select the game’s executable file.
Ever felt your new game wasn’t getting the performance boost it deserves? This often happens when it’s not properly recognized by your graphics software. We’ll guide you through the process of how to add a game to AMD Radeon Software, so you can take full control of your gaming experience.
It might seem daunting but the process is quite simple. By doing this, you can optimize the game-specific settings. This helps make sure you’re getting the best possible performance. Let’s jump in!

How to Add a Game to AMD Radeon Software
Okay, so you’ve got your awesome AMD graphics card all set up, and you’re ready to dive into your favorite games. But sometimes, AMD Radeon Software, which is like your graphics card’s control center, doesn’t automatically know about all the games you play. That’s where this guide comes in! We’re going to walk through exactly how to add a game to the AMD Radeon Software, so you can get the best performance and experience possible.
Why Add Games to Radeon Software?
You might be wondering, “Why bother adding games manually?” Well, there are some pretty great reasons to do this. Think of it like this: adding a game to Radeon Software is like telling your graphics card, “Hey, this is an important game! Pay extra attention to it.” Here’s what that attention gets you:
- Custom Graphics Settings: You can adjust the game’s graphics settings specifically within Radeon Software. This means you don’t have to fumble through the game’s sometimes confusing in-game menus. You can fine-tune things like anti-aliasing, texture quality, and more to get the exact look and performance you want.
- Game Profiles: Once added, Radeon Software will remember your preferences for that particular game. Each time you launch that game, it’ll automatically apply the settings you’ve chosen. No more having to remember what settings you had before and changing them each time you play.
- Performance Monitoring: Radeon Software gives you access to metrics like frames per second (FPS), GPU temperature, and CPU usage. This helps you track how well your system is performing while playing a game. So, if a game gets laggy, you can see what might be going wrong and make necessary changes.
- Radeon Features: Adding your game to the software will allow you to use features like Radeon Anti-Lag, Radeon Chill, and Image Sharpening, all which can enhance your gaming experience. These features can reduce input lag, manage power consumption, and make your games look sharper.
Automatic Game Detection
Before we jump into the manual part, let’s talk about how Radeon Software tries to find games on its own. It’s actually pretty clever. The software scans your computer for installed games. When it finds one, it usually adds it to your library automatically. However, it’s not perfect. Some older games, games installed in unusual locations, or games launched through external platforms might be missed. This is why knowing how to add a game manually is important.
Manual Game Addition: Step-by-Step Guide
Okay, let’s get to the main part! Here’s how to manually add a game to AMD Radeon Software:
Step 1: Open AMD Radeon Software
First, you need to open the AMD Radeon Software. You can do this by:
- Right-clicking on your desktop and selecting “AMD Radeon Software” from the menu.
- Clicking on the AMD Radeon Software icon in your system tray (usually in the bottom-right corner of your screen).
The software should open up, displaying the main screen.
Step 2: Navigate to the Gaming Tab
Once the Radeon Software is open, look for the “Gaming” tab. It’s usually located at the top or the side of the window. Click on this tab to enter the gaming section.
Step 3: Find the “Add a Game” Option
Inside the gaming tab, you should see a list of games that Radeon Software has already found. Below or near the list you will see a button or link that says “Add a game” or “Add Game”. Click on this button or link.
Step 4: Locate Your Game Executable
When you click on “Add a Game,” a file explorer window will pop up. This is where you need to navigate to the exact location where your game is installed. You need to find the game’s executable file which is the file that actually runs the game.
- What’s an Executable? The executable file is the main program file that launches your game. It usually has a “.exe” extension at the end of its name (e.g., game.exe).
- Where to Look: Usually, games are installed in a folder within the “Program Files” or “Program Files (x86)” directory on your main hard drive (usually the C: drive). Sometimes, games may be in a custom location if you chose something different during installation.
- Steam Users: If the game is on Steam, by default it is usually in this folder “C:\Program Files (x86)\Steam\steamapps\common”.
- Epic Games Users: If the game is on Epic games, by default it is usually in this folder “C:\Program Files\Epic Games”.
Once you find the location of the game’s folder, open the folder and look for the executable file. If you are unsure you can search for the .exe extension in the folder to make it easier for you.
Quick Tip: If you are having trouble locating the game’s executable file, you can find it by right clicking the game’s shortcut icon and then click on the “open file location” option in the menu. This will open the folder that contains the game’s executable file.
Step 5: Select the Executable and Add the Game
Click on the game’s .exe file to select it. Once selected, click on the “Open” button. The game will now be added to the Radeon Software game library.
Step 6: Check and Adjust Game Settings
After adding the game, it should now appear in the list on the “Gaming” tab. Click on the game tile/icon to go to the game settings. Here you will see options for:
- Graphics: Customize various graphics settings as per your requirement.
- Performance Monitoring: View real-time stats like frame rate, and see if there are any issues with your computer performance while playing.
- Radeon Features: Access various Radeon features to enhance your gaming experience.
Take the time to customize these settings to your preferences for optimal game performance.
Troubleshooting Common Issues
Sometimes things don’t go exactly as planned. Here are some common issues you might encounter and how to deal with them:
Game Not Appearing After Adding
If the game does not appear in your list after adding the executable file, here are a few things you can try.
- Double Check Executable: Make absolutely sure you selected the correct .exe file. It’s easy to select the wrong file sometimes. Re-trace your steps and add the file again.
- Restart Radeon Software: Sometimes a simple restart of the Radeon software can resolve the issue. Close the software completely and open it up again to see if the game appears now.
- Restart Your PC: If the game still does not show up, a simple restart of your computer may fix the issue. Sometimes the computer needs a refresh to make changes take effect.
- Run as Administrator: Try running the Radeon Software with administrator rights. Sometimes some features don’t work as intended if the software is not given the proper access. Right-click on the Radeon Software icon and then click “Run as administrator.”
- Software Update: Check if your Radeon software is updated to the latest version. Sometimes an older version of the software may contain bugs which lead to problems. You can check for updates in the settings section of the AMD Radeon Software.
Game Crashes After Adjusting Settings
If the game starts to crash after making changes in the Radeon software, try this:
- Revert to Default Settings: Go back to the game’s setting in the software and revert all the changes back to their default value.
- Lower Settings Gradually: If reverting to default fix the crashing issue, slowly change the graphics settings one by one. Play the game to test if there is any change in the performance. Keep doing this and you can find the settings that work best for your setup without causing a crash.
- Check Game Compatibility: Sometimes a certain game might not play well with some of the Radeon Software settings. Try to research if the game you are playing has any reported compatibility issues and work accordingly.
Incorrect Game Detection
Sometimes the Radeon Software can detect a program as a game when it isn’t. In these instances you can easily remove the incorrect game from the game list by doing the following:
- Click on the Game Tile: Go to the “Gaming” tab and find the game. Click on the game tile.
- Remove the Game: Inside the game’s settings you will usually find an option to remove the game from the software’s list. Click that button to remove the game.
Advanced Tips and Tricks
Okay, so you’ve got the basics down. Let’s explore some extra tips to really get the most out of adding games to Radeon Software:
Custom Naming
Sometimes the software shows the game with a long or unusual name. If you want to show the game name that suits you better, here is how you can change the game name:
- Click the Game: Go to the “Gaming” tab and click on the game you want to rename.
- Rename Option: Inside the game’s setting page you should see an option to rename the game. Click on this option and enter the new name you would like to give to the game.
- Save Changes: Make sure you save the changes after entering the name you want.
Using Game Specific Profiles
Game profiles are a really neat feature. You can create custom graphics profiles for each game you play so each time you play a game, it automatically uses the setting you prefer for that specific game. This is done using the “Create profile” option on the settings page for each game.
Global Settings vs. Game Specific Settings
Radeon Software has two sets of settings. One is the “Global” settings that apply to all the games and the other is the settings specific to each game. The game specific settings override the global settings. This means you have control over the global settings and also the custom settings for each of your games. This is very useful to find the optimal performance for each of your games.
It’s better to use global settings that work well for most of your games and then customize individual games that need custom settings.
Staying Updated
AMD constantly updates its Radeon Software. These updates often have performance improvements, bug fixes, and new features. It is important to keep your software up to date to make sure that you have the best experience. You can check for software updates within the Radeon software itself.
Adding games to AMD Radeon Software might seem a bit daunting at first, but with a little practice, it becomes quite easy. Doing this will give you a better control over your games and your gaming experience. Once you have your games added, you can easily fine-tune your graphics, monitor performance and gain access to features like Anti-Lag, Chill, and image sharpening to enhance your gaming. So give it a try and get gaming!
how to add game to AMD radeon software
Final Thoughts
To summarize, adding a game manually involves selecting the “Add a Game” option within the Radeon software. Then you browse your PC to locate the game’s executable file. Once found and added, the software can provide performance adjustments. This covers how to add a game to amd radeon software. The process is very simple.

