
To add games to Aurora on your Xbox 360, you typically transfer game files (ISO or GOD format) to your console’s storage device using FTP or a USB drive, then scan for the games within Aurora’s file manager.
Getting more games onto your modded Xbox 360 using Aurora can feel like entering a new world of gaming. Many users find themselves wanting to know how to add games to aurora xbox 360, and this process is actually quite simple once you get the hang of it.
This guide walks you through the most common methods of moving your games to the proper place on your console. Whether it involves transferring files over your network using FTP or from a portable drive using USB, you’ll soon be playing your backups.

How to Add Games to Aurora Xbox 360
So, you’ve got your Xbox 360 set up with Aurora, that cool custom dashboard, and now you’re itching to play some games. That’s fantastic! But how exactly do you get those games onto your system? Don’t worry; it’s not as complicated as it might seem. This guide will walk you through all the steps, making it super easy to understand and follow, even if you’re new to this. We’ll cover everything from the different ways to get your games to how to make sure they work correctly on your Aurora setup. Let’s dive in!
Understanding Game Formats for Aurora
Before we start, it’s helpful to understand the different types of game files you’ll encounter. Aurora, like other custom dashboards, needs games in specific formats. Knowing these formats will save you a lot of trouble later. Here are the most common ones:
ISO Files
Imagine an ISO file as a perfect copy of a game disc. It’s like a digital clone. These are large files, usually several gigabytes in size. You can’t just directly copy an ISO to your Xbox 360. Instead, you need to extract its contents first. These are exact replicas of the game disc, making sure you have all the original data. They are often found when downloading games online.
GOD (Games on Demand) Files
GOD files are basically pre-packaged game files. They’re ready to go, meaning you don’t have to extract anything. They’re often used for digital copies of games, and Aurora recognizes them perfectly. This format simplifies the process, saving time and effort. Often downloaded from online communities or digital marketplaces.
XEX Files
XEX files are executable files which essentially mean they are the main part of a game’s files. Think of it as the engine that makes the game run. Sometimes, you might get games that are already in XEX folder format. In this case, you just copy the entire folder and place it in your console’s hard drive. They are often used by developers and advanced users.
Ways to Transfer Games to Your Xbox 360
Now that you know about the formats, let’s explore how to move those games onto your console. There are several methods, each with its advantages. We will cover the most reliable and used methods by the community. Here’s a rundown:
Using a USB Drive
This is one of the most common and easiest ways to move game files, especially if you don’t have a direct network connection. Follow these steps:
- Format your USB drive: Your USB drive should be formatted in FAT32. This ensures your Xbox 360 can read it. You can do this using your computer. Just be warned this will delete everything on it, so back up anything you want to keep.
- Copy game files: Transfer your game files to the USB. Make sure you organize them nicely into folders to keep things tidy. For example, “Xbox Games” then into different folders for each game.
- Connect to Xbox 360: Safely plug the USB into a USB port on your Xbox 360.
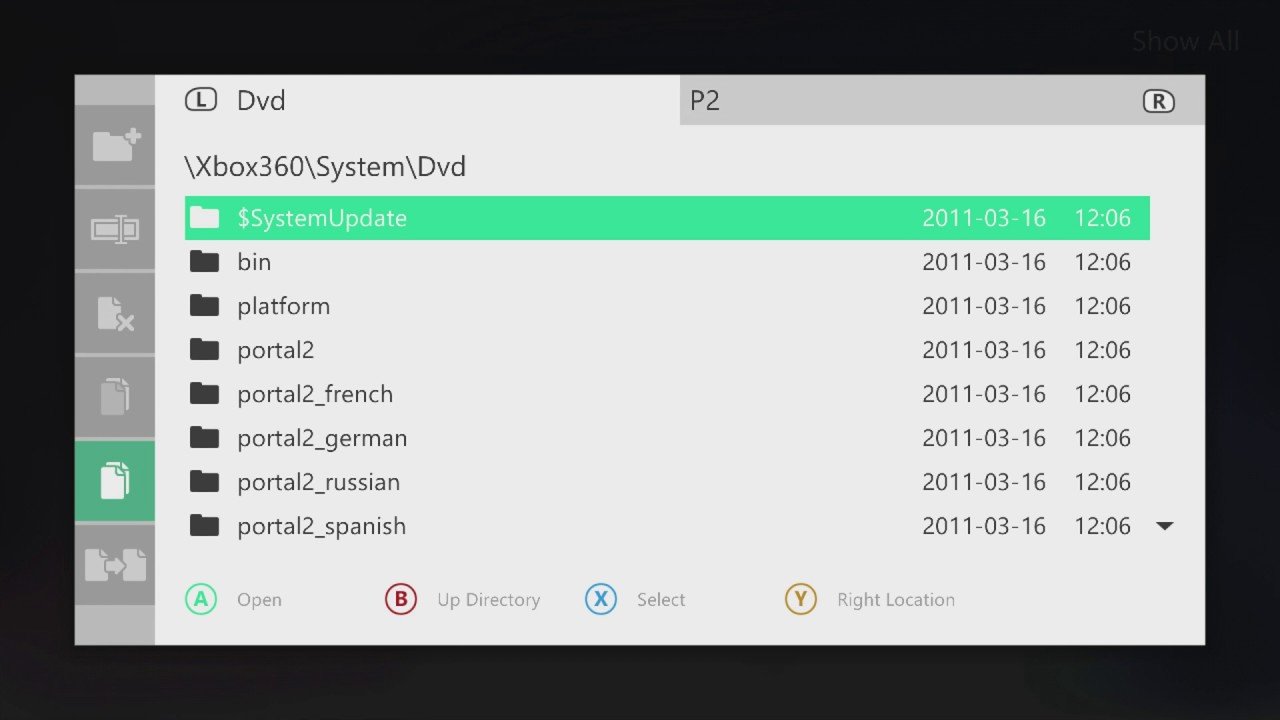
- Move to hard drive: Using Aurora’s file manager, navigate to your USB drive and copy the game files to your Xbox 360 hard drive. Usually the ‘HDD1’ folder or the internal memory location. We will discuss this step later.
Using FTP (File Transfer Protocol)
If your Xbox 360 is connected to the internet, FTP is a fantastic method. It allows you to transfer files wirelessly from your computer to your console. This is faster than USB. Here’s how:
- Get an FTP Client: Download an FTP client on your computer. FileZilla is a popular free option.
- Find your Xbox 360 IP Address: On your Xbox 360, in Aurora’s settings, find your console’s IP address. Note it down somewhere.
- Connect Using FTP: In your FTP client, enter the Xbox 360’s IP address, username (usually ‘xbox’) and password (usually ‘xbox’ or can be blank if you set it up). Connect to your console.
- Transfer game files: Navigate to the appropriate folders on your Xbox 360 via FTP and start transferring your game files. This might take some time depending on the speed of your network.
Using External Hard Drive
If you have an external hard drive, this can be a great option for extra storage and to transfer many game files at once. You will format the external drive just like a USB but it gives more space. Steps are similar to USB but keep in mind the formatting. Check the external drive is formatted for FAT32, and transfer the files via your computer. Then connect it directly to the xbox 360 via usb. Then in aurora using the file manager move the files.
Extracting ISO Files (If Necessary)
As mentioned before, you cannot just copy ISO files directly to your Xbox 360. You need to extract the files. Luckily, it’s easy. Here’s how:
Using Xbox Image Browser
Xbox Image Browser is a free computer program that’s made to do this task easily. This makes extracting ISO files on a Windows machine a simple process. Follow these steps:
- Download and install Xbox Image Browser: Get it online. Install it on your Windows computer.
- Open the ISO file: Launch Xbox Image Browser, and open your ISO file. The program shows all the files inside the ISO file.
- Extract the files: Choose where you want to extract the files, and hit the ‘Extract’ button. A folder will be created in that location with the full contents of the game.
After extracting the ISO files, you’ll have the game ready to move to your Xbox 360, using the methods we discussed before. It’s usually in a folder, ready to go. Sometimes you might also need to transfer the files in a folder such as ‘0000000000’. Don’t worry about this it’s fine as long as the files are there.
Organizing Your Games on Your Xbox 360
After transferring your games, it’s crucial to keep them organized. This will help you find games easily within Aurora’s interface. Here are a few things to remember:
- Use folders: Create a main folder for your games, such as ‘Games’ or ‘Xbox Games.’ Then, inside, create subfolders for each game.
- Keep it Consistent: Make sure all the games follow the same style of file naming, making it easy to find them when using Aurora’s menus. For example “Game Title (folder) > default.xex”, or similar
- Be careful of sub-folders: Keep in mind that sometimes if your game is in the ‘content’ or ‘000000’ folder, it needs to remain in this folder to operate. Check first, and don’t just delete those subfolders
Navigating Aurora to Play Your Games
Now that the games are on your console, let’s check how to launch them from Aurora. Aurora gives you a nice way to browse and start your games:
- Refresh Your Game List: In Aurora’s main menu, you might need to press a refresh button, usually labeled “scan paths” or “scan for new games”. It will then look at the specified hard drive locations for new games.
- Browse Your Games: Use the controller to navigate through the game lists. The game boxart and game titles should appear if all went well. If not, check the game file paths and folder organization.
- Start Your Game: Select the game you wish to play, and press the button to launch it, Usually the ‘A’ button. The game will start as normal.
Troubleshooting Common Issues
Sometimes, things might not go as planned. Don’t panic; here are some usual problems and how to deal with them:
Game Not Showing Up in Aurora
If your game doesn’t appear in Aurora’s game list:
- Rescan for new files: Press the “scan path” button again.
- Double-check file paths: Ensure the game files are in the correct place and not buried deep in subfolders.
- Check file format: Make sure you have extracted ISO correctly and it has the correct file format, GOD files are good to go.
Game Fails to Start
If a game starts but then quits or has errors:
- Game file may be corrupted: Try redownloading the game from a different source, ensuring the game download source is reliable.
- Check for patches: Some games require specific patches for Aurora or system compatibility.
- Check for disc checks: Some games require “disc check” or “bypass checks” before they run, so check online for extra steps.
Game Freezes or Crashes
If your game freezes or crashes during play:
- System issues: Overheating, bad connections or an unstable console can cause crashes. Clean your Xbox 360 and check cooling.
- Game issues: Some games are buggy and unstable in their current version. Check online forums for advice and other people’s feedback.
Advanced Tips for a Better Experience
Here are a few extra tips that can make your gaming experience on Aurora even better:
- Custom covers: Add custom box art for the games in Aurora. Make your menus look amazing!
- Connect to Xbox Live for DLC: Sometimes DLC (Downloadable Content) requires a connection to Xbox Live via your network settings.
- Keep system updated: Make sure your custom dash and plugins are updated for optimal performance and compatibility.
Adding games to your Aurora-powered Xbox 360 can seem daunting at first, but it becomes easy and straightforward with the right information and a little patience. Follow these steps, and you’ll soon have a fantastic library of games ready for playing. Keep exploring, have fun, and enjoy your gaming!
Modded Xbox 360 – Deleting and Installing a Game via USB Aurora
Final Thoughts
Adding games to Aurora on your Xbox 360 is a straightforward process. You typically transfer game files to your console’s hard drive or a connected USB storage device. Then, you refresh the game list within Aurora.
Make sure you have correctly installed Aurora on your console for it to work. You can then easily access your games through the Aurora interface. This explains how to add games to aurora xbox 360.

