
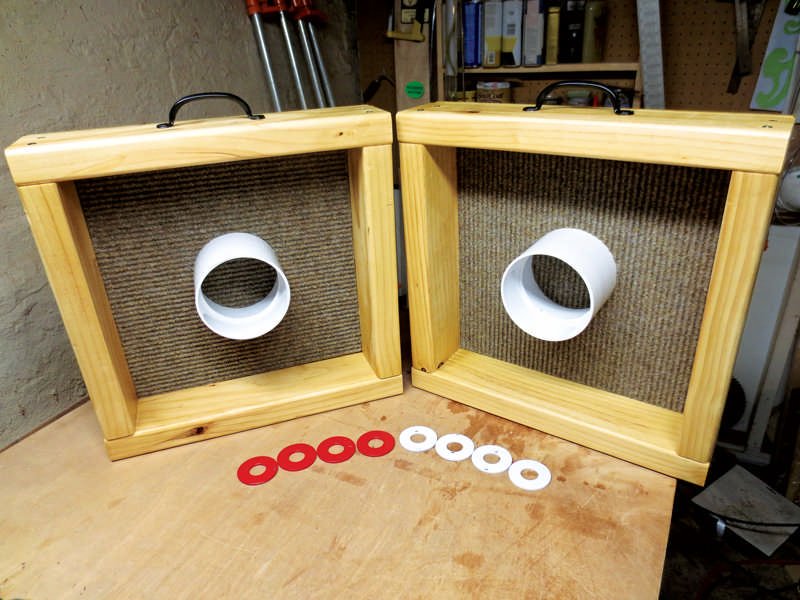
Building a washer game requires creating two wooden boxes, drilling holes in the top, and then using washers as playing pieces.
Have you ever wanted a simple, fun game for outdoor gatherings? Learning how to build a washer game is easier than you might think. With basic materials and some simple tools, you can create a great game for all ages. It’s a fun DIY project for a weekend or afternoon. This is a perfect project for anyone who likes to build and play.

How to Build a Washer Game: A Step-by-Step Guide
Building a washer game, also known as a “muffin toss” or “hillbilly golf,” is a fun and affordable way to add some outdoor entertainment to your backyard gatherings, tailgates, or camping trips. This DIY project isn’t just about crafting a game; it’s about creating memories and enjoying friendly competition. This guide will walk you through each step, making it easy to build your own washer game from scratch. We will cover everything from gathering materials to painting and decorating your finished set.
Understanding the Basics of a Washer Game
Before we dive into construction, let’s quickly explore what makes up a washer game. The game consists of two targets – usually boxes or platforms with holes – and a set of washers. Players take turns tossing their washers towards the targets, trying to land them in the holes for points. The first person to reach a set score wins. It’s simple, engaging, and great for all ages. The great thing about building your own is that you can customize it to your liking. You can select your wood, the colors you use to paint, and even the size and shape of your targets. This flexibility makes the building process just as fun as the game itself.
The Game’s Components
- The Targets: These are usually square or rectangular boxes with one or more holes cut into the top surface. They can be made from wood, plastic, or even sturdy cardboard, but wood is recommended for durability.
- The Washers: These are the “projectiles” you throw. Metal washers are commonly used, but you can also use large coins or other small, weighted objects.
Materials You’ll Need
Now let’s talk about the tools and materials you will need to construct your washer game. Gathering everything beforehand will make the building process smoother and more enjoyable. Make sure you have access to the required tools and that you understand how to use them safely.
Target Construction Materials:
- Wood: (Plywood or lumber) For the target boxes, 1/2-inch or 3/4-inch plywood is a good option. You will also need wood to make the sides and bases for the boxes, about 1×4 or 2×4 lumber.
- Screws: Wood screws are essential for assembling the box structure. 1 ½” or 2” screws are great for most wood thicknesses.
- Wood Glue: This will add extra strength to the box joints, though screws are usually enough.
Target Hole Cutting Materials:
- Drill: A power drill with different sized drill bits will help you make a pilot hole.
- Hole Saw: A 4-inch hole saw will create the holes in the top surface of the game.
- Jig Saw or Scroll Saw: These saws can also be used to create holes and are useful for making any custom shapes or designs.
Finishing and Decoration Materials:
- Sandpaper: Medium and fine grit sandpaper for smoothing the wood before painting.
- Primer and Paint: Exterior paint is recommended to protect against weather damage, and a primer to help the paint adhere to the wood better.
- Paintbrushes or Rollers: For applying the paint.
- Optional: Stencils, stickers, or other decorative elements.
Other Essential Tools and Supplies:
- Measuring Tape or Ruler: For accurate measurements when cutting wood.
- Pencil: For marking the wood.
- Safety Glasses: Protect your eyes during the construction phase.
- Work Gloves: To protect your hands when handling wood and tools.
Step-by-Step Guide to Building Your Washer Game
Okay, now that we’ve gathered our materials, let’s begin building! This step-by-step guide will ensure that you build a great and long-lasting game. Remember to take your time, double-check measurements, and always prioritize safety.
Step 1: Cutting the Wood
First, measure and cut the wood according to your plan. The dimensions will determine the size of your targets. For a standard game, you’ll need:
- Two pieces of wood for the tops of the boxes (e.g., 15″ x 15″ each).
- Eight pieces of wood for the sides of the boxes (e.g., four pieces that are 15″ x 4″ each).
- Two pieces for the base of the boxes (e.g., 15″ x 15″ each), if you decide to have a fully boxed in style.
Use a saw to cut the wood pieces carefully, ensuring that you have precise measurements. Accuracy is important for a stable and well-built game. If you are using the 1×4 wood, you will want to cut these into 4 pieces that are 15″ long. These will make up the sides of the box. It is recommended you get your lumber cut at your local store to minimize cutting at home.
Step 2: Assembling the Box Frames
Now, let’s put the boxes together! Place the side pieces on top of the base, and use your wood glue and screws to attach the box walls to the base. Make sure each piece is flush and that the sides are square. When the glue is dry, use your screws to secure the sides and create a box shape. If you chose to do a simple frame style box, you will use the 1×4 sides and attach them to the top square. Be sure to attach all the edges. Repeat this process for both target boxes.
Step 3: Cutting the Holes
Next, you will cut the hole into the top surface. Mark the center of each target top using a pencil and measuring tape. Attach the 4” hole saw bit to your drill. Use the pilot drill bit that is in the center to start the cut. Carefully drill straight through each top to create the holes. If you do not have a hole saw, you can drill a large hole in the middle and use a jig saw or scroll saw to cut out a 4” circle. It’s important to be slow and steady when using a drill.
Step 4: Sanding and Smoothing
Before painting, give all the wooden surfaces a thorough sanding. Use medium grit sandpaper to smooth out any rough edges and then follow up with the fine grit to get a very smooth surface. Sanding not only makes the game look nicer, but it will also prevent splinters. Be sure to focus on the edges, where the wood is likely to be the roughest. Also ensure to wipe off any dust before proceeding.
Step 5: Painting and Decorating
Now the fun part – painting! Apply a primer to all the wooden surfaces. Once the primer has dried, you can then paint the target boxes with your chosen colors. You can go with a solid color or get creative with designs or patterns. If you decide to paint any patterns on, let the first coat dry before painting other colors. Using stencils can help with crisp edges when painting stripes, patterns, or even words. The best part is that you can fully customize the set as much as you like. Add your initials, your team’s logo, or any other decorative elements.
Step 6: Choosing the Washers
Washers are available at most hardware stores. The standard size washer is about 2 ½ inches, however you can use different sizes. You can also paint them different colors to match your target boxes. You can use other types of materials, but washers are ideal for this game. Be sure they are small enough to fit into the holes that you have cut out for the game.
Tips for Playing and Scoring
Now that you have built your washer game, it’s time to understand the rules and how to keep score. The rules are straightforward, but there are variations you can adapt for your group.
Basic Game Rules
- Setup: Place the two target boxes a specified distance apart. Typically, 20-25 feet is standard, but you can adjust the distance to suit players’ skill levels.
- Taking Turns: Players take turns tossing their washers, usually three per turn.
- Scoring:
- One point is awarded for landing a washer inside the box (but not in the hole).
- Three points are given for landing a washer inside the hole.
- Winning: The first player (or team) to reach a score of 21 points wins the game. It is common to play “bust” scoring which means if you go over 21, you go back down to 15. Some people will also do “exact scoring”, which means you need to hit 21 on the nose.
Strategic Tips
- Aim and Angle: Practice different throwing techniques to improve your accuracy.
- Washer Type: Certain washers might be heavier or easier to throw.
- Target Placement: Adjust the distance between the target boxes to increase or decrease the challenge.
Maintaining and Storing Your Washer Game
To ensure your washer game lasts for years, it’s important to maintain it properly. This involves regular cleaning, storage, and occasional repairs.
Cleaning
After use, wipe down the wooden surfaces with a damp cloth. This will remove any dirt or grime and help keep your game looking new. Do not get the wooden surfaces too wet as the moisture could damage the wood.
Storage
When not in use, store the game in a dry place, away from direct sunlight or harsh weather. This will prevent warping or damage to the wood. Storing the game in a garage or shed can protect it from elements.
Repair
Over time, your game may require minor repairs. If screws become loose, tighten them. If any wood becomes damaged, replace it or repair it with wood filler or glue. You can also touch up the paint if it chips or fades over time. Being proactive with repairs will help to ensure your set lasts for a long time.
Building your own washer game is a rewarding DIY project. It’s fun, it’s relatively inexpensive, and it adds a great activity to your outdoor fun. Remember to take your time, pay attention to detail, and customize it to your liking. Have a good time building and even more fun playing!
How To Build A Washer Toss Game
Final Thoughts
Creating a washer game involves building two boxes with angled plywood bottoms. You need to cut the holes in the plywood to fit the washers. Secure the sides and ensure the target holes are centered.
The finishing touch includes painting or staining the boards for protection. This basic structure forms the core of how to build a washer game. Finally, you have a fun outdoor game.

