
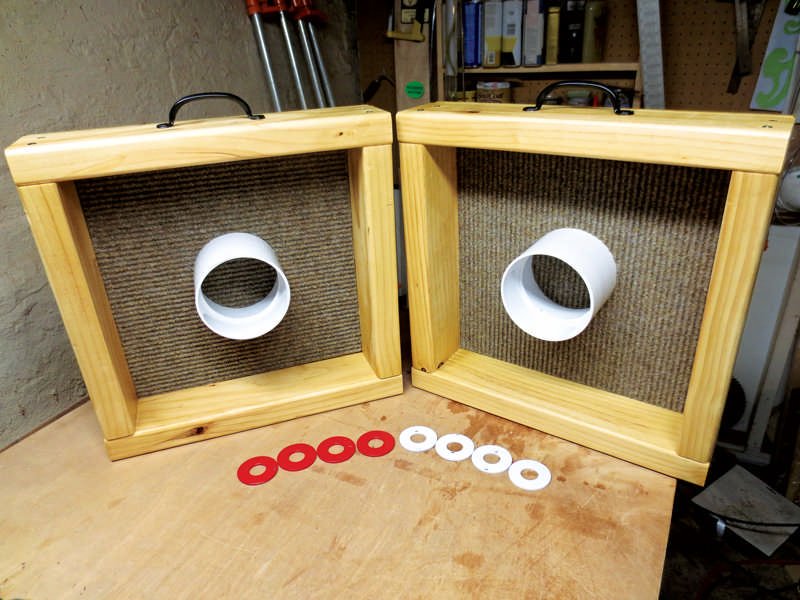
Building the washer game requires constructing two game boxes or targets, drilling holes into their tops, and using washers to toss into the holes for points.
Want a fun backyard game? Consider how to build the washer game; it’s a simple project. You can easily create this game with basic tools and materials. This game will provide hours of entertainment for all ages.
Building your own washer game allows for customization. You get to choose your design and paint scheme. You also save money compared to buying a pre-made set.

How to Build the Washer Game: A Step-by-Step Guide
Let’s get down to it! You want to build a washer game, also known as bean bag toss or hillbilly golf, and that’s fantastic. It’s a super fun outdoor game, perfect for backyard parties, tailgating, or just hanging out with friends and family. Building it yourself isn’t too hard, and it’s way cheaper than buying a pre-made set. This guide will walk you through everything you need, from gathering the materials to putting those final touches on your awesome new game. We’ll break down every step, so even if you’ve never built anything before, you can totally handle this. Get ready to have some fun!
Gathering Your Supplies
Before we start building, we need to gather our supplies. Think of this as your pre-game pep talk. Here’s what you’ll need to get started:
Wood for the Boxes
You’ll need wood to build the boxes that hold the targets. The size can vary, but a good starting point is using 1×4 or 1×6 lumber. The choice of lumber is up to you, depending on the type and strength you want to achieve. Here are a few options for wood:
Common Pine or Fir: These are easy to find and relatively inexpensive. They’re great for a basic set, and you can easily paint them.
Pressure-Treated Wood: This is a better option if you plan to leave your washer game outdoors a lot, because it resists rot and insect damage. It will cost you more, however.
Plywood: Another option, and often economical, is to use a sheet of plywood. You could cut out a solid base, for example. It can be sturdy, but will need to be protected from the weather.
You’ll need enough wood to make two boxes, usually about 12 inches or 14 inches wide, and 2-4 inches deep. The length can vary based on preference, but around 2 feet long is standard. For example, each box could be built with four 2-foot long pieces. For standard construction, you’ll need 8 pieces. Keep in mind to ensure the sides, tops, and bottoms of your boxes are made of wood of the same thickness.
You also need wood to make the crossbar or dividers for the boxes, which are typically 2-3. These will usually be about 10-12 inches long each, if you build 2 foot wide boxes.
Hardware
Next, you need the hardware to hold it all together. This includes:
Screws or Nails: Use screws for a stronger hold. 1 ½ to 2-inch wood screws are a good choice. It will require more time and effort, but screws are more reliable.
Washers: The most important part of the game! Get 3-inch metal washers (or about that size). You’ll need at least 6 washers (3 for each player), but having extra never hurts. Make sure they’re nice and heavy!
Paint or Stain: To personalize your game, you’ll want some paint. Any color you want is fine! You can also stain the wood for a more natural look.
Optional – Protective Finish: If you want the paint to last longer, you might get a clear coat. A polyurethane sealant is usually a good choice.
Wood Glue: Wood glue helps you get a better connection between the wood pieces. It’s useful if you want extra strength.
Tools
Finally, you’ll need tools to help you put everything together, like:
Measuring Tape: You’ll need this to accurately measure and cut the wood pieces.
Pencil: Use this to mark where you’ll cut or attach wood.
Saw: A hand saw will work, but a power saw (like a circular saw or miter saw) will make it easier. Adult supervision and proper safety is needed if young people are handling such equipment.
Drill or Screwdriver: You’ll need this to drive the screws into the wood. A power drill is easier and faster, but a normal screwdriver will work if you’re patient.
Sandpaper: To smooth out any rough edges on the wood, sandpaper will help.
Safety Glasses: Always wear safety glasses when you’re working with wood and tools.
Work Gloves: Gloves will protect your hands while you are doing the work.
Paint Brushes/Rollers: To apply paint/stain to the wood.
Cutting and Assembling the Boxes
Now, let’s get to the fun part: actually building the game!
Step 1: Measure and Cut the Wood
1. Measure: Using your measuring tape and pencil, measure and mark all the wood pieces you’ll need. Remember, you need four pieces for the sides of each box, and two or three pieces for the interior dividers.
2. Cut: Carefully cut each wood piece along the marked lines. If using a power saw, take extra care and use the proper safety equipment. A steady hand is important!
3. Sand: Use sandpaper to smooth all of the cut edges and sides of the wood. This will make them safe to handle and will make your game look more professional.
Step 2: Assemble the First Box
1. Create the Frame: Start by placing the four pieces for the side of a box to form a rectangle or square on your work surface.
2. Glue and Screw: Apply a small amount of wood glue along the edge of one piece of wood, then put it up against an adjacent piece. Then, screw them together. Use 2-3 screws per corner for a good hold. If you want to add more strength, apply glue on all sides, and after that screw them. Be careful not to use too much glue.
3. Repeat: Repeat this process for all four sides until you have a complete box.
Step 3: Adding the Dividers
1. Measure and Mark: Measure and mark where you want to place the interior dividers in your box. The number of dividers is a matter of preference, but 2 or 3 are common.
2. Install: Use the same glue and screw method to install each divider.
Step 4: Assemble the Second Box
1. Repeat: Repeat steps 2 and 3 for your second box. Make sure both boxes are as identical as possible in size.
Painting and Decorating
Now that you have your boxes built, it’s time to make them look awesome!
Step 1: Apply Primer (Optional)
Why Primer?: Primer is a base coat that helps paint stick better. This can be useful especially if your wood has a rough texture, or if you’re using a dark color. It also helps prevent the paint color from being absorbed into the wood.
How to Apply: Apply a thin, even coat of primer to all surfaces of the wood, and then let it dry completely before you start painting.
Step 2: Painting the Boxes
Choose your Color(s): Decide what colors you want to use for your boxes. You can use one solid color, or you can get creative with designs or patterns.
Paint: Apply 2-3 thin coats of paint. Let each coat dry before applying the next one. It’s better to use multiple thin coats instead of one thick coat because thick coats are more likely to drip, run, or bubble.
Drying Time: Follow the directions on your paint can for drying times. This is an important step to follow for your paint to properly dry and to be as effective as possible.
Step 3: Adding Stencils or Designs
Stencils: Once your base coat of paint is dry, you can add stencils. You can use store-bought stencils or create your own with cardboard or paper. Secure it on the surface and apply paint with a brush or sponge. Remove carefully to avoid smearing the design.
Freehand Designs: If you’re feeling artistic, you can create your designs using small brushes and a steady hand. Try making simple stripes or swirls.
Step 4: Applying the Protective Finish (Optional)
Why a Finish?: A protective clear coat can protect the paint and wood from scratches, moisture, and fading from the sun. This is important, especially if you plan on using your washer game outdoors a lot.
How to Apply: Apply a thin, even coat of a clear protective finish, like polyurethane. Let it dry completely.
Preparing the Washers
Even though the washers themselves are metal, you’ll want to personalize them. The key thing is to distinguish between each team’s washers.
Step 1: Choosing Colors or Designs
Paint: Using spray paint or a small brush, paint each team’s washers a different color. You could make one team’s washers red, and the other team’s washers blue.
Other Options: You could also consider adding colored tape, or even using a permanent marker to draw a small design.
Step 2: Drying Time
Allow for Drying: Make sure to allow the paint or marker ink to dry completely before using the washers. If the ink or paint isn’t dry, it can rub off, and you will need to do it again.
Setting Up and Playing the Game
Now that you’ve built your amazing washer game, it’s time to play!
Game Set Up
1. Placement: Place the two washer boxes 10-20 feet apart. The distance between the two boxes is really a matter of preference. Start with a shorter distance, if you have less experience.
2. Player Position: Each player stands by one of the boxes, and throws their washers towards the box on the other side.
3. Team Formation: Decide if you are playing 1 vs. 1, or with teams of two or more players.
How to Play
1. Taking Turns: Players or teams take turns throwing their washers towards the boxes.
2. Scoring: Scoring typically works like this:
1 point for getting your washer inside the box.
3 points for getting your washer inside the center cup or division. (If you added such interior divisions).
3. Winning: Usually, the first team to reach 21 points wins the game.
Tips for a Great Washer Game
Here are a few extra tips to make sure your washer game experience is top-notch:
Safety First: Always throw the washers carefully. Make sure no one is in the path of your throw.
Proper Storage: When you aren’t using your washer game, store it in a dry place. This will help prevent any weather damage, especially if you used non pressure treated lumber.
Personalization: Feel free to add your own twist! You could add decorations, or come up with your own scoring system. There’s no wrong way to play the game, as long as everyone is having fun!
Practice: You will get better at this game with practice! Try to be consistent with your grip, throwing motion, and aiming. This is a great game to play with friends and family over many years.
Modifications: Consider a smaller set for children. Use light weight washers for young children. The rules are also flexible, so you can modify them to suit your own preferences.
Building a washer game is a fun and rewarding project. It’s a great way to spend time outdoors with friends and family. This guide has hopefully given you all the tools you need to get started. So grab your wood, gather your tools, and build your very own washer game. You’ll be glad you did! Enjoy many, many games of washers!
Now you’re all set to build, personalize, and enjoy your new washer game. It’s more than just a game – it’s a way to create fun memories with those around you. Enjoy your hand-made creation!
How to Build a Washer Toss Game
Final Thoughts
So, to build the washer game, gather your materials: plywood, PVC pipes, washers, and paint. Cut the wood into two squares and assemble your targets. Next, create the throwing boxes from the PVC.
Finally, decorate your game and test your aim! Now you know precisely how to build the washer game; it is a fun and simple project. Enjoy playing this outdoor game with friends and family.

