
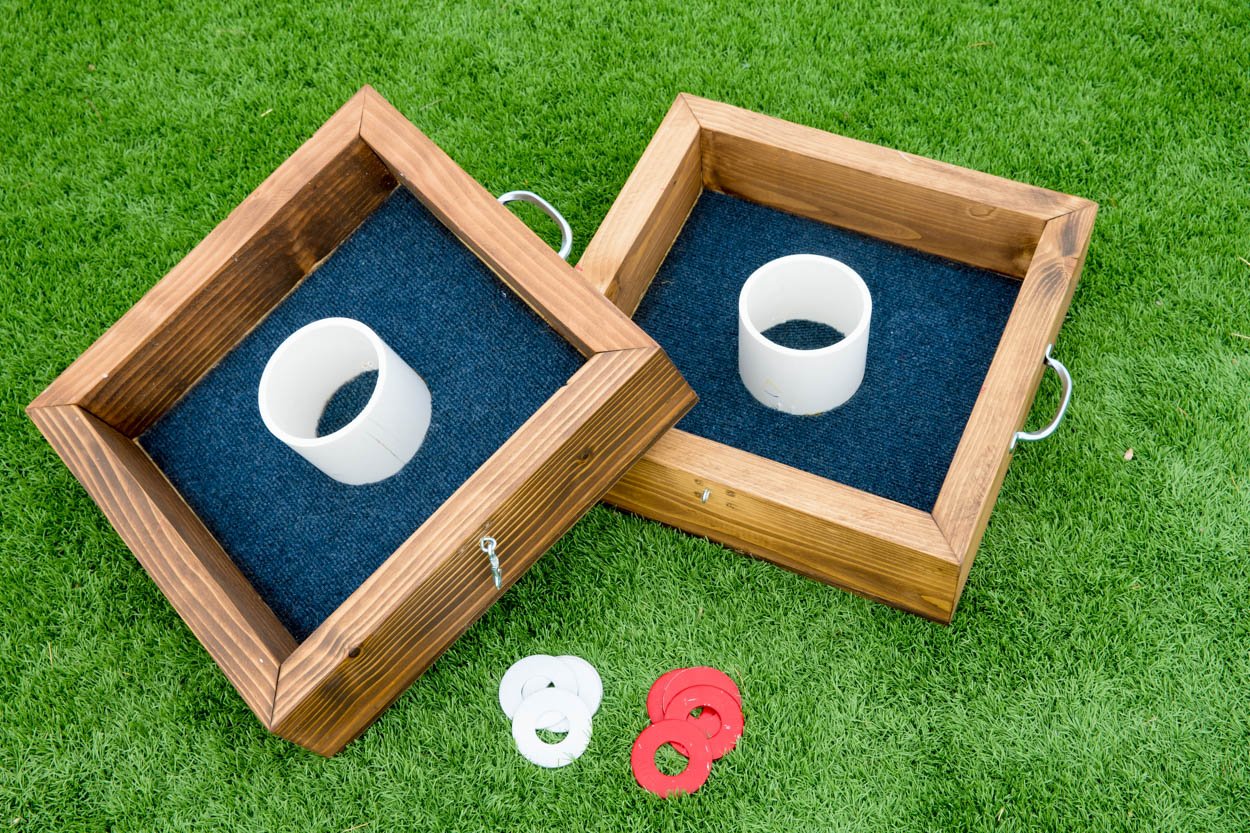
Building a washer toss game requires cutting wood pieces for the boxes, assembling them, creating the target holes, and adding a base.
Want a fun outdoor game everyone can enjoy? It’s surprisingly easy to learn how to build washer toss game. This project is achievable with basic tools and materials, turning your backyard into a hub for friendly competition.
You can create your own washer toss set with simple steps and have hours of entertainment. We will walk you through every step, so that you get a perfect finished product. Gather your supplies, and let’s get started!

How to Build a Washer Toss Game: A Step-by-Step Guide
Ready to create some backyard fun? Building your own washer toss game is easier than you might think, and it’s a fantastic way to spend time outdoors with friends and family. This guide will walk you through the entire process, from gathering your materials to playing your first game. We’ll make sure even beginners can tackle this project with confidence.
Understanding the Washer Toss Game
Before we jump into building, let’s quickly cover what a washer toss game actually is. It’s a game where players throw metal washers into a target box with a central hole. Points are scored based on where the washers land. Typically, washers landing in the hole are worth the most points, followed by washers landing inside the box.
Why Build Your Own?
Building your own washer toss game has several benefits:
- Cost-effective: Making your own is often much cheaper than buying a premade set.
- Customization: You can personalize your game with your favorite colors, designs, and even the size of the board.
- Skill building: It’s a great project to teach woodworking, measuring, and problem-solving skills to kids and adults.
- Family fun: Creating the game together is a great activity for the whole family and can add a personal touch to your backyard games.
Gathering Your Materials
Okay, let’s get started with what you’ll need. Here is a list of materials you will need to build a standard two target washer toss game set:
For the Game Boxes
- Plywood: Two pieces of plywood, each approximately 24 inches by 24 inches for the base, and four pieces, approximately 3 inches by 24 inches for the sides.
- Consider using ½ inch thick plywood for a good balance of strength and weight.
- 2 x 4 lumber: Approximately 8 feet (2.4 meters) of 2×4 lumber. These will be used to make the frame that holds the legs
- Wood Screws: About 1-2 box of 1 ½ inch long wood screws for the side panels and box assembly, and 2-3 inch wood screws for legs
- Wood Glue: For added strength on the side panels and box assembly, use wood glue to join your pieces.
- Drill and Drill Bits: Use drill bits suitable for wood and for making pilot holes.
- Hole Saw or Jig Saw: You’ll need one of these to cut the center hole in each board. A 4-inch diameter hole is standard for washer toss.
- Measuring Tape or Ruler: Accurate measurements are essential.
- Pencil: For marking your cuts and hole locations.
- Sandpaper: To smooth any rough edges.
- Saw: (circular saw, hand saw, or miter saw) To cut the wood to size.
For Finishing and Gameplay
- Paint or Stain: Select colors or a wood stain that suits your style, plus a good sealant to protect against the elements.
- Washers: At least 8-12 metal washers, usually 2 to 2 ½ inch diameter. They are sold at most hardware stores.
- Optional:
- Wood filler: To fill any cracks or imperfections in the wood.
- Stencils or Paintbrushes: To add designs or numbers to the boxes.
Step-by-Step Building Guide
Now that you have all the materials, let’s move on to the construction part.
Step 1: Cutting the Wood
First, measure and cut your plywood. You need two square pieces for the base of each box and four rectangular pieces for the sides. Ensure that your cuts are accurate to make the boxes fit together correctly.
Here’s a breakdown:
- Plywood bases: Cut two pieces of plywood to 24 x 24 inches each. These will form the bottom of the washer toss boxes.
- Plywood sides: Cut four pieces of plywood to 3 x 24 inches each. These will make up the walls of the boxes.
- 2x4s for legs: Cut four pieces of 2×4 lumber to approximately 14 to 18 inches each, depending on your desired height.
- 2x4s for frame: You will need to cut four more pieces of 2×4 lumber as well to create a rectangular frame to support the legs. These pieces will need to be 21 inches long each.
Step 2: Assembling the Box Frames
Now let’s build the frames of the boxes!
- Apply Glue: Apply a line of wood glue along the edge of a plywood base.
- Attach First Side: Align one of the side pieces to the edge of the base with glue applied, and hold firmly.
- Screw Sides in Place: Use wood screws to secure the side panel to the base by driving the screws into place with a power drill. Make sure to screw each corner with two screws for proper attachment.
- Repeat for Remaining Sides: Repeat these steps with the remaining three side pieces, making sure each is firmly attached with glue and screws.
- Make Two Boxes: Once you have finished one box, build the second box in the same fashion, making sure both are equally square.
Step 3: Cutting the Center Hole
Next, create the center hole for the washers to drop into. This is a very important part of the washer toss game and must be in the center of each board.
- Find the Center: Measure to find the exact center of each plywood board. Draw an ‘X’ or circle where the middle point is.
- Drill Pilot Hole: Drill a pilot hole using a smaller drill bit inside the center circle you marked with a pencil. This will guide your hole saw or jig saw.
- Cut the Hole: Use a 4-inch hole saw or a jigsaw to carefully cut out a circular hole at the marked location on each of your plywood box base. If using a jigsaw, use a pencil and compass to trace the hole and then cut along that line. Sand the edges after cutting to smooth them out.
Step 4: Building the Legs and Frame
Now you can assemble the legs of the washer toss game.
- Create Leg Base: Take four of your 2×4 pieces and lay them on the ground. Assemble them to create a rectangle, ensuring the ends overlap. Use screws to secure the rectangle together.
- Attach the Legs: Take each 2×4 leg and attach it to the outside corner of the frame that you just made. Secure with wood screws.
- Attach the Box: Position the box on top of the frame so that it rests over the top of the legs and screws. Secure to the legs and frame with wood screws.
- Repeat: Repeat this process for the second box.
Step 5: Sanding and Finishing
With the boxes assembled, it’s time to prepare them for painting.
- Sanding: Use sandpaper to smooth all the edges, surfaces, and drilled holes. This will make the game both safe and more visually appealing.
- Wood Filler: If necessary, apply wood filler to any cracks, holes, or uneven joints. Let it dry, then sand it smooth.
- Painting or Staining: Now it’s time to get creative!
- Apply a coat of primer to prepare the wood. Let dry.
- Paint or stain the boxes with your desired colors, let each coat dry thoroughly before applying the next.
- Seal your boards with a good clear coat sealant. This will protect it from moisture and wear and tear.
- Add Design: After painting or staining, you can add stencils, numbers, or other designs to the top of each box.
Step 6: Testing and Adjustments
Before you start your games, lets test them and make any necessary adjustments.
- Place on level ground: Place both finished washer toss boxes on a flat, level surface. Make sure that both boxes are the same height off the ground and that they are positioned the same distance apart from each other.
- Test Play: Do a test run. Make sure the washers slide smoothly across the surface of the boxes, and drop properly into the middle hole. Check the boxes for sturdiness and make sure the legs are stable and do not wobble.
- Adjust as Needed: If there are any areas that need adjustment, make them before beginning regular game play.
Tips for Playing Washer Toss
Okay, so you’ve built your own washer toss game! But how do you play it?
Game Setup
- Distance: The game boxes are usually placed 15 to 20 feet apart. Younger players can play with a smaller distance for more enjoyment.
- Players: Two or four players can play as individuals or in two teams.
- Washers: Each player or team gets a set of washers, usually of a different color so they’re easy to keep track of.
Basic Gameplay
- Turns: Players take turns throwing their washers at the opposite box.
- Scoring:
- In the Hole: A washer that goes completely through the center hole usually scores 3 points.
- In the Box: A washer that lands inside the box but not through the hole scores 1 point.
- Outside the Box: A washer that doesn’t land inside the box scores no points.
- Canceling: Sometimes when playing, a washer may knock another washer into the middle hole, or out of the middle hole. Play can either go as the last washer landed or use a canceling rule to put the washer back to its original position.
- Winning: The first player or team to reach a specified point total, often 21, wins the game.
Variations and Fun Extras
- Designated Scoring Areas: You can create additional sections with different point values on the game board to make the game more challenging.
- Advanced Distance: Challenge more seasoned players by increasing the distance between the target boxes to make the game harder.
- Team Play: Two players can work together as a team, helping each other score points as they throw.
Building a washer toss game is a fun project that brings enjoyment for all ages. You’ve got a custom, hand-made game that’s perfect for family gatherings, backyard parties, and some friendly competition. Enjoy the game, and the memories you’ll create while playing.
How to Build a Washer Toss Game
Final Thoughts
In short, building a washer toss game involves creating two boxes and cutting holes. You’ll then need to construct the frames and add a base. Don’t forget to finish by painting for longevity.
To play, just toss washers towards the holes; points vary with location. Enjoy the game you just made by learning how to build washer toss game.

