To capture game footage, use built-in recording features on your console or PC, or utilize third-party software designed for screen recording and gameplay capture.
Want to share epic gaming moments? It’s easier than you think! Many gamers are now looking into how to capture game footage so they can share highlights with their friends and audiences.
This guide will quickly walk you through some options available. You can start recording fantastic gameplay without needing advanced technical knowledge.

How to Capture Game Footage Like a Pro
So, you want to show off your amazing gaming skills or create cool videos? Capturing game footage can seem tricky at first, but it’s actually pretty easy once you know the basics. Whether you’re playing on a PC, console, or even a mobile phone, there are ways to record your gameplay. This guide will walk you through all the steps and options so you can start making awesome game videos.
Understanding Your Options for Game Capture
Before you start pressing buttons and hoping for the best, it’s important to understand the different ways you can capture game footage. The method you choose will depend on what device you’re playing on, what quality you want, and how much money you’re willing to spend.
Software-Based Recording
This is the easiest and often cheapest method, as it uses software on your computer or console to record the game. Think of it as your device “watching” itself play and saving the video. Here are some examples:
- Built-in Recording: Many modern PCs and consoles come with built-in screen recording features. On Windows 10 and 11, you can use the Xbox Game Bar (press Windows key + G). PlayStation and Xbox consoles have their own recording functions that can be accessed through the controller buttons.
- Third-Party Recording Software: If you want more control over your recordings, such as adding overlays or choosing specific file formats, you might want to use third-party software. Some popular options include OBS Studio (free and very powerful), NVIDIA GeForce Experience (if you have an NVIDIA graphics card), and Streamlabs Desktop. These programs offer many different settings and features that you can adjust to match your needs.
Hardware-Based Recording
Hardware-based recording uses a separate device to capture your game. This device sits between your console/PC and your monitor. Hardware solutions are generally better at capturing high-quality footage with lower impact on your gaming performance, but usually cost more than software solutions. Here’s how it works:
- Capture Cards: A capture card is a piece of hardware that you connect to your PC and console. It takes the video signal from the console and transfers it to your computer, where it can be recorded. Capture cards, such as the Elgato HD60 S or AVerMedia Live Gamer Portable 2 Plus, come in different shapes and sizes (some are internal, others external), with various capabilities. A capture card is usually recommended if you’re serious about high-quality recordings from consoles.
Step-by-Step: Capturing Footage on PC
Let’s take a closer look at capturing footage on a PC, since it is used by many gamers:
Using the Xbox Game Bar (Windows 10/11)
The simplest way to capture your PC gameplay is using the Xbox Game Bar. It’s free, easy to use, and built right into Windows. Here’s how:
- Open the Game: Start the game that you want to record.
- Open the Xbox Game Bar: Press the Windows key + G on your keyboard.
- Start Recording: Click the “Start Recording” button (it looks like a circle) or press Windows Key + Alt + R. A small timer will appear in the corner of your screen.
- Stop Recording: Press the “Stop Recording” button or press Windows Key + Alt + R again. Your recording will automatically be saved to your Videos/Captures folder.
- Review Your Recording: Open the Xbox Game Bar again, click on “Show All Captures”, and you can watch your video. You can also locate the video in the “Captures” folder, located within the “Videos” folder in your user’s document folders.
Tips for using Xbox Game Bar:
- Make sure that the game you are trying to capture is not set in windowed mode. The game needs to be in fullscreen to make a recording with the Xbox Game Bar.
- You can adjust the recording quality in the Windows settings. Go to Settings > Gaming > Captures, and you can adjust video quality and audio recording settings.
Using OBS Studio
OBS Studio is a free and open-source program, popular among content creators for its powerful features. It can be a bit complex for beginners, but it’s well worth learning. Here’s a basic guide:
- Download and Install: Go to the OBS Project website and download the correct version for your operating system (Windows, macOS, or Linux). Follow the on-screen instructions to install.
- Set Up a Scene: In OBS, you need to create a “scene” to capture your game. Click the “+” button under “Scenes” to add a new scene. You can name it anything, for example “Gameplay”.
- Add a Source: In the “Sources” section, click the “+” button. Choose “Game Capture” or “Display Capture” (more details about these source types below).
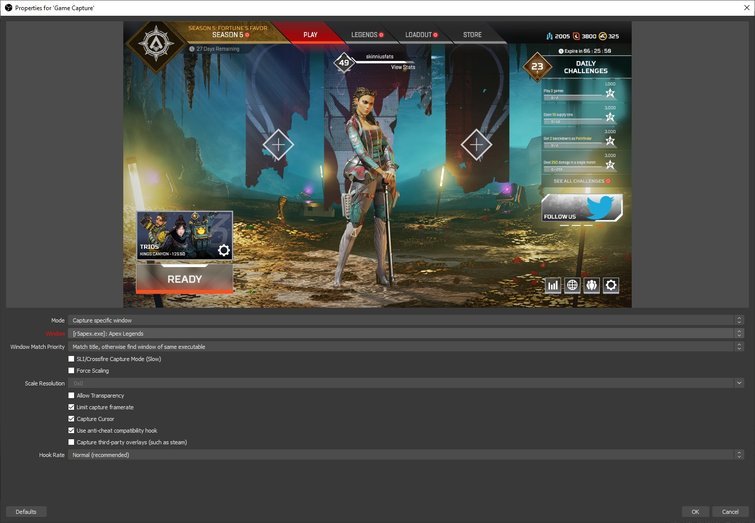
- Game Capture: This is the most efficient way to record a game. Click on “Game Capture” and choose “Capture specific window.” Then select your game’s executable file from the dropdown menu. If your game isn’t on the list you can select “Capture any fullscreen application”. Click “OK”.
- Display Capture: This option captures everything on your monitor. You can use this if you have trouble capturing a game using game capture. If you select display capture, click “OK” and then select the correct display if you have multiple screens.
- Adjust Settings (Optional): Go to File > Settings. Here, you can adjust many settings:
- Output: Set your recording path, choose a recording format (MP4 is common), and adjust recording quality (Bitrate).
- Video: Set your Base resolution, and Output resolution, and FPS (frames per second).
- Start Recording: Click the “Start Recording” button. OBS will now record the selected source.
- Stop Recording: Click the “Stop Recording” button. Your video file will be saved to your output folder that you specified in the settings.
Tips for Using OBS Studio:
- Experiment with settings: There are many settings in OBS Studio that will need adjusting based on the specs of your PC. Spend some time adjusting different things to find the best settings for your PC.
- Use scenes and sources: You can set up different scenes for different games or needs. You can add multiple sources to your scenes (like a camera overlay, for example).
- Watch tutorials: There are lots of helpful videos on YouTube that can guide you through the process.
Using NVIDIA GeForce Experience
If you have an NVIDIA graphics card, you can use the built-in GeForce Experience software to record gameplay. Here’s how:
- Install and Update: Ensure you have the latest version of GeForce Experience installed. You can download it from the NVIDIA website.
- Open the Overlay: Open your game, then press Alt + Z to bring up the GeForce Experience overlay.
- Start Recording: Click the “Record” button or press Alt + F9 to start recording.
- Stop Recording: Click the “Record” button or press Alt + F9 again to stop recording. The recording will automatically be saved to your videos folder.
- Adjust Settings: To change recording settings, go to the main GeForce Experience window, click on the gear icon (Settings), and then select “In-Game Overlay”. Then, go to “Recordings” and you can adjust recording quality and path.
Tips for Using GeForce Experience:
- Shadowplay: The highlight feature in GeForce Experience, called shadowplay, lets you record the past few minutes of your gameplay. This can be really helpful when you forgot to start recording.
- Broadcast: GeForce Experience also has features for broadcasting your games live.
Step-by-Step: Capturing Footage on Consoles (PlayStation and Xbox)
Capturing footage on a PlayStation or Xbox is also pretty straightforward. Both consoles have built-in recording options.
Capturing Footage on PlayStation (PS4/PS5)
- Start Playing: Start the game you want to record.
- Open the Share Menu: Press the “Share” button on your controller (for PS4 it’s the “Share” button on the left side of the touchpad and for PS5, it’s the button next to the D-pad) .
- Start Recording: For the PS4, go to the Share menu options and then select “Start Recording” or press the “Share” button twice quickly. For the PS5 select “Create”, then “Start Recording” or you can press the “Create” button to immediately start recording.
- Stop Recording: Press the “Share” button again (or “Create” button on PS5) and go to the recording options, and then select “Stop Recording”. The video will be saved to your Capture Gallery.
- Access Recordings: Go to your Capture Gallery in the main system menu to find and share your videos.
Tips for capturing on PlayStation:
- Adjust recording time: In the PlayStation settings, you can adjust the length of your video clips (from a few seconds to over an hour).
- Edit on console: PlayStation allows you to make simple edits directly on your console.
- Share: Directly upload the video to YouTube or social media from the console.
Capturing Footage on Xbox (Xbox One/Xbox Series X/S)
- Start Playing: Start the game you want to record.
- Open the Guide: Press the Xbox button in the middle of your controller.
- Start Recording: In the guide, go to the “Capture & share” tab and select “Start Recording.” Alternatively you can press the Xbox button then the “X” button on your controller to start a recording.
- Stop Recording: Press the Xbox button and “X” button again. The clip will be saved.
- View Recordings: Open the Xbox guide again, go to “Capture & share”, and select “Manage Captures” to access and share your recordings.
Tips for capturing on Xbox:
- Adjust recording time: You can adjust recording settings in the settings, under the “Capture & share” tab.
- Share: Directly upload the video to YouTube or social media from the console.
Using a Capture Card
If you are looking for the best recording quality from your console, and you want to do more advanced video editing, a capture card is the option for you. Here’s how to use one:
- Connect the Hardware:
- Plug your console’s HDMI output into the capture card’s HDMI input.
- Plug the capture card’s HDMI output into your monitor or TV.
- Connect the capture card to your computer via USB.
- Install Software:
Install the software that came with the capture card on your computer. This is how your computer will recognize the capture card and record the gameplay. For example, if you use an Elgato capture card, install the Elgato 4k Capture Utility Software. - Set up Recording: Open the capture software on your computer. Select your device as a video source. Adjust your recording settings as needed. For example, choose the video recording quality, and audio recording settings.
- Start Recording: Start the game on your console. Then, in your capture card software, click on the “Record” button.
- Stop Recording: Stop the recording when you’re done. Your file will be saved to a location you chose within the recording software.
Tips for using a Capture Card:
- Choose the right capture card: Different capture cards have different capabilities (resolution, FPS). Pick one that matches what you want to capture.
- Learn the capture card’s software: Spend time exploring all the features of the included software. This will allow you to have complete control over the quality of your recordings.
- Check for updates: Keep the software and drivers updated for best performance.
Tips for Better Game Footage
Capturing is only half the battle, here’s some pointers to make sure the quality is good, and your videos look great.
Audio is Key
Clear audio is super important for any video. It doesn’t matter how good the video looks, if the audio is bad, it will be hard to watch. Make sure you have a good quality microphone, and try not to have too much noise in the background. In most video editing software you can adjust the audio to make it sound better. Consider also recording your game audio on a separate track. This allows you to adjust the levels of each track individually during video editing. For example, you can adjust the levels of the game sound, and the levels of your microphone independently.
Good Lighting
For any camera footage you capture, make sure the lighting is adequate. If it’s too dark, or the light is shining directly into the lens, it will affect how the video looks. If you are capturing your face with a webcam, position a light source in front of you. This light source should not be too strong, but it should illuminate your face. Make sure that your light sources are consistent.
Editing Your Footage
Editing software allows you to make changes to your video footage. You can add intro and outro screens, add text, add music and sound effects, make cuts, and create awesome video content. Here is some very useful advice:
- Learn the Basics: Start with free video editing software like DaVinci Resolve or Shotcut. These programs will have everything you need to create good videos. Watch online tutorials to help you get started.
- Keep it Concise: Edit your video and cut out any boring or unnecessary parts.
- Add Music: Add background music to make your videos more engaging. Make sure that you have permission to use the music you chose, or that it is copyright free.
- Add Text: Add text and effects to your videos to make them more interesting to viewers.
Practice Makes Perfect
Like anything, the more you practice recording and editing gameplay, the better you’ll get. Don’t get discouraged if your first few videos aren’t perfect. Keep experimenting with different settings and techniques, and you’ll improve over time.
Capturing game footage might seem a bit complicated at first, but it’s definitely something you can learn with a little bit of practice. Remember to try different methods to see what works best for you, and always keep learning. So go ahead, start recording, and have fun!
HOW to RECORD/CAPTURE Gameplay on OBS STUDIO 2022
Final Thoughts
To capture game footage, you have several options. PC gamers often use built-in tools or third-party software for screen recording. Console players can utilize their system’s capture function, or an external capture card. Choose the method which best suits your setup and needs.
For better quality, check your recording settings to adjust resolution and frame rate. Remember to test recording and ensure your audio is clear, especially if you plan to add commentary. Experiment with different tools and practice ‘how to capture game footage’ to find your preferences.

