To disable Game Bar Windows 11, go to Settings > Gaming > Game Bar and toggle the switch to ‘Off’.
Is the Game Bar popping up when you don’t need it? Many gamers appreciate the features, but some find it intrusive. If you are not a fan of game bar and want to get rid of it. This quick guide will show you exactly how to disable game bar windows 11 and take back control. Let’s dive straight into the settings and say goodbye to the game bar.

How to Disable Game Bar Windows 11
The Game Bar in Windows 11 is a handy tool for gamers. It lets you take screenshots, record gameplay, and chat with friends. But sometimes, it can get in the way. Maybe it pops up when you don’t need it, or perhaps you’re simply not a gamer and don’t use it. Whatever the reason, it’s easy to turn off the Game Bar if you want to. This guide will show you how to do it in different ways.
Disabling Game Bar Through Windows Settings
The most common way to turn off the Game Bar is through the Windows Settings app. It’s simple and straightforward. Here’s how to do it:
Accessing the Settings Menu
First, you need to open the Settings app. There are a couple of ways to do this:
- Using the Start Menu: Click the Start button (the Windows logo) on the taskbar. Then, click the Settings icon (it looks like a gear).
- Using the Keyboard Shortcut: Press the Windows key + I on your keyboard. This will directly open the Settings app.
Navigating to the Gaming Section
Once the Settings app is open, you’ll need to find the gaming settings:
- Click on the “Gaming” option in the left sidebar. It usually has an Xbox controller icon next to it.
- You’ll see a few options. Choose “Xbox Game Bar”. This is where you control everything related to the Game Bar.
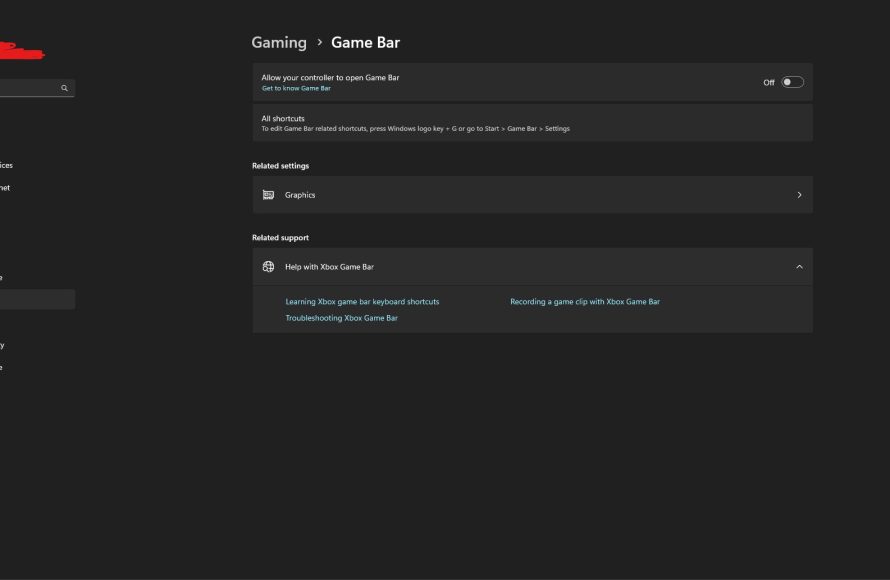
Turning off the Game Bar
Now you’re almost there! On the Xbox Game Bar settings page, you’ll see a toggle switch that says “Open Xbox Game Bar using this button on a controller”.
- Click the toggle switch to turn it off. When it’s off, it will be gray instead of blue.
- You will notice that the checkbox also gets disabled which says, “Open Xbox Game Bar using this button on a keyboard”
- That’s it! You have now disabled the Game Bar through the settings. It won’t pop up anymore when you press the Windows key + G.
This method is the easiest and most recommended way to disable the Game Bar for most people.
Disabling Game Bar Through the Registry Editor
If you prefer a more direct way or the settings method isn’t working for some reason, you can disable the Game Bar using the Registry Editor. However, this method requires extra care because making mistakes in the Registry Editor could cause problems. If you are not comfortable working in the Registry Editor, it’s best to use the settings method described above.
Opening the Registry Editor
Here’s how to open the Registry Editor:
- Press the Windows key + S on your keyboard to open the search bar.
- Type “regedit” (without the quotes) into the search bar.
- Click on “Registry Editor” from the search results. You might be prompted to give the app permission to make changes. Click “Yes” if this happens.
Now that the Registry Editor is open, you need to carefully navigate to the right place.
Finding the Game Bar Key
The Game Bar settings are located in a specific folder or ‘key’ in the registry. Here’s how to find it:
- Copy and paste the following path into the address bar at the top of the Registry Editor window and hit the “Enter” key:
HKEY_CURRENT_USER\Software\Microsoft\GameBar
After pasting the path in address bar of registry editor, it will automatically navigate to the specific key/folder on the left side of the screen.
Modifying the Game Bar Value
Now that you’re in the right place, you need to change a value to disable the Game Bar:
- Look on the right-hand side of the Registry Editor window. You should see something called “AppCaptureEnabled”.
- Double-click on “AppCaptureEnabled”. A small window will pop up.
- In the “Value data” box, change the value from “1” to “0”.
- Click “OK” to save your changes.
If you don’t see “AppCaptureEnabled”, don’t worry. You can create it:
- Right-click on an empty area in the right-hand pane.
- Select “New” and then “DWORD (32-bit) Value”.
- Name the new value “AppCaptureEnabled”.
- Double-click on “AppCaptureEnabled” and set the value to “0” (as described above).
Restarting Your Computer
To make sure the changes take effect, you should restart your computer. Once your computer restarts, the Game Bar should be disabled. If you ever want to re-enable it, just change the “AppCaptureEnabled” value back to “1” or use the settings app described earlier. It’s that simple!
Be cautious when working in the Registry Editor. Always double-check your changes before clicking ‘OK’. This method is a little more technical, but it’s effective.
Disabling Game Bar Using Group Policy Editor
The Group Policy Editor is another tool that advanced users can use to control settings like the Game Bar. This method is mainly for users of Windows 11 Pro, Enterprise, or Education editions as it isn’t available on Windows 11 Home edition. If you have one of the mentioned editions and you are comfortable using the Group Policy Editor, here’s how to disable the Game Bar using this method:
Opening Group Policy Editor
Here’s how you can open the Group Policy Editor:
- Press the Windows key + S to open the search bar.
- Type “gpedit.msc” (without the quotes) in the search bar.
- Click on “Edit group policy” to open the Group Policy Editor.
Remember, this method is not available for all Windows 11 versions. So, if you do not see the “Edit group policy” option, you cannot use this method.
Navigating to the Game Bar Settings
Once the Group Policy Editor is open, you’ll need to navigate to the Game Bar settings. Here’s where to find them:
- In the left panel, go to “Computer Configuration”.
- Then navigate to “Administrative Templates”.
- Click on “Windows Components”.
- Finally, find and click on the “Game Recording and Broadcasting” folder.
Disabling the Game Bar Policy
In the “Game Recording and Broadcasting” folder, you’ll see a setting called “Enable Xbox Game Bar”. Now, you need to modify it:
- Double-click on “Enable Xbox Game Bar”.
- A new window will pop up.
- Select the “Disabled” option.
- Click “Apply” and then “OK” to save changes.
After making the changes, you may need to restart your computer for the setting to take effect. After restarting, Game Bar will be disabled.
Understanding Why You Might Want to Disable Game Bar
Now that you know how to disable the Game Bar, let’s talk about why you might want to do this. Several reasons might prompt you to turn it off.
Resource Consumption
The Game Bar, even when not actively used, can run in the background and consume system resources. It can take up a small amount of your computer’s processing power (CPU) and memory (RAM). If you’re running a low-powered machine or need all available resources for other programs or games, disabling the Game Bar can free up some space.
Preventing Accidental Activation
Sometimes, the Game Bar can be a bit too eager to pop up. Maybe you accidentally press the Windows key + G while typing or doing something else. This unexpected interruption can be annoying. By turning it off, you can prevent these accidental pop-ups from disrupting your work or play.
Not a Gamer
If you’re not a gamer, or even if you are, but you don’t find the Game Bar useful, there’s no need to have it running. It’s perfectly fine to disable features you don’t use. It keeps things cleaner and simpler. The Game Bar is primarily targeted towards gamers, and if you do not belong to that group, you might not need it.
Performance Concerns
Although the Game Bar is generally designed not to impact performance significantly, some users have reported minor performance issues when it’s running in the background. These issues can include slight input lag or frame rate drops. If you’re experiencing such issues, disabling the Game Bar might help improve performance.
Privacy Considerations
The Game Bar is designed to capture and broadcast your gameplay. If you are concerned about potential privacy implications from such features, you can disable it. When the Game Bar is disabled it stops capturing any such data and prevents unintended or accidental recording of your activities.
Other Preferences
Sometimes, you might want to turn off features just to keep things minimalistic. If you prefer a clean interface and don’t need the features that come with Game Bar, feel free to disable it. It’s all about making your computer work the way you want it to.
Re-Enabling the Game Bar
If you disable the Game Bar and later decide you want it back, re-enabling it is just as easy as disabling it. Here’s how to do it:
Using Windows Settings
The easiest way to re-enable the Game Bar is through the Windows Settings app, just like you did to turn it off.
- Go to Settings by pressing Windows Key + I.
- Navigate to “Gaming” and click on “Xbox Game Bar”.
- Click the toggle switch to turn it back on. The switch should be blue when the Game Bar is enabled.
Once you turn the toggle back on, the Game Bar will function again.
Using Registry Editor
If you disabled the Game Bar via the Registry Editor, you can also re-enable it in that same area.
- Open the Registry Editor by typing “regedit” in the search bar and opening the “Registry Editor” app.
- Navigate to
HKEY_CURRENT_USER\Software\Microsoft\GameBarby copying and pasting that address in the address bar at the top of registry editor. - Double-click on “AppCaptureEnabled”.
- Change the “Value data” from “0” to “1”.
- Click “OK” and restart your computer.
After restarting your computer, Game Bar will be enabled again.
Using the Group Policy Editor
If you used the Group Policy Editor to disable the Game Bar, here is how to re-enable it:
- Type “gpedit.msc” into the search bar and open the “Edit group policy” app.
- Navigate to “Computer Configuration” then “Administrative Templates”, “Windows Components”, and “Game Recording and Broadcasting”.
- Double-click on “Enable Xbox Game Bar”.
- Select “Enabled” or “Not Configured”.
- Click “Apply” and “OK” then restart your computer.
As you can see, getting your Game Bar back up and running is quick and easy using any of the above methods. You can use any method you prefer as long as you are comfortable with that specific method. Now you can use the Game Bar features for recording gameplay, taking screenshots and communicating with other players if you want to!
In short, the Game Bar is a useful tool for many, but it’s not for everyone. Windows 11 makes it easy to turn it off and back on whenever you want. Whether you use the settings, Registry Editor, or Group Policy Editor, disabling the Game Bar is a simple process. You now have a complete understanding on how to do it and some reasons behind the necessity of disabling the Game Bar. Choose the method you are most comfortable with and enjoy your windows experience.
How to Remove the XBox Game Bar on Windows 11
Final Thoughts
To disable Game Bar Windows 11, navigate to Settings, then Gaming. Find the Game Bar section and toggle the switch to ‘Off’. This will prevent the overlay from appearing. Another method involves disabling Xbox Game Bar within the Xbox app settings.
This simple process ensures the Game Bar will not interfere with your activities. You’ve successfully learned how to disable game bar windows 11.

