To disable Windows Game Bar, open Settings, click on Gaming, then toggle the “Record game clips, screenshots, and broadcast using Game bar” option to the off position.
Annoying pop-ups and unwanted overlays can disrupt your focus. Many users find the Windows Game Bar intrusive, especially if they aren’t gamers. This tool, meant for recording gameplay, can become a source of frustration for those simply trying to work. Learning how to disable Windows Game Bar is a simple process.
Fortunately, turning it off is quite straightforward. By making a small change in your settings, you can get rid of the interface. Let’s quickly address how to disable windows game bar and reclaim your screen space.

How to Disable Windows Game Bar
The Windows Game Bar can be a handy tool for gamers, providing quick access to screen recording, screenshots, and performance monitoring. However, if you don’t use these features, or if you find it popping up when you don’t want it to, it can be more of a nuisance than a help. Luckily, Microsoft makes it easy to disable the Game Bar completely, and you have several ways to do it. Let’s explore these methods step by step.
Disabling the Game Bar Through Settings
The most straightforward way to get rid of the Game Bar is through the Windows Settings app. Here’s how you do it:
Accessing the Settings Menu
First, you’ll need to open the Settings app. You can do this in a couple of ways:
- Method 1: Click on the Start button (the Windows logo in the bottom-left corner of your screen), and then click on the gear-shaped “Settings” icon.
- Method 2: Press the Windows key + I on your keyboard at the same time. This keyboard shortcut will directly open the Settings app.
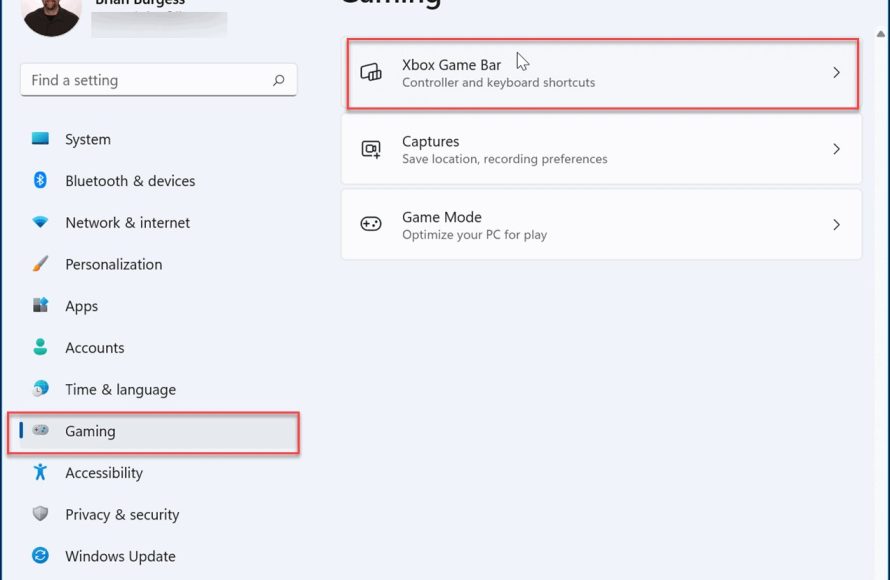
Navigating to the Gaming Section
Once you’re inside the Settings app, you’ll need to find the “Gaming” section. It usually has a picture of a game controller. Click on it to proceed.
Turning Off the Game Bar
Now that you’re in the Gaming settings, you should see “Game bar” listed on the left-hand side. Click on it. On the right side, you’ll see a toggle switch that says “Record game clips, screenshots, and broadcast using Game bar.” To disable the Game Bar, simply click this switch to the “Off” position. It will turn from blue/on to grey/off. That’s it! The Game Bar is now disabled.
Turning Off Game Bar Using the Registry Editor
If you are comfortable using the Registry Editor, you can also disable the Game Bar using this method. The Registry Editor is a powerful tool, so please be cautious and follow these steps carefully. Any incorrect change can affect the working of your operating system.
Opening the Registry Editor
First, press the Windows key on your keyboard. Now, type “regedit” and press Enter. This will open the Registry Editor. A window will pop up asking if you want to allow the app to make changes to your computer, click yes.
Navigating to the Correct Registry Key
Inside the Registry Editor, you will see a folder-like structure on the left. You need to navigate to the specific location where the Game Bar settings are stored. In the address bar at the top of the Registry Editor, you can copy this path to go directly to the desired folder:
HKEY_CURRENT_USER\Software\Microsoft\GameBar
You can also navigate to this by expanding the following folders:
HKEY_CURRENT_USERSoftwareMicrosoftGameBar
Modifying the AppCaptureEnabled Value
Once you are inside the GameBar folder, look for an entry called “AppCaptureEnabled”. This entry controls whether the Game Bar is enabled or not. Double click on it. A small window should pop up. Under the “Value Data” section, you’ll see a number. If the Game Bar is currently enabled, it will be set to “1”. Change this value to “0” (zero) and click the “Ok” button. This will effectively disable the Game Bar.
Restarting Your Computer
For the change to take effect, you must restart your computer. After your computer restarts, the Game Bar will no longer be active.
Disabling Game Bar Through Xbox App
The Xbox app also plays a role in the Windows Game Bar functionality. If you have the Xbox app installed, you can disable the Game Bar from within it. Here’s how:
Opening the Xbox App
You can open the Xbox app by clicking the Start button and typing “Xbox,” then clicking on the Xbox app icon.
Accessing Settings
Once the Xbox app is open, look for the “Settings” icon. This is typically represented by a gear icon and may be located on the left-hand menu bar or in a drop-down menu. Click on it to open the Xbox app settings.
Disabling Game Bar from within the Xbox App
Within the Xbox settings, you’ll find an option related to the Game Bar. Look for something like “Game Bar” or “Gaming” and click on it. You should now be able to see a toggle switch or a check box to disable the Game Bar. Turn it off to disable the Game Bar. Now, the Game bar will be turned off. You might need to restart your computer for the changes to take full effect.
Why You Might Want to Disable the Game Bar
While the Game Bar offers some useful features, many users find reasons to disable it. Here are some common scenarios:
Performance Issues
Some users report that the Game Bar can sometimes cause performance issues, particularly on older computers or while running demanding games. It can use system resources, even when not actively being used, potentially leading to lower frame rates or stuttering in games. Disabling it can free up system resources and improve overall game performance.
Accidental Pop-ups
The default keyboard shortcut to open the Game Bar is Windows key + G. Many users accidentally press this combination, which can interrupt what they are doing. Disabling the Game Bar can prevent those unwanted pop-ups and keep your workflow flowing smoothly. This can be particularly annoying if you are not into gaming but accidentally press the shortcut while typing.
Not Using Game Bar Features
If you are not a gamer or you prefer other applications for screen recording and screenshots, then the Game Bar becomes redundant. Disabling it can remove unnecessary overhead from your system. You also might have a dedicated software for video recording or game captures that does the work of Windows Game Bar, then you can simply disable Windows Game Bar.
Resource Consumption
Even when it’s not actively being used, the Game Bar runs in the background and consumes system resources like RAM and processing power. Disabling the Game Bar can help free up these resources, which can benefit overall system performance, particularly if you’re using older or lower-end hardware.
Customization Preference
Some users prefer to use a different screen recording software or do not need game specific features. In that case, the Windows Game Bar is extra and you might want to turn it off to minimize the applications running in the background.
What Happens When You Disable the Game Bar?
When you disable the Game Bar, the following changes occur:
- No more overlays: The Game Bar overlay will no longer appear when you are playing a game or when you press the Windows key + G combination.
- No more captures: You won’t be able to capture gameplay footage, take screenshots, or use the broadcast functions using the Game Bar.
- No more performance monitoring: The performance overlay features of the Game Bar will no longer be available.
- No More Xbox Social Features: Any social features of the Game Bar will be unavailable as well.
- Reduced background usage: With the Game Bar disabled, it will not be using system resources, which means that your system can perform better.
If you decide you want the Game Bar back, you can re-enable it by reversing the steps you took to disable it. For example, if you disabled through Settings app, simply go back to the same menu and turn the switch to “On” position. If you disabled through the registry editor, go to the same registry key location and change the value back to 1.
Alternative screen recording and screenshot options
Even if you have disabled the Windows Game Bar, you still have access to other options for screen recording and taking screenshots. Here are some commonly used ones:
Snipping Tool
Windows comes with built-in screen capture tool called the Snipping Tool. This tool allows you to capture specific part of your screen and save it as image. You can open it from the Windows menu. Press start and type snipping tool in the search bar, and click the app from the result.
Print Screen
You can also press the Print Screen key on your keyboard to capture a screenshot of the full screen. This screenshot is copied to clipboard, and you can paste it into an image editing software like Paint or Photoshop. You can also press Windows Key + Print screen to capture the image and save it to the Pictures folder.
Third Party Screen Recording Software
There are a lot of free and paid software out there that you can use to capture videos. For example, OBS Studio is a free and open source tool that is used by many to record gameplay and create videos. Some other screen recording software options are Fraps and Bandicam. These tools offer more advanced features compared to the basic Windows Game Bar.
Disabling the Windows Game Bar can help streamline your computer, reduce resource usage, and prevent accidental pop-ups. Whether you choose to disable it through the Settings app, the Registry Editor, or the Xbox app, these steps will allow you to take control of your gaming environment. Remember, you can always enable it again if you find you need the features it offers.
How to Disable Xbox Game Bar on Windows 11 / 10 PC
Final Thoughts
To disable the Windows Game Bar, navigate to Settings, then Gaming. You’ll find the Game Bar option there. Simply toggle it off to prevent it from appearing.
This action will stop the overlay from showing during your gaming sessions. It also prevents unwanted recordings and interruptions. You can easily turn it back on when needed.
Therefore, knowing how to disable windows game bar can be beneficial. This action allows you to focus solely on your game.

