
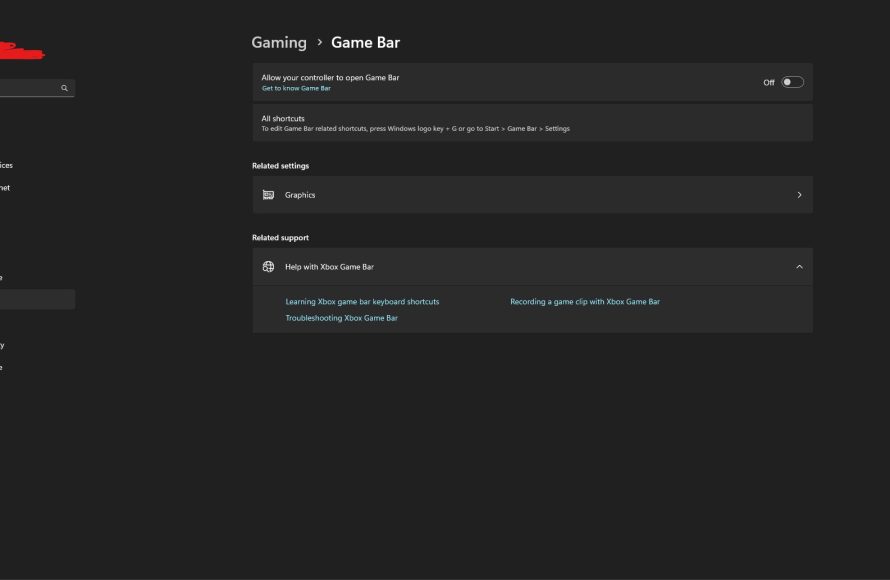
To disable Xbox Game Bar on Windows 11, navigate to Settings > Gaming > Xbox Game Bar and toggle the switch to ‘Off’.
Are you finding the Xbox Game Bar popping up unexpectedly during your workflow or gaming sessions? Perhaps you’d prefer a cleaner experience without its overlays. Many users seek guidance on how to disable Xbox Game Bar windows 11 because it can interfere with their focused tasks.
This simple guide will show you the exact steps required. We’ll cover the quick method to turn off this feature, allowing you to enjoy a distraction-free environment.

How to Disable Xbox Game Bar Windows 11
Okay, let’s talk about the Xbox Game Bar. It’s that little overlay that pops up when you press the Windows key and G at the same time. It’s meant to be super helpful for gamers, letting you record gameplay, take screenshots, chat with friends, and even check your system performance. But sometimes, you just don’t need it. Maybe it’s interfering with other programs, or you simply find it annoying. Whatever the reason, turning it off is pretty straightforward. We’re going to walk you through all the ways you can disable the Xbox Game Bar on Windows 11, so you can choose the method that works best for you.
Why Disable the Xbox Game Bar?
Before we jump into the how-to, let’s quickly touch on why you might want to disable the Xbox Game Bar in the first place. It’s not that it’s a bad feature, it’s just that it might not be for everyone. Here are a few common reasons:
- Performance Issues: On some computers, especially older ones, the Xbox Game Bar can sometimes use up resources, which can slow down your games. If you notice stuttering or lag, disabling the Game Bar could help.
- Interference with Other Programs: Sometimes, the overlay might clash with other programs you’re using. This can lead to unexpected errors or glitches.
- Unwanted Overlays: If you’re not a gamer, you might find the Game Bar popping up unexpectedly to be just plain annoying.
- Simplicity: Some people simply prefer a cleaner screen with fewer distractions. Turning off the Xbox Game Bar can help achieve this.
Disabling Game Bar Through Windows Settings
The most common and probably the easiest way to turn off the Xbox Game Bar is directly through Windows Settings. Let’s go through it step-by-step:
Accessing Windows Settings
First things first, you need to open the Windows Settings app. Here’s how you can do it:
- Click on the Start button (the Windows logo in the bottom-left corner of your screen).
- Click on the gear icon labeled “Settings.” This will open the Windows Settings window.
Navigating to Gaming Settings
Once you’re inside the Settings app, you’ll need to find the gaming section. Here’s where you should look:
- In the left-hand sidebar, click on “Gaming.” It’s usually represented by an Xbox controller icon.
- This will take you to the main Gaming settings page.
Turning off the Xbox Game Bar
Now that you’re in the Gaming settings, turning off the Xbox Game Bar is very simple:
- On the main Gaming page, you should see a section called “Xbox Game Bar.” Click on it.
- You’ll see a toggle switch labeled “Open Xbox Game Bar using this button on a controller.” (You may also see a toggle that says “Open Xbox Game Bar with the Xbox button on a controller”) Simply click the toggle switch to turn it “Off”. When the switch is grey, the feature is disabled.
- You’ll notice that there’s another toggle switch called “Open Xbox Game Bar with the keyboard shortcut”. When the toggle is grey, the feature is disabled.
And that’s it! The Xbox Game Bar is now disabled. It will no longer open when you press the Windows key + G shortcut, nor it will appear if you have an Xbox controller connected and you press the Xbox button on it.
Disabling Game Bar Through the Registry Editor
If for some reason the Settings app isn’t working for you, or you’d just prefer another way, you can disable the Xbox Game Bar using the Registry Editor. This method is a bit more technical, so please follow the instructions carefully.
A Word of Caution About the Registry Editor
Before we proceed, it’s very important to note that the Registry Editor is a powerful tool, and making incorrect changes can cause serious problems with your computer. Always create a system restore point before you make any changes to the registry, so that you can revert if necessary. This way you are always safe if something goes wrong.
Opening the Registry Editor
Here’s how to open the Registry Editor:
- Press the Windows key, type “regedit,” and press Enter.
- A User Account Control (UAC) window may appear asking for your permission to let the Registry Editor make changes. Click “Yes”.
Navigating to the Correct Registry Key
Inside the Registry Editor, you’ll need to navigate to a specific folder (which is called a “key”). Here’s the path to follow:
- In the address bar at the top of the Registry Editor window, paste this and press “Enter”:
HKEY_CURRENT_USER\Software\Microsoft\Windows\CurrentVersion\GameDVR
Disabling the Game Bar Using the Registry
Once you’ve reached the correct key, it’s time to make the change:
- Look for an entry named “AppCaptureEnabled” in the right-hand pane. If it does not exist, right-click in the right hand pane, select New > DWORD (32-bit) Value and rename the new value to “AppCaptureEnabled”.
- Double-click on “AppCaptureEnabled” to open its properties.
- In the “Value data” field, change the value from
1to0. - Click “OK” to save the change.
- Now, look for an entry named “EnableGameBar”. If it does not exist, right-click in the right hand pane, select New > DWORD (32-bit) Value and rename the new value to “EnableGameBar”.
- Double-click on “EnableGameBar” to open its properties.
- In the “Value data” field, change the value from
1to0. - Click “OK” to save the change.
Restarting Your Computer
After you’ve made these changes, you need to restart your computer for them to take effect. After restarting, the Xbox Game Bar should be disabled.
Disabling Game Bar Features Individually
If you don’t want to completely disable the Xbox Game Bar but find some specific features annoying, you can turn them off one by one. This allows you to use some of its functions while avoiding the parts you dislike.
Turning off background recording
One frequent annoyance is the background recording. While it’s designed to help you catch those amazing moments in gameplay, it might be something you wish to switch off. Here’s how:
- Open the Settings app.
- Go to “Gaming”.
- Click on “Captures”.
- Under “Background recording”, find the “Record in the background while I’m playing a game” option, and turn the toggle to the “Off” position.
Disabling the Game Bar Shortcut
As mentioned before, many people find that the Game Bar shortcut being enabled is quite bothersome. You can turn this off while keeping the bar itself active:
- Open the Settings app.
- Go to “Gaming”.
- Click on “Xbox Game Bar”.
- Turn the “Open Xbox Game Bar using this button on a controller” toggle to the “Off” position.
- Turn the “Open Xbox Game Bar with the keyboard shortcut” toggle to the “Off” position.
With these tweaks, you will still be able to open the Game Bar manually from the start menu (by searching for “Xbox Game Bar”), or through the Xbox App if you have it installed, but will not have it popup with shortcut keys or controller button.
When to Re-enable the Xbox Game Bar
Even if you’ve disabled the Xbox Game Bar, there might be times when you want it back. For example, if you are going to use the record feature, or if you are going to play games with your friends and need the party chat feature. Re-enabling it is just as simple as disabling it.
Re-enabling Through Settings
If you disabled it through Windows Settings, here’s how to bring it back:
- Open the Settings app.
- Go to “Gaming”.
- Click on “Xbox Game Bar”.
- Turn the “Open Xbox Game Bar using this button on a controller” toggle to the “On” position.
- Turn the “Open Xbox Game Bar with the keyboard shortcut” toggle to the “On” position.
Re-enabling Through the Registry Editor
If you disabled it with the Registry Editor, follow these steps:
- Open the Registry Editor again by typing “regedit” into the search bar and hitting enter.
- Navigate to the same key as before:
HKEY_CURRENT_USER\Software\Microsoft\Windows\CurrentVersion\GameDVR. - Double-click on “AppCaptureEnabled” and change the value from
0back to1. - Double-click on “EnableGameBar” and change the value from
0back to1. - Click “OK” and restart your computer.
The Xbox Game Bar is now back, ready for whenever you might need it!
Disabling the Xbox Game Bar on Windows 11 is a straightforward process. Whether you prefer the simple steps in Windows Settings or the more advanced method using the Registry Editor, the choice is yours. You can even choose to disable some of the features while keeping others. The goal is to customize your Windows experience to fit your preferences. Remember to always proceed with caution when making changes to the registry, and you’ll be able to personalize your computer to your heart’s content.
How to Disable Xbox Game Bar on Windows 11 / 10 PC
Final Thoughts
To disable the Xbox Game Bar in Windows 11, you can navigate to the Settings app and select the “Gaming” section. Then, click on “Xbox Game Bar” and toggle the switch to off. This will prevent the overlay from appearing while you play games.
Remember to check the “Captures” settings as well, as these are related. Adjust settings according to your preference to stop the game bar from popping up unexpectedly. Effectively disabling ‘how to disable xbox game bar windows 11’ provides a cleaner, distraction-free experience during gameplay.

