
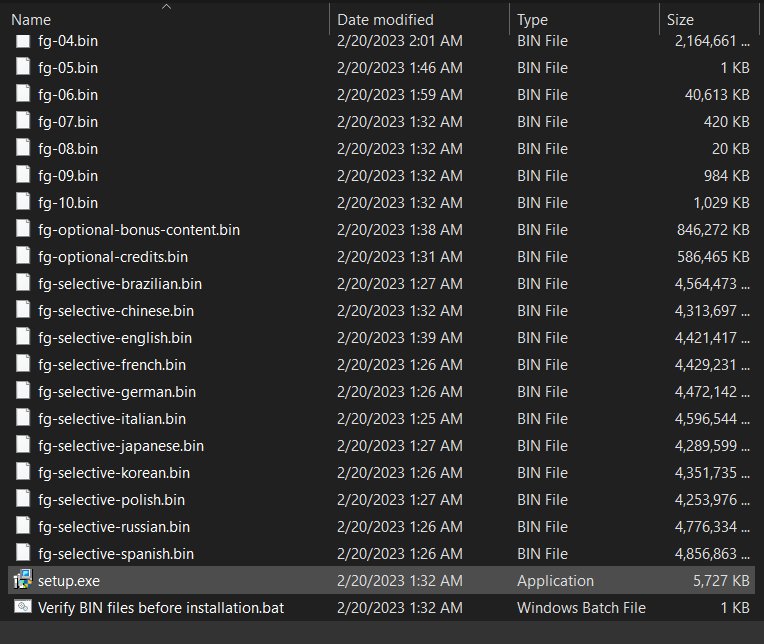
To install FitGirl games, you need to download the torrent file, use a torrent client to download the game files, then run the setup.exe file and follow the on-screen prompts to complete the installation.
Have you ever felt the urge to dive into a new game but faced the daunting task of acquiring it? The world of game repacks can seem complex, especially when dealing with torrent files. That’s why we are addressing the common query: how to install FitGirl games. This guide will simplify the process.
We will walk you through each step, from downloading the files to getting the game running on your computer. You can begin playing your favorite titles without stress by understanding the process. It’s not as intimidating as it first appears.

How to Install FitGirl Games
Okay, so you’ve downloaded a FitGirl repack and you’re ready to play! That’s awesome! But sometimes, installing these games can feel a little tricky. Don’t worry, it’s not as hard as it seems. This guide will walk you through the whole process step-by-step, making it easy to get your game up and running. We will explore everything from preparing your computer, understanding the setup process, and troubleshooting common problems. Let’s dive in and get you gaming!
Before You Begin: Getting Ready for Installation
Before we jump into the installation process, there are a few important things to check to make sure everything goes smoothly. Think of it like preparing ingredients before you start baking a cake. It makes everything much easier!
Checking System Requirements
Every game has minimum and recommended requirements. These are the specs your computer needs to run the game well. It’s important to check these before you try to install. Here’s how:
- Find the Game’s Page: Go to the website where you got your FitGirl repack. You should find a description of the game.
- Look for System Requirements: On that page, there will be a section listing the minimum and recommended system requirements. Look for things like:
- Operating System: Windows 7, 10, 11, or something else. Make sure your computer uses the correct version.
- Processor: The type of CPU your computer uses. It will be something like Intel Core i5 or AMD Ryzen 5.
- Memory (RAM): How much RAM your computer has. This is usually shown in Gigabytes (GB), like 8GB or 16GB.
- Graphics Card: The type of graphics card your computer uses. It will be something like NVIDIA GeForce GTX or AMD Radeon RX.
- Storage Space: How much free space you need on your hard drive. This will be shown in GB.
- Compare to Your Computer: Now, check your computer’s specs. You can do this by:
- Going to the Windows search bar and typing “System Information.”
- Looking for the same information mentioned above and comparing it to the requirements.
If your computer meets the minimum requirements, the game will probably run, but it might not be super smooth. Meeting the recommended requirements will give you the best experience. If your computer is below the minimum, the game might not work at all.
Downloading the Necessary Software
FitGirl repacks often use specific software to compress and extract the game files. Here are a couple of important ones you might need:
- 7-Zip or WinRAR: These are programs that can extract the game files. If you don’t have one of them, download one from the official website. It’s free.
- Torrent Client: If you used torrents to download the game, you probably already have one. Popular options include:
You don’t need a torrent client if you used direct downloads.
Checking for Enough Disk Space
Make sure you have enough free space on your hard drive. Look at the system requirements again and check the size of the game. Remember you need extra space for the installation process. It’s a good idea to have a bit more space than the game’s size. Sometimes, the installation process needs extra room to unpack the files, and if you don’t have sufficient space available, the setup will be interrupted.
Disabling Antivirus Temporarily
Sometimes, antivirus software can mistake the game files as harmful, because they are compressed to an extreme extent, and block the installation. It’s a good idea to temporarily turn off your antivirus during the installation. Don’t forget to turn it back on after the installation is complete. Here’s how to disable it:
- Find the Antivirus Icon: Look for the icon in the system tray (usually in the bottom-right corner of your screen).
- Right-click and Disable: Right-click on the icon and you should see an option to disable it. Depending on your antivirus software, it may say “Disable Protection,” “Turn Off,” or something similar.
- Choose the Duration: Select how long you want to disable it for. Choose an appropriate time so you remember to turn it back on after you are finished.
Remember to enable your antivirus after the installation to keep your computer protected.
Step-by-Step Installation Guide
Okay, now that you’ve got everything prepared, let’s get to installing the game!
Extracting the Game Files
FitGirl repacks come in compressed files (.zip, .rar, or other archive types). You’ll need to extract these first. Here’s how:
- Locate the Downloaded Files: Find the folder where you downloaded the FitGirl game. You’ll likely see one or more files with extensions like .zip or .rar.
- Right-Click and Extract: Right-click on the first archive file (usually named something like “setup.part1.rar”). You should see options for 7-Zip or WinRAR.
- Select “Extract Here” or “Extract to [Folder Name]”: Choose to “Extract Here” if you want the files in the same folder. “Extract to [Folder Name]” will create a new folder with the extracted files.
- Wait for Extraction: The extraction process can take some time, depending on the size of the game. Let it finish without interruption. Sometimes you need to extract each part separately. Be careful to select all of them during the extracting phase.
Running the Setup File
After extraction, you’ll find the setup executable (.exe) file. This file starts the installation process.
- Locate the Setup File: Go to the folder where you extracted the files. The setup file usually has a name like “setup.exe” or something similar.
- Run as Administrator: Right-click on the setup file and choose “Run as administrator.” This ensures the setup has the permissions it needs to install the game.
If the setup asks for any permission, make sure to allow them to proceed.
Navigating the Setup Wizard
The setup wizard is like a guide that helps you through the installation. Here’s what you’ll usually see:
- Language Selection: The first screen might ask you to choose the language for the installation. Pick the language you prefer.
- Installation Path: The installer will ask where you want to install the game. You can either use the default location or choose your own by clicking “Browse.” Select a drive with enough space.
- Components and Options: Sometimes, you’ll have options to select specific components (like language packs or extra tools). Check the boxes for what you need, or just use the default options.
- Start Menu and Desktop Shortcuts: You will be given options to create Start Menu shortcuts or Desktop shortcuts so it’s easier to launch the game. Choose what you prefer and click the checkbox.
- Installation Process: The installer will start copying the game files. This can take a while, so be patient and don’t close the window. You can usually see a progress bar showing how much is left.
Just follow the instructions and wait for the installation to complete. It may take some time, depending on the size of the game and your computer’s performance. You will see the percentage progress on the window. Don’t interrupt it.
Verifying the Installation
Once the installation is done, it’s a good idea to make sure everything is okay before you start playing.
- Launch the Game: Find the shortcut on your desktop or in the Start Menu. Click it to launch the game.
- Check for Errors: If the game starts without any problems, great! If you see error messages, we’ll cover some common issues later.
- Play a Little: Play a little bit to make sure that the game is working and running smoothly.
Dealing with Common Installation Problems
Sometimes, things don’t go as planned. Here are some common issues you might encounter and how to fix them.
Installation Errors
Installation errors can happen for various reasons. Here’s how to approach them:
- “ISDone.dll” or “Unarc.dll” Errors: These are common with FitGirl repacks. They usually indicate a problem with the installation files or your system.
- Free up RAM: Close any other running programs and apps.
- Increase Virtual Memory: Search for “Performance Settings” in your Windows Search bar. Go to “Advanced” and click on “Change…” under “Virtual Memory”. Select “Automatically manage paging file size for all drives” or set it manually and click “Set” and restart your PC.
- Reinstall the Game: Try reinstalling the game again, this time disabling your antivirus again. You can also try to use the “Verify Binaries” option during setup.
- Not Enough Space Errors: If you get an error about not enough space, double-check your hard drive. You need to have enough free space for the installation.
- Corrupted Downloaded Files: Sometimes, the downloaded files are corrupted. Re-download the game from a different source.
- Permissions Issues: Make sure you “Run as administrator” during the setup process.
Game Crashes or Won’t Launch
If the game installs fine but crashes or won’t start, try these fixes:
- Update Drivers: Make sure your graphics card drivers are up to date. You can download them from the manufacturer’s website (NVIDIA or AMD).
- Run the Game in Compatibility Mode: Right-click on the game shortcut and select properties. Go to the “Compatibility” tab and try to run in compatibility mode for an earlier version of Windows.
- Verify Game Files: You may be given an option to Verify Binaries during the setup process, use it to verify and fix missing files.
- Check System Requirements Again: Maybe the problem is related to that your system is still not up to the mark for running the game smoothly.
Issues with Antivirus
Antivirus software can sometimes prevent the game from working correctly, so be sure to temporarily disable it while the installation process is underway. You can also add the game’s installation folder to the antivirus exceptions, so it doesn’t interfere with the game. Follow these steps:
- Disable Antivirus During Setup: Before running the setup, disable your antivirus software.
- Add Game Folder to Exceptions: After installation, if the game is still being flagged as unsafe by antivirus software, you will need to add the installation folder to the exceptions list.
Troubleshooting General Issues
Sometimes, you might encounter unusual problems. Try these general tips:
- Restart your Computer: Sometimes a simple restart can fix a lot of problems.
- Check Forums: Search online forums and communities for the game. Other people might have faced similar issues and have found solutions.
- Reinstall the Game: If all else fails, you can try to reinstall the game. Make sure to delete the previous files thoroughly.
Important Considerations
A couple of extra things to keep in mind.
- Patience is Key: Installing large games, especially repacks, can take a long time. Be patient and let the installation finish.
- Read Instructions: FitGirl sometimes includes text files or other instructions with the game. Make sure to read them.
- Be Careful with Downloads: Only download games from safe and trusted sources, to avoid viruses or other issues.
By following these steps and troubleshooting tips, you should be able to install and play your favorite FitGirl games without any problems. Enjoy gaming!
How To Properly Install Fitgirl Repack Without Any Errors – Resolve ISDONE.DLL Error
Final Thoughts
To install FitGirl games, you must first download the torrent file. Then, use a torrent client to get the game files.
Next, run the installer, following the on-screen instructions carefully. It’s essential to have sufficient disk space.
Finally, some games need specific crack files copied; instructions will be available. With these steps, you know how to install fitgirl games.

