To move Xbox games to external hard drive, navigate to Settings > System > Storage. Select the game you wish to move, then choose ‘Move or Copy’ and select your external drive.
Running out of space on your Xbox? We’ve all been there, staring at that dreaded “storage full” message. It’s a common issue, especially with today’s massive game files. Luckily, there’s a simple solution, and this guide will quickly teach you how to move Xbox games to external hard drive.
This process frees up space on your console’s internal drive, while still allowing you access to all your favorite titles. It’s easy to do and can make a big difference in your gaming experience, so let’s get started.

How to Move Xbox Games to External Hard Drive
Running out of space on your Xbox? It’s a problem many gamers face. Those big, awesome games take up a lot of room! But don’t worry, you don’t have to delete your favorite adventures. You can move your Xbox games to an external hard drive, and it’s easier than you might think. This frees up space on your console’s internal drive, letting you download even more games. In this article, we’ll guide you through the entire process, step-by-step. We will cover everything from choosing the right external hard drive to actually moving the games and even troubleshooting potential problems.
Why Move Games to an External Hard Drive?
Before we jump into how to move your games, let’s quickly talk about why you’d want to. Here are some key reasons:
- More Space: The most obvious reason! Consoles often fill up quickly, especially with the size of modern games. An external drive gives you tons of extra room.
- Faster Load Times: Surprisingly, some external hard drives (especially solid-state drives or SSDs) can make your games load faster than the internal drive.
- Game Portability: If you have multiple Xbox consoles, you can easily move your games between them using an external drive.
- Organization: You can keep your games organized and separate from other files on your console.
Choosing the Right External Hard Drive
Not just any hard drive will work with your Xbox. There are some important things to keep in mind when choosing one. Let’s break them down:
Hard Drive Type: HDD vs. SSD
There are two main types of external hard drives:
- HDD (Hard Disk Drive): These drives are generally more affordable and come in larger storage capacities. They are a good option if you’re on a budget and need lots of space. The speed, however, might be slower than an SSD.
- SSD (Solid State Drive): These drives are much faster than HDDs, which can lead to quicker game loading times and a smoother experience. They tend to be more expensive and may offer less storage for the same price.
For most people, an HDD is perfectly fine for storing Xbox games. However, if you prioritize speed and don’t mind paying a bit more, an SSD is a great option.
Storage Capacity
How much storage you need depends on how many games you plan to download. Modern games can range from 20 GB to over 100 GB each. Think about your gaming habits and how many titles you typically have installed at once. Here’s a general guide:
- 500 GB: Good for smaller game libraries.
- 1 TB (Terabyte): A solid choice for most gamers.
- 2 TB or More: Recommended for avid gamers with extensive libraries.
USB Compatibility
Your Xbox needs a USB 3.0 (or higher) connection to use an external hard drive. This provides the necessary speed for transferring games and playing them from the external drive. Make sure the external hard drive you choose has a USB 3.0 or USB 3.1 port. Most drives made for gaming will already have this, but it’s always good to double-check.
Drive Formatting
The Xbox uses a specific format for external hard drives. When you connect a new drive, your console will prompt you to format it, and it will usually format the drive to the correct format automatically. This erases all data on the drive, so make sure it doesn’t have any important files on it before connecting it to your Xbox. We will talk more about formatting in steps below.
Preparing Your External Hard Drive
Okay, you have chosen your external hard drive; now, let’s get it ready to work with your Xbox.
Connecting the Drive
The first step is connecting the external drive to your Xbox. Here’s how:
- Make sure your Xbox is powered on.
- Locate a USB port on your Xbox. These are typically on the back of the console, but some models may also have them on the front.
- Plug in the USB cable from your external hard drive into the USB port of your Xbox.
- The Xbox should recognize the new device and show a notification.
Formatting the Drive
If the external drive is new, or if it was previously used with another device that uses different file formats, the Xbox may prompt you to format it. This process makes the drive compatible with your Xbox. Follow these steps:
- Your Xbox will detect that you have connected an external drive for first time or when you connect an external drive that is formatted for other devices.
- You will be prompted with a pop-up menu and the pop-up will ask you “Format Storage Device?”. Click on format storage device.
- Choose “Format as Xbox Storage.”
- The Xbox will ask you to confirm this action. It will remind you that formatting the device will delete all existing files. If you’re sure, click “Format Storage Device.”
- The Xbox will format the drive and when this action completes, the external hard drive will be ready to use.
Important Note: Formatting erases everything on the external hard drive. So, double-check to ensure there are no personal files you need. If there are, back them up to your PC or other storage device.
Moving Xbox Games to the External Hard Drive
Now that your external hard drive is set up, let’s move some games over! The process is fairly straightforward.
Using the Xbox Settings
Here is the most common way to transfer games to your external hard drive:
- Press the Xbox button on your controller to open the guide.
- Go to “Profile & System” at the far right menu.
- Select “Settings” from that menu.
- Go to “System” and select “Storage”.
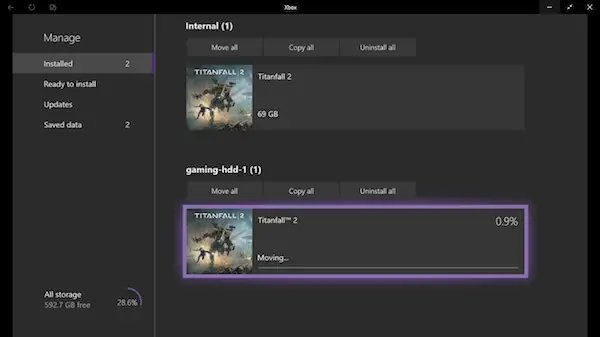
- You’ll see the internal drive and your external drive listed. Select the internal drive which contains the games you want to move.
- Highlight the games you want to move, and from the option select, choose “Move or Copy”.
- Select the external drive as the destination.
- The games will be moved to your external drive. The time it takes will depend on the size of the games and the speed of your drives.
Moving Multiple Games
You can select multiple games to move at once. Just follow the same steps and choose the specific games you want to transfer. This can save you a lot of time compared to moving games one by one.
Moving Games from Disk
If you have installed the games from disk, it is generally recommended to re-install those games into your external hard drive rather than move. this avoids any potential problems or conflicts.
Managing Your Games on the External Hard Drive
Once you have moved games to your external hard drive, it’s good to know how to manage them. Here are some tips:
Launching Games
You can launch games on your external drive exactly the same way you would launch games on your internal drive. They will appear in your games library just like before.
Moving Games Back to Internal Storage
If you need to move games back to your internal storage, follow the same steps as before, but simply select your internal hard drive as the destination.
Disconnecting the Drive Safely
Always properly disconnect your external hard drive to prevent any data loss. Here is the correct way to do it.
- Press the Xbox button to open the guide.
- Go to “Profile & System” and then select “Settings.”
- Go to “System” and then select “Storage.”
- Choose the external drive and then select “Eject”.
- Once you see the notification, it is now safe to unplug the external drive.
Troubleshooting Common Problems
Sometimes, you might encounter a few hiccups when moving your games. Here are some common issues and how to resolve them:
Drive Not Recognized
If your Xbox doesn’t recognize the external hard drive, try these steps:
- Check the USB connection, make sure your USB cable is plugged in correctly into the Xbox and your external hard drive.
- Try a different USB port on your Xbox, if available.
- Check the external hard drive with another computer to make sure that it is working.
- Restart your Xbox.
- Check that your hard drive uses USB 3.0 or higher.
Slow Transfer Speeds
If your games are moving very slowly, check these things:
- Make sure your external hard drive uses a USB 3.0 or higher connection.
- If you use a USB Hub, make sure that it is not the culprit of slow speed. Try plugging the drive directly to the Xbox.
- Avoid using your Xbox for other tasks while transferring games.
- Consider upgrading to a faster external hard drive, like an SSD, to improve speed.
Game Errors
If you encounter errors while playing games on your external drive, try these:
- Restart your Xbox and try again.
- Move the game back to the internal drive and then back again.
- Update your Xbox software.
- Make sure your external hard drive is compatible with your Xbox.
- Make sure your external hard drive is not full.
Drive Not Formatting
If your external hard drive does not format, do these:
- Check the drive in another device to ensure it is in working condition.
- Restart your Xbox and try formatting it again.
- Make sure you selected “Format Storage Device” and not “Format Storage for Media”.
- Check if there is any compatibility problem of the drive.
If you are still facing problems even after trying all the troubleshooting techniques, contact Xbox support.
Moving your Xbox games to an external hard drive is an excellent way to increase your storage and help your console perform better. By carefully choosing the right drive and following the steps outlined above, you can easily manage your game library and enjoy more of your favorite titles. This also allows you to quickly install and move games around different consoles.
How to transfer your games to External Hard Drive on Xbox
Final Thoughts
Moving your Xbox games to an external drive is simple. Go to settings, then storage, and select your internal drive. Choose the games you want to transfer and pick the external hard drive as the destination.
The process is quick and effective. This helps free up space on your console’s primary storage. You will benefit from faster loading times using this method.
Therefore, knowing ‘how to move xbox games to external hard drive’ is crucial for any serious gamer. It keeps your console running smoothly and provides flexibility for storing and accessing games.

