The easiest way to switch which monitor a game is on is usually by pressing Windows Key + Shift + Left or Right arrow key to move the game window. Alternatively, many games also allow you to select the display in their video settings.
Ever found your game launching on the wrong screen, pulling you away from your primary setup? It’s a common frustration, but thankfully, there are simple ways to solve this. You’re not alone in wondering how to switch which monitor a game is on, and we’ll show you the quick solutions. We’ll get you back in the action on your preferred display with minimal fuss and effort.

How to Switch Which Monitor a Game is On
It’s super frustrating when you fire up your favorite game, and it pops up on the wrong screen! Maybe you’ve got a big, awesome monitor perfect for gaming, but the game stubbornly appears on your smaller, less exciting one. Or, perhaps you want to switch between monitors mid-game to show your friend or switch to a second screen for multitasking. Don’t worry; we’ve all been there! This guide will show you all the easy ways to control where your games show up, whether you’re using Windows or looking into specific game settings. You can quickly get your game displayed exactly where you want it.
Understanding Multiple Monitors Setup
Before we jump into methods, let’s make sure we all have the same idea about how multiple monitors work. When you connect more than one monitor to your computer, it’s like having one giant desktop stretched across multiple screens. You can move your mouse from one screen to another, drag windows between them, and generally act like it’s all one big area.
Primary vs. Secondary Monitors
Your computer thinks of one monitor as the “primary” one. Usually, this is the monitor where your start menu, taskbar, and icons show up. It’s like the main stage of your computer show. All other monitors are considered secondary or extended monitors. Games, by default, often try to start on the primary screen. That’s why you might need to nudge them to the monitor you actually prefer.
How Your Computer “Sees” Monitors
Your computer doesn’t know what monitors you see with your eyes; instead, it sees them as numbered screens. Windows has a way to identify each screen, usually as ‘1’, ‘2’, ‘3’, and so on. You can check this in your display settings and even rearrange how they are positioned in Windows. This can greatly affect how windows travel between your screens. If your screens are positioned side by side on your desk, then windows should travel between them similarly on your desktop.
Simple Ways to Move Games Between Monitors
Let’s start with the quickest and easiest ways to move a game screen, without getting into specific settings of the game.
Using Windows Key + Shift + Arrow Keys
This is probably the fastest trick in the book! If a game is in windowed mode (not full screen), you can use these simple keys.
1. Make sure your game is in windowed mode. If it’s full screen, press the Esc key, or the key that shows the menu options to change the screen setting.
2. Click on the game window to make sure it’s the one you want to move.
3. Press the Windows key, the Shift key, and either the right or left arrow key at the same time. Press the right arrow key to move to the monitor to the right. And the left arrow to the monitor on the left. Keep pressing until the game window is on your chosen screen.
This shortcut works for almost any window, not just games, which is super convenient. It works as long as you have two or more displays setup.
Drag and Drop Method
This is as simple as it sounds! If your game is in a windowed mode, you can just click the top bar of the game window and drag it to the screen you like. Just like you drag an image from one place to another on your computer. It’s simple and reliable. Make sure the game is not in full screen, or it will stay fixed to its current screen.
Game Specific Settings
Sometimes, the easiest methods don’t work, or you want to make your game remember which monitor you want to use. Many games have their own settings that let you pick which monitor they should open on.
Checking In-Game Display Settings
Most modern games have graphics settings that control which monitor they use. Here’s how to usually find these:
1. Start your game.
2. Look for “Settings,” “Options,” or a similar menu option, usually in the main menu.
3. Find the “Graphics,” “Video,” or “Display” settings.
4. You should see a dropdown menu or a selection box where you can choose which monitor the game will appear on. The options will likely have labels like “Monitor 1,” “Monitor 2”, or “Primary Monitor”, etc. Sometimes you might also see the name of your monitor, like “Samsung monitor” or a series of letters and numbers for your monitor id.
5. Select your chosen monitor and save the changes. Your game might restart.
Full-Screen vs. Windowed Mode
It is essential to remember that full-screen games behave a bit differently than windowed games. A full screen game will always prioritize the monitor that is assigned as the main monitor. A windowed or windowed-borderless game is much easier to manipulate, drag and move to other displays.
Full Screen: Locks the game to a single monitor and can be more optimized but harder to move between screens.
Windowed: The game plays in a window that you can move, resize, and drag easily between monitors.
Windowed Borderless: This is like full screen but actually runs in a window that takes up the full screen. It’s often easier to switch to other programs in this mode.
If your game is stuck on the wrong monitor, try switching to windowed mode to move it, and then switch back to full screen on your preferred screen.
Windows Display Settings
Windows has its own system for managing multiple monitors, which you can adjust to your liking. Changing these settings can also affect where your games appear.
Accessing Display Settings
Here’s how to get to the display settings in Windows 10 and 11:
1. Right-click anywhere on your desktop.
2. Select “Display settings.” In Windows 11, it’s just “Display.”
3. You’ll see a graphical representation of your monitors. They are numbered. It is helpful to make sure that they are placed similar to your actual screen setup. For example, If the monitors are placed side by side in your desk, they should also be placed side by side in this display settings window. If the second screen is to the right of your first screen, then the second box should be positioned to the right of the first box in this setting window.
Changing the Primary Monitor
To change which monitor is primary:
1. Click on the box that represents the monitor you want as your main display.
2. Scroll down to where it says “Multiple displays.”
3. Check the box that says “Make this my main display.”
4. Click “Apply.” Your screen might flicker as the primary display changes.
By default, a game might start on the primary display. So if you change the primary display, then the game might start on a different screen.
Setting Display Arrangement
If the boxes don’t match where your screens are positioned in real life, they could cause issues when moving windows between displays. To fix this, click and drag each monitor in the settings to reflect their actual positions on your desk. The position of your monitors in this setting can greatly affect how you move windows between screens. It can be very annoying if the positions do not align with the actual placement of the monitors on your desk.
Dealing With Stubborn Games
Sometimes, a game just won’t switch monitors, no matter what you try. Here are a few extra ideas that might work.
Forcing a Windowed Mode
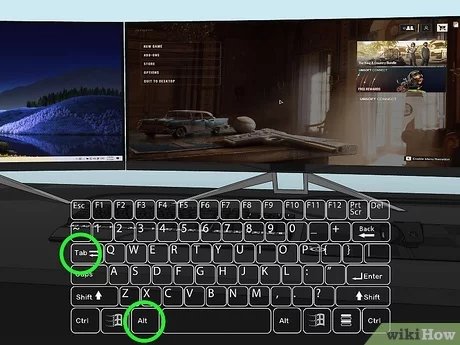
If you’re not able to get into the game settings to change the display settings, try this method.
1. Start the game, and when it starts, look for any key combination, like Alt + Enter. This is a common key combination that switches a game in full screen to a windowed screen.
2. If this works, you can now use the “Windows Key + Shift + Arrow Keys” shortcut to move the game to the correct monitor.
3. Once it is on the monitor you desire, you can try changing the game settings again to go back to full screen or you can try the “Alt + Enter” key combination again.
4. There are also some programs you can get that would force windowed mode on stubborn games.
Checking Graphics Card Settings
Your graphics card software (like NVIDIA Control Panel or AMD Radeon Software) also has display settings. These settings can sometimes override game settings.
1. Right-click on your desktop and look for the name of your graphics card. Select it.
2. Look for “Display” settings and click on it.
3. See if you can set which is the primary monitor.
Updating Graphics Drivers
Old or incorrect drivers can cause all sorts of problems, including weird monitor issues. Try updating your graphics card drivers. You can download the newest drivers from the website of your graphics card manufacturer, which is usually either NVIDIA or AMD.
Try a Different Game Mode
Some games offer multiple graphics modes, such as DirectX 9, 11, or 12. Selecting a different graphics mode sometimes changes how the game handles monitors. These modes are commonly found in the game’s display settings. If one mode is not working with multiple screens, try the other.
Using Game Launchers
Some launchers like Steam, GOG, or Epic Games sometimes have settings that can help force the game to start on a specific monitor. Check your game launcher for those settings. Sometimes the settings are located in the game’s properties, or game settings. It is usually very easy to find.
Maintaining Preferred Monitor Settings
After getting your game on the right monitor, here are a few ways to try and keep it that way.
Game Configuration Files
Some games save their settings in a file, typically a configuration file. You can sometimes open this file with a text editor (like Notepad) and find the monitor settings, then manually change them if needed. Be very careful when changing these files because it can cause problems with the game. It’s best not to change these settings if you don’t know what you’re doing. If you decide to try, create a backup of the file just in case something goes wrong.
Creating a Shortcut
You can sometimes create a shortcut to the game that includes commands to force it to start on a specific monitor. This is a slightly more advanced technique, but it’s possible using command line parameters. Search for a guide for your particular game, since this method can change by game.
A Note on Ultrawide Monitors
If you have an ultrawide monitor, some games might have trouble with the aspect ratio and resolution. Check the in-game display settings for options to make it fit your screen properly. Some older games may not even have support for ultrawide monitors.
Getting your game on the correct monitor should not be complicated, and there are many easy ways to make sure your game starts on your preferred monitor. By exploring these many options, hopefully you can spend less time changing your game setting and more time gaming.
Once you’ve got the hang of these methods, switching games between monitors will become second nature. You’ll no longer be held hostage by games appearing on the wrong screen. Remember, most of the time, the simple Windows shortcut of using the Windows key, Shift key, and arrow keys will do the trick, and if not, the game will usually have display settings that will easily let you chose which display you want. Enjoy your gaming!
How to Open Games on a Certain Monitor (Best Tutorial)
Final Thoughts
To switch which monitor a game displays on, use Windows key + Shift + left or right arrow. This shortcut moves the game window between your screens easily. You can also use the game’s settings menu. Sometimes selecting full-screen or windowed mode again can make the switch.
Often games remember your selected display. However, if they don’t, this is how to switch which monitor a game is on quickly. Try the mentioned shortcuts to easily move your gameplay between screens.

