To turn off Game Bar, navigate to Settings > Gaming > Game Bar and toggle the switch to the off position.
Does that pesky Game Bar pop up when you least expect it? Maybe you’re not a gamer and find it more of a distraction. Whatever the reason, it can be a bit irritating. Don’t worry, figuring out how to turn off Game Bar is actually quite simple.
We’ll walk you through the steps to disable it entirely, reclaiming your screen from those sometimes unwanted overlays. It’s a quick fix to get back to a more focused experience. Let’s get started.

How to Turn Off Game Bar
Okay, let’s talk about the Game Bar. It’s that thing that pops up when you’re playing games on your computer, right? It’s supposed to be helpful, giving you quick access to recording, chatting, and other fun features. But sometimes, it can get in the way. Maybe it keeps popping up when you don’t want it to, or maybe you just don’t use it at all. If you’re thinking, “How do I turn this thing off?” you’ve come to the right place! This guide will walk you through all the different ways you can say goodbye to the Game Bar, so you can enjoy your games without any interruptions. Whether you are on Windows 10 or the latest version of Windows 11, we’ve got you covered.
Why Turn Off Game Bar?
Before we jump into how to disable the Game Bar, let’s think about why you might want to do that in the first place. There are several common reasons why folks decide to turn this feature off. Understanding these can help you decide if turning it off is the right choice for you.
Performance Issues
One of the main reasons people disable the Game Bar is because it can sometimes affect game performance. Even if you aren’t actively using the recording or streaming features, the Game Bar still runs in the background. This can sometimes use up valuable system resources, like your computer’s processing power (CPU) and memory (RAM). If your computer isn’t super powerful, this can cause your games to run slower, or even stutter. Turning off the Game Bar could potentially make your games run smoother and faster. For gamers who are very particular about performance, any gain is crucial!
Annoying Overlays
Another common issue is the Game Bar popping up unexpectedly. Maybe you press a button or combination of buttons accidentally, and suddenly the Game Bar appears right in the middle of your game. This can be really annoying, especially if it happens during a critical moment in your gameplay. Some players simply find the overlay disruptive and prefer a more clean, uncluttered gaming experience. It can block your view of the game, disrupt your focus and interfere with your gameplay.
Unwanted Notifications
The Game Bar sometimes sends notifications. These alerts might be for things like when a friend joins a game, or if a recording has finished. While some people find these notifications useful, others find them distracting. If you’re trying to focus and those notifications are popping up, it might be better to turn off the Game Bar entirely to avoid these distractions. Too many notifications are not just bothersome but can also draw valuable system resources.
Simply Not Used
Sometimes, it’s just a matter of personal preference. If you’re not interested in recording gameplay, streaming, or using any of the other Game Bar features, it makes sense to turn it off. Why keep something running that you never use? Getting rid of unused features makes your system run more efficiently and leaves more resources for the things you do care about.
Different Ways to Disable the Game Bar
Alright, now that we know why you might want to disable the Game Bar, let’s get to the “how.” There are a few different ways to turn off this feature, and we’ll go through each one step-by-step. Whether you’re using Windows 10 or Windows 11, most of these methods will work. Let’s dive in!
Using Windows Settings App
The first, and often easiest, way to turn off the Game Bar is through the Windows Settings app. This is the most direct method and can be done with just a few clicks.
Steps for Windows 10
- Click on the Start button (the Windows logo in the bottom-left corner of your screen).
- Click on the Settings icon (it looks like a gear).
- In the Settings window, click on Gaming.
- On the left-hand side, click on Game Bar.
- You will see a toggle that says “Record game clips, screenshots, and broadcast using Game bar”. Simply click on the switch to turn it Off. When the toggle is gray, it’s off.
That’s it! You have now disabled the Game Bar in Windows 10.
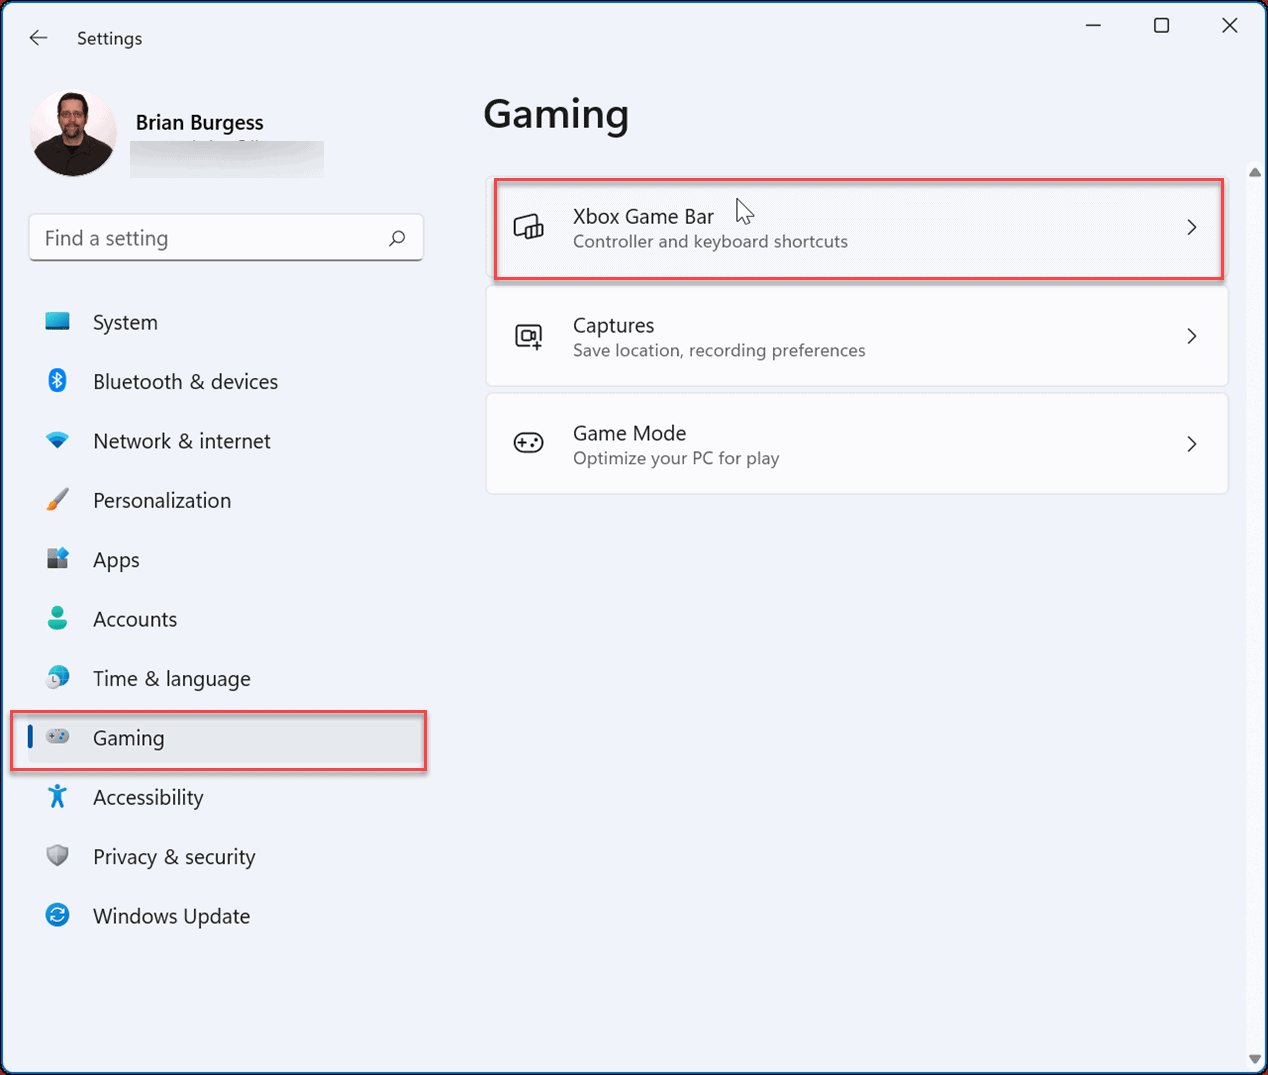
Steps for Windows 11
The process for Windows 11 is very similar to Windows 10, with just a slightly different look.
- Click on the Start button (the Windows logo in the center of your taskbar).
- Click on the Settings icon (it looks like a gear).
- In the Settings window, click on Gaming on the left sidebar.
- Click on Game Bar on the right side.
- Again, you’ll find the option to turn off the Game Bar with a toggle labeled “Open Game bar using the Xbox button on a controller”. Switch this to Off by clicking on the toggle, the toggle will become gray when off.
And there you have it! You’ve successfully turned off the Game Bar in Windows 11 using the Settings App.
Disabling Game Bar Through the Registry Editor
For those who are a bit more tech-savvy, or if the Settings method doesn’t work for some reason, you can also disable the Game Bar using the Registry Editor. Be warned: The Registry Editor is a powerful tool, and making mistakes here can cause problems with your computer. Make sure to follow these steps carefully and consider backing up your registry before making any changes. It’s a bit like playing with the computer’s brain!
Steps to Disable Game Bar using Registry Editor
- Press the Windows key + R on your keyboard to open the Run dialog box.
- Type regedit and press Enter. This will open the Registry Editor.
- If asked by User Access Control window, click on Yes.
- In the Registry Editor, you’ll need to navigate to the correct location. Copy and paste the following path into the address bar at the top of the Registry Editor:
HKEY_CURRENT_USER\Software\Microsoft\GameBar - If there is no GameBar folder under Microsoft, you need to create it. Right click on the Microsoft folder, select New and click Key then, enter name as GameBar.
- If there is no value called “AppCaptureEnabled”, then create a new DWORD (32-bit) Value in the right-hand side pane. Right-click in the empty space, select New, and then click on DWORD (32-bit) Value. Name this new value as AppCaptureEnabled.
- Now, double-click on the AppCaptureEnabled value.
- In the “Value data” field, type 0 (zero) and click OK.
- Now close the Registry Editor.
- You may need to restart your computer for the changes to take effect.
By changing the value of AppCaptureEnabled to 0, you’ve effectively disabled the Game Bar using the Registry Editor. This method is a bit more technical but offers a more permanent solution.
Using the Xbox App
The Game Bar is part of the Xbox app on Windows, so another way to manage it is directly through the app. This might be helpful if you’re someone who also uses other Xbox features and prefers to manage everything from one place.
Steps to Disable Game Bar Through the Xbox App
- Click the Start button, and then search for Xbox and click on the Xbox app to open it.
- Once the Xbox App is open, click on your profile picture at the top of the screen and then choose Settings from the drop-down menu.
- Navigate to the General tab.
- Find the setting labeled “Enable Game bar” or something similar, and set its toggle to the Off position. The exact wording might slightly vary depending on your version of the app.
- Close the Xbox app, and the changes should be applied.
You’ve now successfully turned off the Game Bar through the Xbox app!
Disabling Game Bar Services
Finally, if you want to make sure the Game Bar is really, truly disabled, you can also stop its background service from running. This is an advanced method but ensures that it does not interfere with performance and wont run at all unless you explicitly start the service manually. This will completely prevent the Game Bar from running.
Steps to Disable the Game Bar Service
- Press Windows key + R on your keyboard to open the Run dialog box.
- Type services.msc and press Enter. This will open the Services app.
- In the Services app, scroll down until you find a service named Xbox Game Bar Service.
- Right-click on Xbox Game Bar Service and select Properties.
- In the properties window, change the “Startup type” from Automatic or Manual to Disabled using the drop-down menu.
- Click on Apply and then click OK.
- Now, right-click on the same Xbox Game Bar Service again and choose Stop to completely stop the background process.
By disabling the service, you’re ensuring the Game Bar won’t run in the background at all. Remember to follow the steps carefully if you decide to use this method.
Verifying Game Bar is Turned Off
After trying any of the above methods, it’s a good idea to check and make sure that the Game Bar is actually turned off. Here are a couple of ways to verify:
Try Opening Game Bar
The simplest way to check is to try opening the Game Bar. By default, you can do this by pressing the Windows key + G. If the Game Bar doesn’t appear after you press these keys, it’s likely disabled. If some other application opens, it means Game Bar is not running.
Check Settings
Go back to the Settings app as described earlier and check that the Game Bar toggle is still in the “Off” position. This confirms the setting is still disabled and is the first thing to check.
Check Task Manager
If you suspect the Game Bar might still be running in the background, you can check Task Manager.
- Press Ctrl + Shift + Esc to open Task Manager.
- Navigate to the Details or Processes tab.
- Look for any processes related to the Xbox Game Bar. If you don’t see any, that’s a good sign that it’s not running. Some potential names are GameBar.exe or something similar. If they are not there, it means Game Bar is disabled.
Troubleshooting
Sometimes, despite your best efforts, the Game Bar might not turn off as expected. Here are some troubleshooting steps you can try:
Restart Your Computer
A simple restart often fixes many computer problems. After disabling the Game Bar, restart your computer and see if that helps.
Check For Updates
Make sure that your Windows system is completely up-to-date. Updates sometimes include bug fixes that may resolve issues related to the Game Bar.
- Click on the Start button.
- Click on the Settings icon (it looks like a gear).
- Click on Update & Security.
- Click on Check for updates. If updates are available, download and install them.
Re-Enable and Re-Disable
Try turning the Game Bar back on, and then turn it off again. This can sometimes reset the settings and make them work correctly.
Run System File Checker
Sometimes, corrupted system files can cause issues. You can use the System File Checker tool to find and fix these files.
- Press the Windows key and type cmd.
- Right click on the Command Prompt result and choose Run as administrator.
- In the command prompt, type sfc /scannow and press Enter.
- Let the process run and fix any found system file issues.
After the system file checker finishes, restart your computer and try turning the Game Bar off again.
Consult Microsoft Support
If none of these steps work, you can always reach out to Microsoft Support. They may be able to provide more specific help based on your system and situation.
Turning off the Game Bar can make your gaming experience smoother and less distracting. By using the various methods mentioned above, you can ensure it stays turned off and doesn’t interfere with your gameplay. Choose the method that you are most comfortable with, and follow the steps carefully. Now you can get back to your game with no interruptions!
How To Turn Off Xbox Game Bar In Windows 11 – Full Guide
Final Thoughts
To stop the game bar, navigate to the settings menu on your computer. Then, select gaming and locate the game bar option. Finally, toggle the switch to the off position.
This will successfully disable the game bar. Following these quick steps ensures that you learn how to turn off game bar completely. You can always re-enable it later if you need it.

