
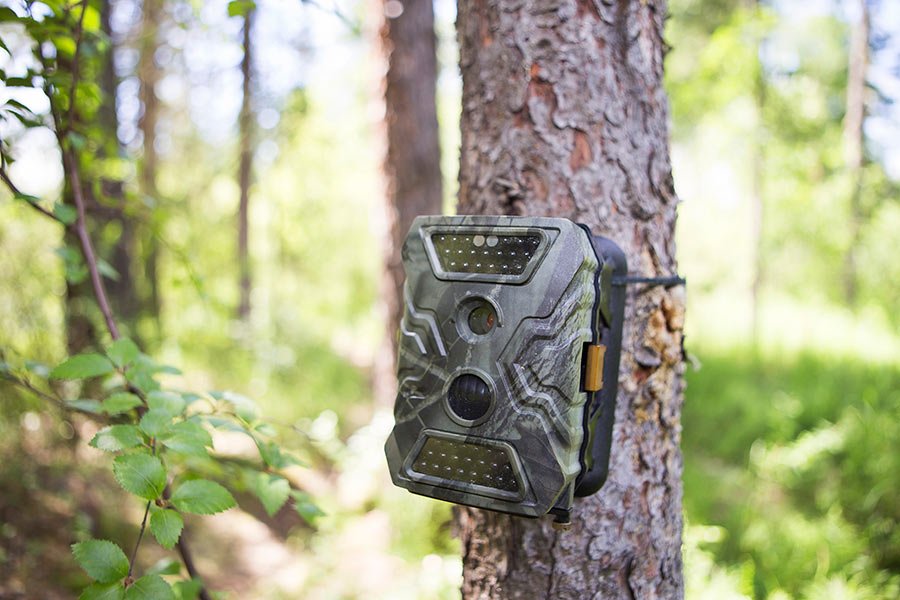
Using a game camera involves selecting a suitable location, securely mounting the camera, setting the desired trigger sensitivity and capture mode, and regularly checking the device for images and battery levels.
Ever wondered what wildlife roams your property when you’re not around? Learning how to use a game camera opens up a fascinating world of observation. It allows you to capture images and videos of animals in their natural habitat.
These cameras, often referred to as trail cameras, are perfect for scouting, wildlife research, or simply satisfying your curiosity. This simple tool can give you a unique perspective.

How to Use a Game Camera: Your Guide to Wildlife Observation
So, you’ve got a game camera – that cool little gadget that lets you peek into the secret lives of animals. Maybe you’re hoping to see deer prancing through the woods, a fox sneaking by, or even a shy bear taking a stroll. Whatever your reason, using a game camera effectively can feel a bit tricky at first. But don’t worry! This guide will walk you through each step, making you a pro wildlife photographer in no time. We’ll cover everything from choosing the right spot to understanding the different settings and getting the best pictures possible.
Understanding Your Game Camera
Before we dive into placement and settings, let’s get familiar with the basic parts and functions of your game camera. Think of it like learning the names of the players before you start the game.
Key Components
- The Camera Lens: This is the “eye” of your camera, capturing the images or videos.
- The Infrared (IR) Flash or LED: This is what helps your camera see at night. Some use a red glow (low glow), while others use a barely noticeable black light (no glow).
- The PIR Motion Sensor: This detects movement and tells the camera to start taking pictures or videos.
- The Battery Compartment: This is where you put the batteries that power the camera.
- The SD Card Slot: This is where you put the memory card that saves all your pictures and videos.
- The Menu Buttons and Screen: These help you navigate the camera settings.
- The Mounting Strap or Bracket: This is used to attach the camera to a tree or other object.
Types of Game Cameras
Game cameras come in a few different styles. Here’s a quick look at the most common:
- Standard Infrared (IR) Cameras: These are the most common, using a red-glow IR flash. They’re generally good for shorter distances.
- Low-Glow IR Cameras: These use a less noticeable red glow, less likely to spook animals. They are a middle ground between standard and no-glow.
- No-Glow IR Cameras: These are the stealthiest. They use a black flash, almost invisible to the human eye and animals. Great for not disturbing wildlife.
- Cellular Game Cameras: These cameras can send pictures directly to your phone or email using a cell signal. They’re great for checking in on your area remotely.
Choosing the Right Location
Where you place your game camera is just as important as the camera itself. Picking the best spot will greatly increase your chances of capturing some exciting pictures.
Animal Trails and Travel Routes
Animals, just like us, often use established paths when traveling through the woods. Look for these trails – they often have less vegetation and look like well-used roads. Set your camera facing the trail to catch the animals as they pass.
Water Sources
Whether it’s a pond, stream, or even a puddle, animals need water. Placing your camera near a water source can get you a lot of activity, especially during hot weather.
Feeding Areas
Areas where animals feed, such as fields with crops, berry patches, or spots with acorn trees, are like wildlife magnets. Placing a camera in these spots is a great idea.
Edges of Cover
Animals often travel along the edges of fields or thickets. Place your camera at these edges to catch them as they move between different areas.
Avoid Direct Sunlight
Direct sunlight can cause the camera to overheat and also create blurry, overexposed images. Place your camera in an area with shade if possible.
Think about Camera Angle
Try to avoid having the camera pointed directly into the sky or ground. Having the camera aimed at the most likely area for movement will be better. Try to aim the camera toward the ground as this will catch the legs of the animals as they walk past, increasing the likelihood of capturing a picture.
Avoid High Traffic Areas
Avoid placing your camera in areas where humans or pets often walk. This will help prevent your camera from capturing too many empty photos.
Setting Up Your Game Camera
Okay, now you’ve picked the perfect spot. Let’s get the camera ready to go.
Mounting Your Camera
Most game cameras come with a strap that you can use to attach the camera to a tree or post. Here’s what to do:
- Wrap the strap around the tree.
- Thread the strap through the buckle on the back of the camera.
- Pull the strap tight to secure the camera firmly. Make sure the camera is stable and doesn’t wobble.
- Adjust the camera angle so it’s pointing towards where you expect the action to be.
Some cameras also have a tripod mount on the bottom, allowing for more flexibility when mounting in different areas.
Powering Your Camera
Game cameras use batteries. Here are some things to keep in mind:
- Battery Type: Most cameras use AA batteries, but some may use C or D batteries. Check your camera’s manual to see which type it needs.
- Battery Life: The life of your batteries will depend on how much your camera is used, and the quality of the battery.
- Rechargeable Batteries: Consider using rechargeable batteries to save money and reduce waste.
- Check Batteries: It’s a good practice to check your camera’s battery level before and after each trip to the woods.
Installing the SD Card
Your camera will need an SD card to store all those wonderful images and videos. Here’s what to know:
- SD Card Type: Most game cameras use standard SD or microSD cards. Check your camera manual for the recommended type and size.
- Format the SD Card: Before using it, format the card in your camera. This clears the card and makes sure it works properly with your camera. You can usually find this option in your camera’s menu settings.
- SD Card Capacity: The size of the card will determine how many images and videos it can hold. A 32GB or 64GB SD card is usually sufficient.
- Check the SD card: Before leaving your camera to record, make sure the card is securely installed.
Understanding Game Camera Settings
Now, let’s talk about the settings on your camera. Knowing these will help you get the best results.
Image Resolution
This setting determines how detailed your photos are. Higher resolution means sharper images, but they also take up more space on your SD card. Lower resolution photos use less space on the card. It’s a trade-off between quality and capacity. The typical resolution for game cameras range from 8 to 20 megapixels, but this number can increase on new models. A setting between 8 and 12 megapixels is a great option.
Video Resolution
Video resolution works the same as photo resolution. Higher resolution means clearer videos, but also more space used on your SD card. Lower resolution videos are smaller in file size, so you can fit more on the card. 1080p is generally a good resolution to use for videos.
Trigger Speed
This is how fast the camera takes a picture after sensing motion. Faster trigger speeds mean you’re less likely to miss an animal. A trigger speed of less than 1 second is desirable. But, this feature also increases battery use.
Recovery Time
Recovery time is how long the camera takes to be ready to take another picture after taking one. Shorter recovery times mean you get more photos, but could also capture many of the same animal. Longer recovery times will lead to missed photos but less battery use. A recovery time of 1-2 seconds is generally sufficient.
Sensitivity
The sensitivity setting controls how sensitive the motion sensor is. If it’s too high, the camera will take pictures of every little thing, like leaves blowing in the wind. If it’s too low, it might miss animals. Adjust this setting based on your environment.
Time Lapse Mode
Some cameras have a time-lapse mode, which takes photos at set intervals (every 5 minutes, every hour, etc.). This mode is useful for monitoring slow-moving events, such as a nest of bird eggs hatching.
Photo Burst Mode
Some cameras have a photo burst feature. This takes multiple photos when motion is detected. This increases your chances of capturing a great action shot, as well as identifying animals faster.
Date and Time Settings
Make sure you set the correct date and time on your camera. This will help you organize your photos and videos.
Infrared (IR) Flash or LED Settings
Most game cameras allow you to select from a few options for the brightness of the IR flash. When using a lower powered IR flash your battery will last longer. However, a brighter flash will produce clearer images.
Tips for Getting the Best Images
Now that your camera is all set up, let’s talk about how to get those amazing pictures you’re hoping for.
Clean Your Camera Lens
A dirty camera lens can make your pictures blurry. Before you set up your camera, clean the lens with a soft cloth.
Clear the Area
Make sure there are not any objects blocking the view of the area you want to capture. Brush and small tree limbs can interfere with your pictures. Also, make sure there are not any large leaves or other objects in the immediate foreground that will activate the camera.
Avoid Overhanging Branches
Overhanging branches can sometimes trigger the motion sensor on windy days, resulting in many empty photos.
Camouflage Your Camera
While game cameras are designed to blend in, sometimes a little extra camouflage can help. Try covering the camera with leaves or twigs. Also, make sure that your camera is pointed away from areas with direct sunlight and bright reflections, as this can make it more noticeable to animals.
Check Your Camera Regularly
Don’t just set it up and forget it. Check your camera regularly to make sure it’s still positioned correctly, the batteries are good, and you have space on the SD card. Check once a week or every other week, depending on how often you want to see your images.
Patience is Key
Sometimes, you might not capture anything on your first try. It takes time and patience to get good photos. Don’t be discouraged and keep experimenting with locations and settings.
Be a Responsible Observer
Remember that the goal is to observe wildlife without disturbing it. Always practice good ethics when using your game camera.
Learn From Your Pictures
Pay attention to the time and place of your good photos. This will give you clues to where and when to try your camera next time.
Troubleshooting
Sometimes, things don’t go as planned. Here are a few common problems and how to fix them.
Empty Photos
If your camera is taking lots of pictures with nothing in them, here are a few things to check:
- Sensitivity is too high: Try lowering the sensitivity setting on your camera.
- Branches moving in the wind: Clear the area around your camera of any branches or vegetation that could trigger the sensor.
- Camera is too high: Make sure your camera is not pointing to the sky.
Blurry Pictures
If your pictures are blurry, here are a few things to try:
- Clean the camera lens: Use a soft cloth to clean any smudges or dirt.
- Make sure the camera is stable: Ensure the camera is securely mounted.
- Camera is too far away: Try moving the camera closer to where the animals pass.
Night Photos are Too Dark
If your night photos are too dark, consider the following:
- Battery power is too low: Replace the batteries with fresh ones.
- IR flash is too weak: Increase the power of the infrared flash or use a camera that has a higher powered flash.
Camera Not Working
If your camera doesn’t turn on or isn’t working correctly, check these:
- Batteries are installed correctly: Make sure the batteries are correctly oriented in the battery compartment.
- SD Card is inserted properly: Make sure the SD card is all the way in and correctly oriented.
- Check the manual: Review your manual for troubleshooting tips specific to your model.
Using a game camera is a great way to see wildlife in their natural environment. It can also help you scout for game animals before hunting season. While it may take a few tries to get the hang of it, with a little practice and these tips, you’ll be taking amazing wildlife photos in no time. Remember to have patience, enjoy the process, and respect the wildlife you’re observing. Happy trails!
How to set up and use a trail camera (Training Video)
Final Thoughts
Proper placement and settings are crucial for successful wildlife observation. Consider the area you want to monitor and adjust the sensitivity. Always check batteries and memory cards for sufficient capacity.
Familiarize yourself with the camera’s specific functions, and test it before full deployment. Correctly setting the date and time is also very important. This step ensures data accuracy.
To optimize results, remember how to use a game camera effectively. Consider factors like camera angle, distance and background environment. Consistent monitoring of your game camera yields great data.

