Unfortunately, Roblox does not provide a feature to directly view in-game chat history after you leave a game session.
Ever wondered if you could check back on a funny conversation you had in Roblox? You’re not alone. Many players ask about how to view roblox in-game chat history. It’s a feature that could be quite handy for a few reasons.
Unfortunately, Roblox does not save or make readily available these chat logs for users. The chats are live and only exist during your active play session. This limitation might be disappointing, but there are reasons behind it.

How to View Roblox In-Game Chat History
Okay, so you’re playing Roblox and something important was said in the chat. Maybe you need to remember a friend’s username or check back on some instructions. It’s happened to all of us! The good news is that while Roblox doesn’t keep a permanent, easy-to-access log of every chat, there are definitely ways to see what was said. Let’s jump in and explore how you can find that in-game chat history.
Understanding Roblox Chat Limitations
Before we get into the ‘how,’ let’s talk a bit about what Roblox chat isn’t. Unlike some messaging apps, Roblox doesn’t have a built-in archive where you can scroll back through days, weeks, or even hours of previous chats. Think of it more like a whiteboard – it shows what’s written on it right now, but it gets erased when you leave the game or the game server resets. This is because keeping all that chat data for everyone would take up a huge amount of computer space and could slow things down. So, we need to get clever with the methods we do have.
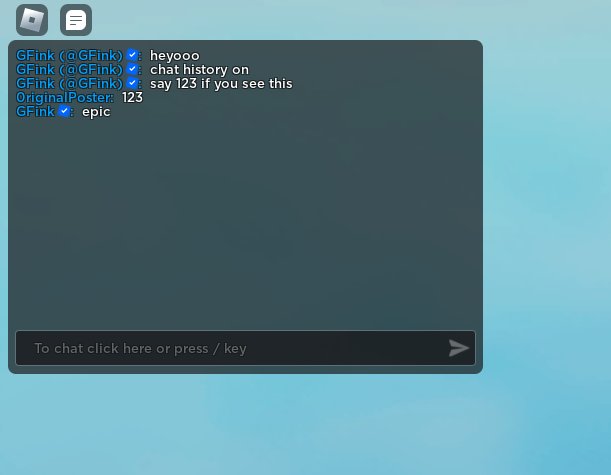
Method 1: The In-Game Scrollback Feature
The most basic and easiest way to view recent chat is to use the in-game scrollback. This lets you look back at the chat messages that have appeared since you joined a particular game session. It’s not super extensive, but it’s the first place you should check.
How to Scroll Back in Roblox Chat
Here’s how to do it:
- Open the Chat Window: While you are in a Roblox game, usually you can press the forward slash key (‘/’) or the chat bubble icon on the screen to open the chat window. This will show the chat messages in the bottom or bottom-left part of your screen.
- Use Your Mouse or Keyboard: Once the chat window is open, use your mouse wheel to scroll up and down, or use the arrow keys on your keyboard to move through the chat history. The scrollback is limited to the amount of chat that has happened during your current session in that specific server.
- Limitations: Keep in mind that this scrollback only goes so far. When the chat gets very active and lots of messages appear, earlier messages get pushed off the top and are no longer available to see. Once you leave the game or the game server resets, this history is gone.
The scrollback feature is very helpful for seeing what was just said, but it’s not a perfect long-term solution.
Method 2: Taking Screenshots of Chat
Since Roblox doesn’t store chat history permanently, sometimes the best solution is to take matters into our own hands! Taking screenshots of the chat window allows you to save specific conversations or important information as a picture file on your computer or device.
Taking Screenshots on Different Devices
The process of taking screenshots varies slightly depending on the type of device you’re using:
-
On Windows PC:
- The easiest way is to use the ‘Print Screen’ (PrtScn) key on your keyboard. This will copy the entire screen to your clipboard, and you can paste it into a program like Paint or even a Word document.
- You can also use the ‘Windows Key + Shift + S’ shortcut to open the Snipping Tool, which lets you select a specific area of the screen to screenshot. This is helpful for grabbing just the chat window.
-
On macOS:
- Use the ‘Shift + Command + 3’ shortcut to capture the entire screen.
- Use ‘Shift + Command + 4’ to select an area of the screen to capture.
-
On Mobile (Android or iOS):
- The method varies depending on your phone or tablet model. Most devices use a combination of the power button and a volume button pressed at the same time.
- Check your device’s user manual or search online for instructions specific to your model.
Organizing Your Screenshots
Once you start taking screenshots of the chat, it’s helpful to keep things organized so you can find them later. Here are some ideas:
- Create a special folder on your computer or device just for Roblox chat screenshots.
- Rename each screenshot with a descriptive title. For example, “Roblox Chat Friend Request,” or “Roblox Game Instructions.”
- If you have a lot of screenshots, you might consider grouping them further into subfolders for different games or conversations.
While taking screenshots is a bit more work, it’s the best way to save chat history on a permanent basis. It works well for recording important instructions or conversations you’d like to refer back to later.
Method 3: Utilizing Third-Party Screen Recording Software
If you want to capture a longer period of chat, taking individual screenshots can become time-consuming. This is where screen recording software can become a great method to record a video of the Roblox game while it plays. You can then rewind the video to check chat history.
How Screen Recording Works
Screen recording software does just what it says, it records everything happening on your screen including the Roblox gameplay, the chat, the sounds and all the elements that appear on the screen. This lets you go back and see what was said at any point during that recording.
Popular Screen Recording Options
There are many screen recording tools available, both free and paid. Here are a few popular options:
- OBS Studio: OBS Studio is a free, open-source screen recorder that is very popular. It works on Windows, Mac, and Linux. It’s a bit more technical to setup but has lots of advanced features and lets you record both your screen and sounds, as well as choose specific areas of your screen to record.
- Xbox Game Bar (Windows 10/11): If you’re using Windows, the Xbox Game Bar is a built-in tool that offers screen recording. Press ‘Windows Key + G’ to open it, and then you can start recording. It’s a simple and convenient option for quickly recording your game.
- QuickTime Player (macOS): On Mac computers, QuickTime Player provides a screen recording feature. Open QuickTime, go to “File” and select “New Screen Recording.”
- Mobile Screen Recording Apps: There are also many apps available for both Android and iOS that let you record your screen. Search your app store for terms like “screen recorder” to find an app you like.
Tips for Using Screen Recording
- Start Recording Early: Begin the screen recording before the chat you want to capture begins. This will ensure you don’t miss anything.
- Adjust Recording Settings: Make sure your screen recording settings capture the chat clearly. High resolution video settings are better but may also take up more disk space.
- Review Your Recording: Once you finish playing, review your recording to find the chat you wanted to check.
- Delete Unnecessary Recordings: Screen recordings can take up a lot of storage, so make sure to delete old recordings you no longer need.
Screen recording is a very helpful technique for capturing a lot of chat history, but it requires a little more preparation and storage space on your device compared to screenshots.
Method 4: Roblox Developer Console (Advanced Users)
This method is primarily meant for developers and more technical users, however I’m adding it here for the sake of completeness. If you are comfortable with programming concepts, this method could be of interest. The Roblox Developer Console provides some insight into the game’s internal workings, including recent chat messages. However, this method is not designed for normal players, so it’s not easily accessible or user-friendly. It is also not a permanent storage solution. The developer console is used for debugging and checking the properties of a game; it’s not really designed for reviewing chat history, and it may not display all the chat messages. Use this method at your own risk.
Accessing the Developer Console
You can usually access the Developer Console in a Roblox game by pressing the ‘F9’ key on your keyboard. This will open a window at the bottom of your screen.
Checking for Chat Messages in the Console
Once the developer console is open, you can switch to the ‘Server’ or ‘Client’ tabs to see if any messages are being logged. Keep in mind that this method is very unreliable, and the information presented is raw data, and is often hard to understand. The console is also not a place where the game will keep a historical log of all the messages. It usually only shows the messages that appear in real-time.
Important Considerations
- This method is complex and is intended for developers, not for standard players.
- The information in the Developer Console is not usually very clear or helpful to understand for the common player.
- The Developer Console doesn’t store chat history. It displays real-time information and some recent events.
This method is typically not useful for the majority of players who simply want to check previous chat messages. If you are not very familiar with programming and developer tools, you can ignore this method entirely.
Tips for Managing Chat
While trying to figure out how to see old chat, it’s also a good idea to develop some best practices for managing the chat during the game. These tips can help you capture the chat you need, and minimize missing information:
- Pay Attention to Important Messages: If something important is mentioned in the chat, make a note of it, or take a quick screenshot immediately. Don’t wait too long, or you might lose the message.
- Use Private Messages: If you need to have a detailed conversation with one person, use Roblox’s private messaging feature, rather than the public chat. These messages can be viewed in your inbox later.
- Use a Note-Taking App: If you’re anticipating important chat, keep a notes application on your computer handy. You can quickly copy and paste important information from the game’s chat to your notes app.
- Communicate Clearly: Always be clear and polite in your messages in Roblox to ensure messages are easily understood.
Implementing these tips can make it easier to manage your chat and make sure you can always find important information.
While Roblox does not have a built-in feature for seeing past chat logs, there are workarounds you can use. These methods range from the basic scrollback to screenshots and screen recording. Remember to stay safe online, and use these tips for good use only.
How To Check Roblox Chat History
Final Thoughts
You cannot directly view in-game chat history within Roblox itself. Roblox does not offer a built-in feature for this. Players need to rely on third-party applications or browser extensions if they want to record chat.
These methods typically function by logging the chat data as you play. Therefore, you must set them up before you want to review messages. The primary conclusion is that you can’t access it within Roblox; you need external assistance for how to view roblox in-game chat history.

