
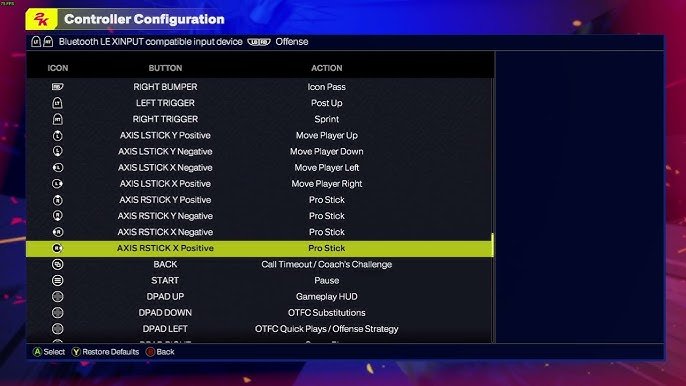
The game allows you to customize your NBA 2K25 input configuration settings through the options menu, letting you remap buttons and adjust stick sensitivity for your preferred gameplay style.
Getting the most from your virtual basketball experience is key, right? Many gamers wonder about personalizing how they control the action. The good news is that NBA 2K25 input configuration settings are indeed changeable, letting you tailor the controls to fit your own needs.
Adjusting these settings can make a big difference in how you perform on the court. Experimenting with different setups will help you find what feels best. Don’t be afraid to tweak things until you achieve optimal performance.

NBA 2K25 Input Configuration Settings
Getting your NBA 2K25 controls just right can make a huge difference in how well you play. It’s like finding the perfect pair of shoes for the court; if they fit well, you can move better and play your best game. This part of the game is all about setting up your controller, whether you’re using a PlayStation, Xbox, or PC, so it feels comfortable and responsive. We’ll walk through all the different ways you can customize your input settings to become a more skilled player. This guide helps you understand every button and stick, and how to change them so they work the way you want them to. Whether you’re a beginner or an experienced player, spending a little time here can seriously level up your game.
Understanding the Basics of Input Settings
Before we dive into the nitty-gritty, let’s talk about the main types of input settings you’ll find in NBA 2K25. These settings let you change how you control your player’s movement, shooting, passing, and defense. It’s not just about button mapping; it’s also about how sensitive the sticks are and what kind of feedback you get when you press a button. For example, you can adjust how hard you have to push the stick to move or how long you hold a button to shoot. This customization gives you the power to play with more precision and react faster to what’s happening on the court.
Controller Types and Compatibility
NBA 2K25 supports different kinds of controllers. Most commonly, you can use:
- PlayStation DualSense controllers
- Xbox Wireless controllers
- PC controllers (like those by Logitech, Razer, and others)
It’s important to check if your controller is fully supported because compatibility can impact how well it works with the game. A supported controller gives you full access to all customization settings. Some cheaper or off-brand controllers might work, but you might not have full button customization options and could experience performance issues. If you run into problems, it might be best to use a recommended controller to avoid headaches.
The Importance of Button Mapping
Button mapping is like making your own set of instructions for your controller. The default settings are a good starting point but you can change them around to match your play style. You may find it more comfortable or efficient to dribble with a different button or to call a play using the bumper instead of the D-pad. The important thing is to configure your settings so they make sense to you and how you play. When buttons feel natural, you don’t have to think much about pressing the right one, which can make a big difference in a fast-paced game.
Navigating the Input Settings Menu
Finding and navigating to the input settings is quite simple. First, launch NBA 2K25. Then, go to the main menu and look for “Settings” or “Options.” Once you’re in the settings menu, find the section labelled “Controller,” “Controls,” or “Input”. This is where you’ll find everything related to setting up how your controller works. The menu often has multiple sub-sections. You may need to look through sub-menus for different controls, such as shooting, passing, defense, and movement. It might seem a bit confusing at first, but once you become familiar with the layout, it’s easy to change settings.
General Controller Settings
The general settings are usually the first options you will see. Here you will find basic things like:
- Controller Vibration: You can turn vibration on or off. Some players love the feedback that vibration gives, but others find it distracting.
- Controller Speaker: Some controllers have built-in speakers. If you don’t like game sounds coming from your controller, you can turn it off.
- Controller Orientation: This option is usually only relevant for some special controllers but ensure the controller is recognized correctly by the game.
Specific Control Schemes
Within the general controller settings, you will find options for specific control schemes. This includes how you handle your player while on offense and defense. Let’s break down these aspects individually.
Offensive Controls
Offensive controls involve everything you do while trying to score. This section is where most players spend their time adjusting things to suit their playstyle. Here’s a detailed look at the main areas:
- Movement Controls: Typically, the left analog stick controls movement. You can adjust stick sensitivity, determining how quickly your player responds to your stick movements.
- Stick Sensitivity: Some people prefer a high sensitivity for quick movements, while others like lower sensitivity for more controlled steps. Experiment to find what feels right for you.
- Movement with D-Pad: While usually not primary, some prefer to use the D-pad for very precise movements.
- Shooting Controls: Shooting is critical, and NBA 2K25 has multiple shooting methods. You can usually configure things like shot meter placement or toggle between button and stick shooting.
- Button Shooting: Pressing a button to shoot a jump shot. This may be more straightforward for new players.
- Stick Shooting: Moving the right stick in the correct direction for a shot. This gives you more control over shot timing and shot types, which is good for experienced players.
- Shot Meter Feedback: How the meter appears on the screen and the visual feedback it provides on shot timing. Some prefer having the meter turned off for more visual space on the screen.
- Shot Timing: Adjusting your release time, which is how long you press the shooting button/stick to get a perfect shot.
- Passing Controls: Effective passing is important for team plays. This section lets you customize how you pass the ball.
- Button Passing: Assign buttons to pass to specific players on your team.
- Icon Passing: Passing to players by pressing a button when an icon of their face appears above their heads.
- Skip Pass: A quick pass that jumps over a player to get to the target quicker.
- Lob Pass: A high arching pass, often used for alley-oops.
- Dribbling Controls: Dribbling controls how you move with the ball.
- Dribble Moves: Different button combinations trigger dribble moves like crossovers and spins.
- Speed Boost: Combining certain actions with running will give you a short speed increase.
Defensive Controls
Defensive controls let you stop the other team from scoring. These settings are just as important as offense:
- Player Switching: How you switch between players on defense.
- Automatic Switching: The game automatically chooses a nearby player.
- Manual Switching: You pick which player you want to control. Manual switching lets you react faster if you’re skilled at it.
- Stealing: How you attempt to steal the ball.
- Blocking: The controls to block shots and contest the shot.
- Defensive Stance: The button to get into a defensive stance and stay in front of your opponents.
Advanced Input Settings
Once you have a good handle on the basic control settings, you can dive into the more advanced options. This part lets you really fine-tune how the game responds to your inputs. These are not essential for beginners, but experienced players can benefit greatly from adjusting these.
Analog Stick Customization
The analog sticks are the primary way you interact with the game, and they offer a lot of customization:
- Dead Zones: These determine how far you have to move the stick before it’s recognized by the game.
- Low Dead Zones: You don’t need to move the stick very far for the game to see it. This is good for fast responses, but can lead to unintentional movements.
- High Dead Zones: You have to move the stick farther for it to register. This can help prevent accidental movements.
- Response Curve: You can change the stick response curve to adjust how much stick movement translates to in-game motion.
- Linear Curve: The further you move the stick, the more your player moves.
- Exponential Curve: Smaller stick movements result in small in-game movements, while larger stick movements result in faster in-game motion. This can give more precise control over small movements and more power for big actions.
Trigger Customization
The triggers also offer customization options that can affect your game:
- Trigger Sensitivity: Just like with the sticks, you can customize how sensitive the triggers are.
- Light Triggers: Require a soft touch for full activation.
- Hard Triggers: Require a harder touch for full activation.
- Trigger Feedback: The force feedback you feel when pushing the triggers.
On-Screen Feedback
These settings control how the game provides visual feedback on your inputs.
- Shot Meter Placement: You can change where the shot meter is on screen.
- Controller Icons: Some people like to turn these off so there is less visual clutter on screen.
- Input Timings: Some of this will give you real time feedback of how you time your actions.
Tips for Finding Your Perfect Input Settings
Finding the best input settings takes time and practice. It’s not a one-size-fits-all type of thing; what works for one player might not be ideal for you. However, there are some things you can do to help.
Start with Small Changes
Don’t try to change everything all at once. Make one change at a time and then play a few games to see how it feels. If you make too many changes at once, it’s hard to tell what actually helped, or hurt you. For example, if you want to improve shooting, maybe start with stick vs. button shooting. Then you can tweak the dead zones and sensitivity later after getting used to the base mechanic.
Practice in Different Game Modes
Test out your new settings in different game modes. A quick game against the computer will feel much different than online play. Some settings might work well in one mode but be bad in another. Try them in different game situations, and test them for several games. A good setting should feel consistent across every mode.
Adjust Based on Playstyle
Your playstyle matters a lot. If you like fast dribbling, you will need to tweak things to support that playstyle. If you prefer a slow and tactical passing game, then you will need to configure for that style. Think about the aspects of the game that are most important to you and then adjust your settings around them. For example, if shooting is most important to you, make sure that shooting is set up to feel the most comfortable and effective.
Don’t Be Afraid to Experiment
The best way to find your perfect settings is to experiment. There is no penalty for trying new things. The settings menu is there for you to try and test many different settings. Never be afraid to try something different. You can always change them back to the default settings at any time.
Watch Professional Players
Watching pro players is a good way to see how different control styles look. While their settings might not be right for you, you can get ideas on different settings to try. You may notice how they use certain button combinations that you could try to add into your own game. Watching them play is a free resource for learning new techniques and how they apply to the different settings. You can search the settings they use online.
Take Breaks
If you are getting frustrated, take a break. Sometimes a fresh mind can see things that you would miss while feeling frustrated. Also, your muscle memory will adjust over time as you play more. Coming back fresh is always a good idea.
Adjusting your input settings in NBA 2K25 takes time and practice, but it is an important thing for every player to consider. The effort to fine tune these settings will allow you to play more efficiently, and ultimately will make you more competitive. Play around, find what works for you, and get ready to dominate the court.
5 SECRET Settings That You NEED To Use In NBA 2K25
Final Thoughts
Experiment with sensitivity and vibration settings to find your perfect feel. Tailoring button layouts gives you personalized control. Don’t forget to adjust dead zones, ensuring precise movements. These tweaks to NBA 2K25 input configuration settings directly impact gameplay.
Customizing these options allows for a much more comfortable gaming experience. It can even improve your performance on the virtual court. The right settings are crucial. Therefore, taking the time to optimize the NBA 2K25 input configuration settings is definitely worthwhile.

