
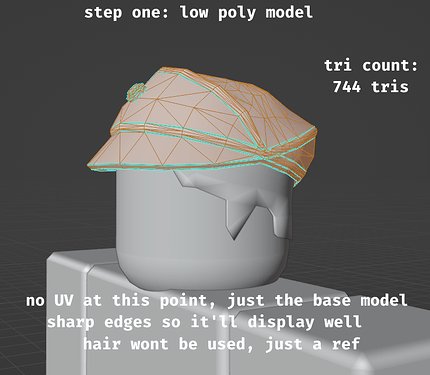
The Roblox 3D modeling pipeline typically involves creating models in software like Blender or Maya, exporting them as .fbx files, and then importing them into Roblox Studio.
Creating 3D assets for Roblox games requires a specific workflow. This roblox 3d modeling pipeline helps you make those cool characters and items you see in the game. You begin with design and build using external programs.
Next, you’ll need to prepare your model for the game. You export from your chosen 3D program. Then, you import into Roblox Studio and configure it there.

Roblox 3D Modeling Pipeline: From Idea to Game Asset
Creating amazing 3D models for Roblox games might seem like magic, but it’s actually a well-organized process. Think of it like building with LEGOs – you start with an idea, plan how it will look, gather the pieces, build it, and then make it look amazing! The 3D modeling pipeline for Roblox follows a similar set of steps, helping you turn your creative thoughts into cool game assets. Let’s break down each step and see how it all works.
Planning Your 3D Model
Before you even touch a 3D modeling program, you need a solid plan. This is like having the instructions before building your LEGO spaceship. It will save you time, effort, and frustration down the road. This phase is very critical for successful 3D model creation and involves these important sub-steps:
Conceptualization and Idea Generation
This is where your imagination gets to shine! Think about what you want to create. Is it a character, a weapon, a building, or something else entirely? Ask yourself questions like:
- What will the model be used for in my Roblox game?
- What is the general shape and size of my desired model?
- What style am I aiming for? (realistic, cartoonish, low-poly, etc.)
- What kind of details will my model require?
Gather ideas from real-world objects, other games, or your own imagination. Sketching out your idea is super helpful. You don’t need to be a great artist; simple doodles can help visualize your concept. Use references, like pictures, to guide your work later in 3D modeling.
Gathering References
Once you have a general idea, it’s time to collect references. References are like cheat sheets, they help make your model look accurate and consistent. If you’re making a sword, find pictures of different kinds of swords. If you’re creating a car, look at real car pictures. The more references you have, the easier it is to build your models accurately. Good references can help you understand:
- Proportions of the object
- Specific features and details
- Textural properties of the object
Creating a Basic Blueprint
Before jumping into 3D modeling software, it’s a good idea to have a rough blueprint or basic plan. This could be a simple sketch showing the main shapes of your model, or a more detailed diagram showing the different parts of your object. This blueprint will act like a guide to ensure your model is created to the required dimensions and specifications. A basic plan may include:
- Dimensions of your object
- Key shapes for object creation
- Breakdown of object into smaller parts
- Rough placement of specific details
3D Modeling Software
Now, with your plan in hand, it’s time to start building in 3D! There are several 3D modeling programs that are popular for Roblox game developers.
Choosing the Right Software
There are different kinds of 3D modeling software available, each with different strengths. Here are a few popular ones:
- Blender: A free and very powerful option, used by many professionals. It has a bit of a learning curve, but it’s worth it.
- Autodesk Maya: An industry standard software with great tools for creating high-end models. It is a paid option and is good for more detailed models.
- Autodesk 3ds Max: Similar to Maya, this is also a paid software that provides powerful modeling capabilities and is great for complex projects.
- MagicaVoxel: A free and easy-to-use program for creating voxel-based models, great for low-poly or blocky styles.
For many new Roblox developers, Blender is an excellent choice because it’s free and very powerful, offering most features. Pick the software that matches your needs, skill level, and the complexity of your project. Try out a free option first before considering a purchase to see what works best for you.
Basic Modeling Techniques
Once you choose your software, you’ll start learning how to build in 3D. Here are some common techniques you might use:
- Extrusion: Pulling a 2D shape into 3D. It’s like building a wall from a floor.
- Subdivision: Taking a low-resolution object and adding more polygons to make it smoother and more detailed.
- Sculpting: Like working with clay; you can push and pull vertices to achieve the desired shape.
- Boolean Operations: Using shapes to combine or subtract from other shapes, like cutting out a hole with a cube.
Start with simple shapes and slowly add details. It’s important to understand how these techniques work to create great-looking models. Many tutorials can be found online for these techniques specific to your chosen software.
Working with Polygons
3D models are made of polygons (mostly triangles). The more polygons, the more detailed the model can be, but also the more difficult it becomes for game engine to render. Learning about polygon count is very important, especially when creating models for games. Having too many polygons can make your game slow down or lag. This is why you should always aim to keep the poly count low as much as possible, particularly in mobile game development. Here are things you need to keep in mind:
- Low Poly: Models with few polygons, which are great for mobile games. These are less detailed and often have a simpler look.
- High Poly: Models with many polygons, which are more detailed and smoother. These are often more suitable for high-end platforms and detailed renders.
- Optimization: The process of reducing the polygon count without losing visual fidelity is very important. This can be achieved with specific modeling techniques and optimization features in your chosen software.
Texturing and Materials
A model without textures and materials would look very boring! Textures are like the skin of your model. They add color, patterns, and surface details. Materials control how your model interacts with light, making it look shiny, dull, or transparent.
Understanding UV Mapping
UV mapping is like unwrapping your 3D model into a 2D space so you can add textures to it. Imagine taking a box and flattening it out to draw on it, and then putting the box back together. Without it, textures would look distorted or stretched. Here are the things you need to know about UV mapping:
- UV Unwrapping: The process of taking a 3D model and turning it into a 2D layout.
- UV Islands: Individual areas of your UV map that represent different parts of your model.
- Seams: Lines where the UV map is cut open so that the model can be flattened into a 2D representation.
Creating and Applying Textures
Textures can be created in programs like Photoshop, GIMP, or Substance Painter. You can create the textures yourself or find free textures online. Once you have the texture, you need to apply it to your model using the UV map. Here are the things to keep in mind:
- Color Maps: The basic color of your model.
- Normal Maps: Add details like bumps and grooves.
- Roughness Maps: Control how shiny or dull the surface appears.
- Metalness Maps: Dictate how metallic your model appears.
Working with Materials
Materials are what give your models surface characteristics. You can make things look like plastic, metal, wood, or anything else you can imagine. Here’s how materials can affect the appearance of your model:
- Surface Reflection: How light bounces off your object.
- Transparency: Make the model see-through.
- Subsurface Scattering: Light that penetrates an object before bouncing back.
Rigging and Skinning
If you are making a character or anything else that needs to move, you’ll need to rig and skin it. Rigging involves creating a skeleton for your model. Skinning involves connecting the model to the skeleton, so that when the skeleton moves, the model moves with it. This is like adding joints and muscles to a puppet so it can perform actions!
Creating a Skeleton
A skeleton is a set of bones that controls the movement of your 3D model. The skeleton has joints that can rotate and bend. This is the key to making your model move correctly. Here are the major steps:
- Joint Placement: Decide where each joint (bone) needs to go, such as the knees, elbows, and neck.
- Hierarchy: Link the bones together in a way that makes sense. For example, the hand bone should be connected to the arm bone.
- Naming Bones: Giving clear names to your bones is very helpful for animation.
Skinning the Mesh
After you create the skeleton, you need to attach the model (the skin) to the skeleton. This makes the mesh move along with the bones. This is a very delicate process and will require a lot of practice for you to master it. Here’s what you need to know:
- Weight Painting: This process involves assigning how much influence each bone has over each part of the mesh.
- Smooth Binding: This ensures that the skin deforms naturally when the model moves.
- Adjustments: After skinning, check the model carefully and fix any parts that don’t move correctly.
Animation
With a rigged model, you can finally bring it to life! Animation involves creating a sequence of movements that make your character or object perform actions. The animation gives the feeling that your game is interactive and fun to play. Here’s a brief look at it:
Keyframe Animation
Keyframe animation is the most common way to create animations in 3D. You define the position, rotation, and scale of your model at specific points in time (key-frames). The animation software then fills in the gaps between these keyframes to create a smooth transition. Here are the steps to the keyframe process:
- Setting Keyframes: Setting the position of your model or the rotation of the bones at different times.
- Tweaking Animations: Refining the animation to make it look natural and smooth.
- Using Timelines: You will be using the timeline within your chosen software to organize your keyframes.
Looping Animations
Many times, you’ll want your character to repeat the same action over and over. In this case, you will have to create looping animations. Here’s what you need to keep in mind:
- Seamless Cycles: Make sure that the start and end frames of your animation match up so the loop looks smooth.
- Animation Length: The duration of the animation should be the right length for the desired action.
Exporting for Roblox
Now that you have a great model, it’s time to get it into Roblox. Roblox accepts several file types, such as .fbx and .obj. Here is how you export models:
Choosing the Right File Format
The most common format is .fbx, which can contain the model, textures, and animation data. Exporting models correctly is critical, so that the textures and animation play as they should. Follow these steps carefully:
- Export Settings: Use the correct settings, including file type, for compatibility with Roblox.
- Texture Baking: Bake all the textures onto your model before exporting.
- Animation Settings: Make sure you are exporting with the right settings for animation to play correctly.
Importing into Roblox Studio
Once you have your file, you can import it into Roblox Studio using the asset manager. You might need to adjust the scale and position of your model, and also create collisions. Here’s what you’ll do:
- Importing: Bring your asset into your game.
- Positioning: Move the model to where it needs to be in your game.
- Adding Collisions: Adding the parts where players should collide with the model, so they can walk on it or interact with it.
Optimization
Even after you’ve imported your model, there are ways to optimize it to make sure it runs smoothly in Roblox. Optimization is important for a better game performance on different devices.
Reducing Polygon Count
If your model is too complex, it can cause lag. Reducing the polygon count is a great way to improve game performance. Here are some techniques:
- Decimation: Reducing the number of polygons while keeping the original shape.
- LODs (Level of Detail): Creating different versions of the model with varying polygon counts, which are displayed based on their distance from the camera.
Optimizing Textures
Large textures can also cause performance issues. Reducing the size of texture files or using optimized file formats can greatly improve game performance. Here are a couple ways of doing it:
- Texture Compression: Reduce the size of your texture files without losing too much quality.
- Texture Atlases: Combining all your textures into a single texture file, reducing the number of times they need to be loaded.
Testing and Iteration
After importing the model, always test your game. You might find some small things to adjust to make everything perfect. Testing is essential to spot any errors that might occur in your model. Here’s how you should go about it:
- Play Testing: Make sure your model moves and looks correct in the game.
- Bug Fixes: Repair any problems you find.
- Refinement: Improve your model based on feedback and observation.
The Roblox 3D modeling pipeline might seem like a lot of work, but with practice, you will find the steps become much easier. The more you practice, the better you’ll get at creating amazing 3D models for your Roblox game.
By understanding this process, you’re well on your way to building unique, amazing Roblox games!
3D to 2D pipeline for Roblox Classic Clothing
Final Thoughts
In summary, the roblox 3d modeling pipeline involves creating assets in external software, importing them, and optimizing for the platform. This process requires careful attention to detail and polycount limitations.
You must learn each stage to get the best results. Effective utilization of this pipeline directly influences the visual quality within your Roblox experiences.
The complete roblox 3d modeling pipeline is vital for developers wanting to create compelling games. It combines artistic skill with technical understanding.

