
To improve your Roblox audio, use tools like Audacity for cleaning up sound and adding effects, then import your finished work into Roblox Studio.
Creating immersive games needs good sound. Knowing roblox audio editing tips will make a huge difference. Poor audio can ruin the gaming experience, but with proper tools and techniques, you can create captivating soundscapes.
Improving sound quality involves understanding noise reduction and proper audio layering. Applying effects thoughtfully and importing the audio correctly directly impacts the player.

Roblox Audio Editing Tips
Making your Roblox games sound awesome is super important! Good sounds can make your game feel more real and exciting. But how do you get those perfect sound effects and background music? That’s where audio editing comes in. It might seem tricky, but with a few helpful tips, you can make your Roblox games sound like a professional made them. Let’s jump into some secrets that can help you.
Understanding Roblox Audio Basics
Before we start tweaking sounds, it’s good to know some basic things about how Roblox handles audio. Roblox uses sound files that are either .mp3 or .ogg format. These are just ways that sound information is stored on computers. When you upload sounds to Roblox, you have to make sure they meet certain rules. One important rule is how long they can be; sound effects are shorter than background music, usually. It is also important to know that Roblox will check if the music you’re uploading belongs to you or not, so it’s better if you have the rights to the music.
Sound File Types
Let’s talk a little more about those sound file types.
- MP3: This is a very common type. Many devices can play it, and many sound editing programs can use it. It’s usually a good choice for most situations in Roblox, such as background music.
- Ogg: This is another popular choice, and sometimes it can sound slightly better than mp3 if both are at similar bitrates. Some editors may work better with Ogg files too. Ogg is also a great file format for use in your Roblox games.
Think of these like different kinds of paint. They each work, but some might be slightly better for different jobs. In Roblox, you can use both types. Knowing about them will help you decide what to use in the future.
Sound Length Limits
Roblox has rules about how long your sounds can be. Here’s the basic rundown:
- Sound Effects: These are the short sounds, like a door opening, a jump, or an explosion. They should usually be just a few seconds long, no more than 10 seconds in most cases. Making sure they are short makes your games load faster.
- Background Music: This is the music that plays in the background to set the mood. These can be longer, perhaps up to several minutes, but keep it mind that players have to download the audio and that can affect the time of the game loading.
Roblox recently changed these limits, so check their website for the most up-to-date details. It’s always best to keep your sound files as small as possible to help with your game’s performance.
Finding the Right Sounds
Now that you know the basics, where do you even find sounds for your games? You have a few different options:
Roblox Library
Roblox has its own library of sounds! You can find all kinds of sound effects and music there. It’s really easy to use; just go to the “Create” page, then “Library,” and search for “Audio”. You can then filter by “Sound” or “Music” and find the sounds you are looking for.
Free Sound Websites
You can also find many free sound effects and music on websites dedicated to free audio. Some good places are:
- Freesound.org: It’s a huge database of different kinds of sound effects. Just be sure to check the license to make sure you can use it.
- Pixabay.com: This website has a section with music that you can use for free.
- YouTube Audio Library: YouTube has a library where you can find free music, that you can download and use in your game.
Always double-check the rules (the “license”) for these sounds before you use them. Some might be free for personal use only, while others might require you to give credit to the person who made the sound.
Creating Your Own Sounds
If you can’t find what you’re looking for, you can also make your own sounds! This can be a little trickier, but it’s definitely doable with the right tools.
- Recording with a Microphone: You can record your own sounds with a microphone. You can use a regular microphone on your computer, or even the microphone on your phone.
- Using Sound Design Software: Some programs help you create cool sound effects and music. These programs can be more difficult to use, but you can make truly custom sounds.
If you’re just starting, finding sounds that already exist is usually the quickest way to get great sounds for your game. As you improve, you might want to make your own!
Basic Audio Editing Tools
Alright, let’s talk about editing the sounds you have. You do not need to be a professional to edit sound, you just need some basic tools. There are many programs you can use to edit your sounds, some are free and some will cost money. But here are some that people use most often:
Audacity (Free)
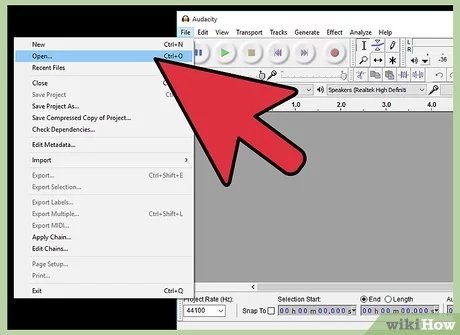
Audacity is a free sound editor that you can download and use on your computer. It is a super good tool for beginners, because it is very easy to use and it has most of the basic features that you need. You can use Audacity to:
- Cut and trim your sounds.
- Make a sound louder or quieter.
- Add simple sound effects like fade-ins and fade-outs.
Audacity is a fantastic tool for getting your sounds in shape for Roblox. It’s the perfect starting point for anyone who doesn’t have a lot of experience with sound editing.
Online Audio Editors
There are also a bunch of free online sound editors that you can use if you do not want to download any software on your computer. A couple of the most popular are:
- Audio Trimmer: This is a really easy to use website, where you can quickly trim the sound.
- Twisted Wave: This is a more advanced tool but it works online, too.
These online editors are great if you don’t want to install any software. However, they may have fewer features than a program like Audacity.
Key Audio Editing Techniques
Now that you know some tools to use, let’s discuss the most important things you will need to do.
Trimming and Cutting Sounds
When you edit sounds, you will most likely want to cut it down to a specific part, or you may need to cut it in multiple sections. This is a super important step because sometimes you may have a long music file, but you only need the first ten seconds for your game. Here’s how:
- Select: Use your mouse to pick the area of the sound you want to keep.
- Cut: Press the cut button (usually shown with scissors) or remove the parts you do not want.
Think of it like cutting a piece of paper to the size you need. Cutting and trimming is essential to making sure the sounds in your game are exactly the length they need to be.
Adjusting Volume
It’s super important that the volume of your sound is just right. If a sound is too quiet, players won’t hear it. If it’s too loud, it will be really annoying. Here is how to change it:
- Amplifying: This makes the sound louder. It’s good if the sound is too quiet.
- Reducing: This makes the sound quieter. It’s good if the sound is too loud or you want a background music not to be too loud.
Always test how loud your sound is in your Roblox game after adjusting it. What sounds good in your editor might be too loud or too quiet in the game.
Adding Fade-Ins and Fade-Outs
Fades can make sounds sound smoother and more professional. A fade-in gradually makes the sound louder when it starts. A fade-out gradually makes it quieter when it ends.
- Fade In: This makes a sound start quietly and then get louder over time. It’s nice for a music track or a sound that should ease in.
- Fade Out: This makes a sound start loud and then get quieter over time. It is a good option for the end of the song or to make your sound effects end in a smooth way.
Many editors have a fade-in/fade-out function that makes it easy to add these effects to your sounds. Try them out to make your game sounds blend together perfectly.
Removing Unwanted Noise
Sometimes, your sounds might have some extra noise. This could be like hissing, static, or other background noises. Here’s how to try and get rid of them:
- Noise Reduction: Most editors have a tool that can help with this.
- Experiment: You might have to try different settings to get the best result.
Removing noise is very helpful in making your sounds more clear, especially for background music.
Advanced Audio Tips
Once you know the basics, you can try some more advanced tricks. These can make your game’s sound design extra special.
Layering Sounds
Layering sounds is when you put multiple sounds on top of each other to make a new sound. For example, you could have one sound for the wind, one for trees rustling, and one for a bird chirping to make a forest background. By combining multiple sounds in this way, you can create really complex and immersive environments for your players to experience. The trick to layering is to make sure they all play well together.
Using Sound Effects
Adding sound effects can greatly increase the quality of your Roblox game. Things like echo, reverb, and delay can make your sounds more interesting. These add extra depth to your game.
- Echo: This makes a sound repeat.
- Reverb: This makes the sound feel like it is in a real place.
- Delay: This is when the sound repeats a short time after the original sound.
Experiment with sound effects to create unique sounds for your game. Make your player feel like they are in your game by adding the correct sounds.
Balancing Sounds
Balance is very important when editing audio. Make sure all of your game sounds do not overpower each other. Think of it like balancing the ingredients in a recipe; you need just the right amount of everything to make the whole thing taste good. It may take some trial and error, but it’s a very important step in making your audio professional.
Uploading Sounds to Roblox
After editing your sounds, you’re ready to put them in your game! Here’s how:
- Go to the Create Page: Go to the Roblox website and click “Create”.
- Find Audio: Click “Audio” in the side menu.
- Upload: Click “Upload Audio.” Pick the sound file you want to upload.
- Set Details: Give your sound a name and set the type of audio (sound effect or music).
- Confirm: Pay the small fee for uploading audio (if there is one) and hit submit.
Remember that Roblox has rules about the sounds you can upload. Make sure that you have permission to use it and that it is appropriate for Roblox games. It may also take a few minutes for your audio to be available.
Implementing Audio in Your Game
Now that your sounds are on Roblox, it is time to place it in your games! Here’s the basics:
Using Sound Instances
You can place sound directly into the game by using sound objects. These sounds can play when the game loads, when certain things happen, or when the player is in a certain area.
- Adding the Sound: Insert the sound into your game using the “Sound” object.
- Setting the ID: Copy and paste the sound ID from the sound you just uploaded into the sound property.
- Controlling the Sound: You can control when and how a sound plays by using scripts.
Scripting for Audio Control
Roblox uses scripts to make audio more dynamic. Here’s a simple example of how you would do this:
local sound = script.Parent:WaitForChild("Sound") --this is the path of where your sound is in your Roblox game
sound:Play() -- plays the sound
You can do a lot with scripts, such as:
- Play different sounds for different events, such as the player jumping or getting hit.
- Changing the volume depending on how close the player is to the sound.
- Adding looping sounds such as background music.
Don’t be afraid to experiment with scripts to make your audio system feel immersive and responsive.
Testing and Iterating
The final step to good audio design is to always test and improve. When you have sound in your games, always:
- Test it: Make sure that all the sounds are at the correct volume. You need to try out your sounds in your game to make sure they are just right.
- Ask for feedback: Have your friends or other players try your game. Ask them what they thought about your sound.
- Make Changes: You might have to change how the audio is mixed, or change when or how it plays.
Good audio takes a little bit of time to get right. Don’t be afraid to make a lot of adjustments. Great audio in your games is very noticeable, and can be the make or break of the quality of your game.
With these tips and tricks, you are on your way to making amazing Roblox games. Remember that learning to edit sound takes time and practice, but it will greatly improve your game. So keep going, and make your game sound awesome!
Quick edit tutorial || Roblox edit || #shorts
Final Thoughts
Experiment with different effects to get unique sounds for your game. Remember to adjust volume levels carefully to avoid sudden loud noises. Use looping techniques to make background music and ambient sounds.
Sound layering adds depth and a professional feel to your projects. These roblox audio editing tips can greatly improve your game’s experience. Pay close attention to your audio and make needed edits.

