
Creating a Roblox rig involves using Blender or similar software to model and then import your character mesh and bones into Roblox Studio, followed by scripting and animation work.
Ever wanted to bring your own unique characters to life in Roblox? This Roblox rig creation guide will walk you through the essential steps. Building your own rigs allows for far greater customization than using the standard avatars.
It might seem daunting initially, but with some practice, you’ll be making amazing models. We’ll discuss the modeling, rigging, and import process, giving you the basics. From there, you will learn to add your own scripts.

Roblox Rig Creation Guide
Ready to make your own awesome characters for Roblox games? Creating a rig, which is like the skeleton of your character, is the first big step. It might sound tricky, but it’s totally doable, and we’re here to guide you through it! Let’s dive into the world of Roblox rig creation and learn how to make your characters move and come to life.
Understanding Roblox Rigs
Before we start building, let’s talk about what a rig actually is. Imagine a puppet – it needs a frame to hold its body parts together, right? A Roblox rig is just like that frame. It’s made of parts connected by joints, which allow the different pieces to move smoothly and realistically. These parts are usually blocks, and the joints help them bend and rotate.
Types of Rigs
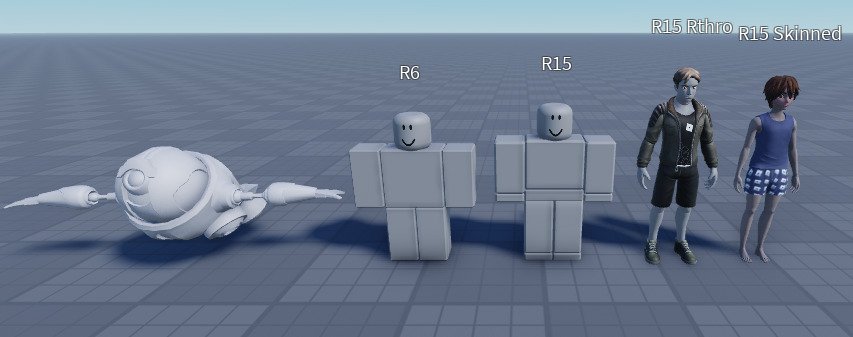
Roblox uses different kinds of rigs, but the most common ones are:
- R15: This is the newer type of rig, and it’s what most new games use. It has 15 joints, which means it can move in more flexible ways. Think of it like a very bendy action figure!
- R6: This is an older type of rig with just 6 joints. It’s simpler to make and use, but it doesn’t move as smoothly as R15. Imagine a basic toy that can only bend at a few points.
For this guide, we will mostly focus on R15 as it offers more possibilities for movement and customization.
Planning Your Rig
Before we start building, let’s plan what our rig will look like. Think about what type of character you want to make. Will it be a human, an animal, or something completely unique? This will affect the size and shape of your rig’s parts.
Sketching Your Character
A simple drawing can help you visualize your character before you start building. Think about:
- Size: How tall or small should your character be?
- Proportions: How long should the arms and legs be compared to the body?
- Unique features: Does your character have special parts like wings or extra arms?
Gathering References
Looking at pictures or even other Roblox characters can give you great ideas for your rig. Don’t be afraid to get inspired by what others have created.
Building Your Rig in Roblox Studio
Now for the fun part! We will use Roblox Studio to build our rig. If you don’t have it, download it from the Roblox website. It’s free to use!
Opening Roblox Studio
Once you have Roblox Studio installed, open it up. You’ll see the startup screen. Create a new baseplate by selecting “New” and then “Baseplate”.
Adding the Parts
The first step to building our rig is adding parts. We will start with basic blocks. Here’s how:
- Go to the “Home” tab at the top of the screen.
- Click on the “Part” dropdown menu and select “Block”. A new block will appear in your workspace.
- Use the move tool (the icon with the arrows) to move the block to the center of the workspace.
- Use the scale tool (the icon with the squares) to change the size of the block. For a human-like rig, this could be the torso.
Creating the Torso
Let’s start with the torso. Make it a rectangular block about 2 studs tall, 4 studs wide and 2 studs deep. Make sure you rename it. You can do this in the “Explorer” window (usually on the right side). Select the part and change the name to “Torso”.
It’s good practice to rename every part of your rig so that it’s easy to find them later when we begin coding.
Adding Other Parts
Now, let’s add the other parts: the head, arms, and legs.
Here’s how you can add the Head:
- Add another Block.
- Resize it to make it smaller than the torso, probably a block of around 3 by 3 by 3 studs.
- Move it above the Torso, placing the head on top of the torso.
- Rename this block to “Head”.
Here’s how you can add the Arms:
- Add another block.
- Resize it to make it long and thin.
- Move it to the side of the Torso.
- Rename this block “LeftArm”.
- Duplicate the LeftArm (Ctrl + D) and move the duplicated arm to the right side of the Torso, and rename it “RightArm”.
Here’s how you can add the Legs:
- Add another block.
- Resize it to make it long and thin.
- Move it to the bottom of the Torso.
- Rename this block “LeftLeg”.
- Duplicate the LeftLeg (Ctrl + D) and move the duplicated leg to the right side of the Torso, and rename it “RightLeg”.
Adjusting the Parts
Play around with the size and position of the blocks until you are happy with how they look. Remember, you can always go back and change things.
Understanding Joints and Connections
Now that we have the parts of our rig, we need to connect them with joints. Joints are like hinges that allow our parts to move relative to each other. In Roblox, these are called ‘Motor6D’ joints.
Adding Motor6D Joints
Motor6D joints are the key to making our rig move. Here’s how to add them:
- Select the “Model” tab at the top.
- Find the “Constraints” dropdown menu.
- Click on “Motor6D”.
- Click on the Torso (Part0) and then the Head(Part1). A joint will appear between these two parts.
Repeat this for the torso and each arm, and for the torso and each leg. Each time, make sure you select the torso first, and then the part you want to connect.
After connecting all the parts, your “Explorer” should show the Motor6D joint for each of the Body parts under the Torso.
Rig Naming Convention
Use naming conventions that make sense for the rig. For instance, the torso, head, left arm, right arm, left leg, and right leg. It is important to name all parts and joints according to convention, so it will make coding and animating easier. It would also make the model easier for others to work with.
Rig Hierarchy
The order of your rig in the explorer window matters! Parts should be grouped in a parent-child structure for easy manipulation. For a character rig, it is common to make the Torso the main parent and all the other body parts be child of the Torso
Here’s how to make the Torso parent to the rest of the body:
- In the “Explorer” window, drag the Head, LeftArm, RightArm, LeftLeg, and RightLeg and drop each on top of “Torso”. They should appear as children under Torso.
Now that they are children of the Torso, if the torso moves, the rest of the body will follow. This is how we can control the entire rig.
Anchoring and Unanchoring Parts
Anchoring parts will help your rig be stable when moving, but make it unanchored when you want the parts to fall or be affected by gravity. Anchor all the parts in your rig. Select all parts in the “Explorer” window and in the “Properties” window, tick the anchor box.
Testing your Rig
Now that your rig is built, let’s test it out. Click the “Play” button at the top of the screen. Your rig should stay in place, not fall apart, and each part should move together with the torso. If it falls apart, check if you’ve made the proper connection with Motor6D joints and if the parts are properly parented.
Moving the Rig
To see how your rig moves, you can select the Torso, and use the move tool. The other body parts should follow the torso.
Saving Your Rig
It’s always a good idea to save your work often. Click “File” then “Save to Roblox”. Make sure you name the file something memorable.
Advanced Rigging Techniques
Once you are comfortable with the basics, you can explore more complex techniques such as:
Adding Accessories
You can add accessories to your rig, like hats, weapons, or special clothes. You can get these from the Roblox Toolbox, or you can model them yourself.
Customizing Textures and Colors
You can change the appearance of your rig using different colors and textures. Select a part, and in the “Properties” window, you can adjust the color and material of the part.
Creating Custom Animations
You can also create animations for your rig, like walking, running, or dancing. This can be done by using the Animation Editor plugin.
Troubleshooting Common Rig Problems
Sometimes, things don’t go as planned. Here are a few common problems and how to fix them.
Parts Fall Apart
If your rig falls apart when you test it, it means the parts are not properly connected. Check that the Motor6D joints are correctly placed between each part and parent them to the torso in the “Explorer” window. Also make sure the parts aren’t unanchored.
Parts Don’t Move Correctly
If parts don’t move as expected, it could be because of the position of the joints. Try adjusting the position of your Motor6D joint using the move tool.
Joints are in wrong position
The joints are important. If they are not positioned correctly on the parts they are connecting, it would affect the way the model behaves. If this is the case, delete the joint and try reconnecting it correctly.
Rig is too big or too small
If you feel that the rig is too big or small, you can go back and resize them with the scale tool.
Why Learn Rig Creation
Creating rigs is a very important skill for game creators and developers. Knowing how to build your own rigs allows you to have custom characters in your game. You can even sell your character models and rigs. By mastering this skill, you are one step closer to making your games a huge hit!
Tips for Success
- Practice Regularly: The more you build, the better you will become.
- Experiment: Don’t be afraid to try new things and break a few rules.
- Learn from Others: Check out what other rig creators have made, and try to learn from them.
- Start Small: Start with simple designs and work your way up to more complex projects.
- Have fun: Rig creation is all about creativity. Make sure you enjoy the process!
Rig creation is a fundamental skill for any aspiring Roblox game developer. While it may appear complex at first, with some patience and practice, you can learn how to create amazing characters for your games. Remember to experiment, have fun, and keep learning new things. You are now on your way to become a great Roblox game developer!
How To Make a Custom Character Rig in ROBLOX STUDIO!! [Tutorial]
Final Thoughts
Creating rigs in Roblox involves understanding its building blocks and animation capabilities. This guide walks you through crucial steps of developing your own custom characters.
This ‘roblox rig creation guide’ has outlined key areas. Practice and experimentation are important for improvement.
With the right approach, creating custom rigs becomes achievable. You can now design unique characters in Roblox.

