To beat World’s Hardest Game Level 1, you must carefully memorize the precise path, executing each movement with perfect timing to avoid obstacles.
Have you ever felt the frustration of a game so difficult it seems impossible? We understand that feeling, especially when trying to figure out how to beat world’s hardest game level 1. Many players spend hours, even days, stuck on this initial stage. It seems unfair, right?
Level 1 demands extreme patience and precision. Each move must be planned, every twitch of the finger calculated. This is not about luck; it’s about knowing the path and executing it flawlessly, which takes practice.

How to Beat World’s Hardest Game Level 1
Alright, buckle up, gamers! You’ve probably heard whispers of the “World’s Hardest Game,” and if you’re here, you’re likely staring down the barrel of level 1. It’s notorious for a reason – it’s tricky! But don’t worry, we’re not about to give up. This guide will break down exactly what you need to know to conquer this notorious first level. We’ll go over the moves, the best tactics, and help you finally get past this seemingly impossible hurdle. Get ready, because we’re going to learn how to beat World’s Hardest Game Level 1!
Understanding the Basics of World’s Hardest Game Level 1
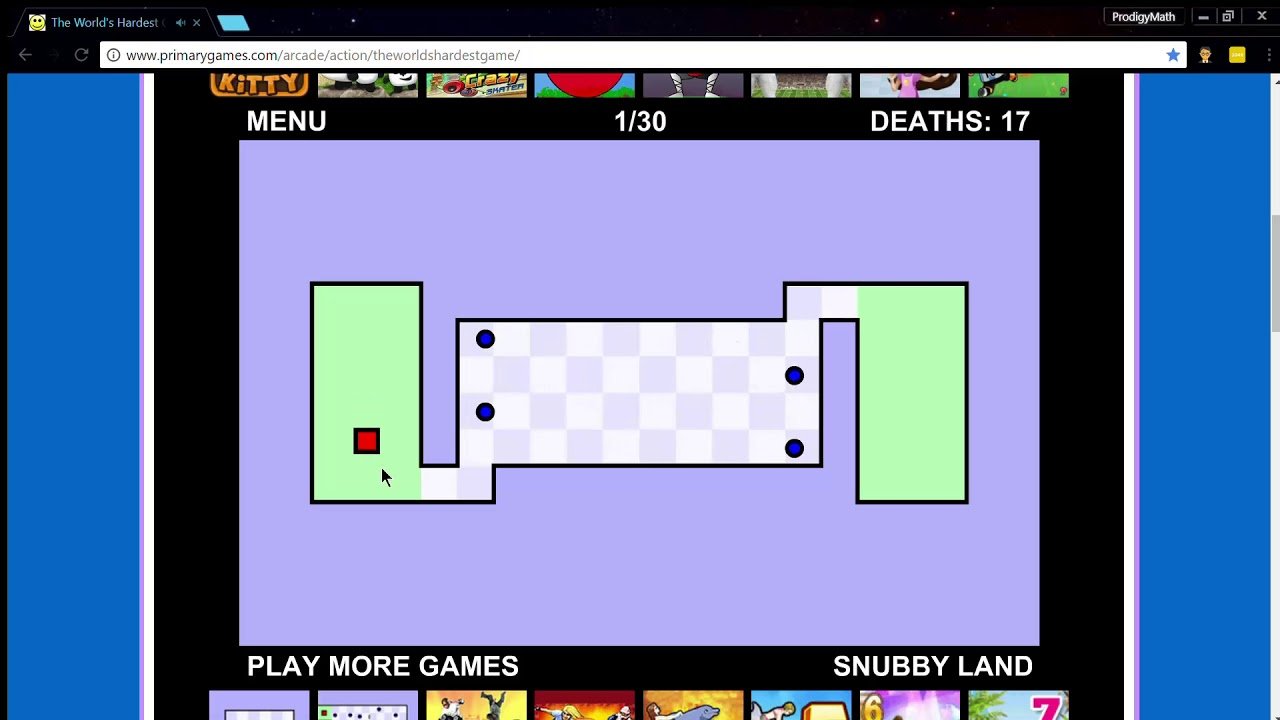
Before we dive into advanced strategies, let’s make sure we understand the basics. Level 1 of the World’s Hardest Game, like the rest of the game, centers around guiding a red square from a starting point to a green goal. Sounds easy, right? Wrong! This level is packed with challenges that test your patience and precision. You’ll be moving the red square around the map, dodging blue circles that patrol the area. If a blue circle touches your red square, you’ll have to start the level again. The first level might feel simple in concept, but it requires planning, timing, and a lot of careful movement. Let’s break it down even further.
The Layout
The level presents a rectangular playing field. Your red square starts near the bottom left. The goal is a green square located on the top right. Scattered between your red square and your goal are those pesky blue circles. These circles travel in straight lines, bouncing off the walls of the playing area. The level also includes a couple of strategically placed blocks. These don’t move, but they are vital for you to use to create safe paths.
Movement and Control
You control the red square using the arrow keys on your keyboard. This is crucial: the red square moves with a little bit of inertia. When you press an arrow key, the square starts moving. If you let go, it won’t stop instantly. It’ll slide a short distance before coming to a complete stop. This is one of the first challenges most players encounter. You need to learn to control your speed and the momentum of the square to navigate around the blue circles.
What Makes it Difficult?
So, what exactly makes the first level of World’s Hardest Game so challenging? It’s a combination of factors. The blue circles’ movement patterns seem simple, but their speed and placement create complex situations. The square’s inertia requires very careful, short movements and precise timing. The level doesn’t forgive mistakes; one touch from a blue circle sends you back to start. It teaches us the importance of planning our moves and paying attention to every detail. This is a game about skill, patience, and perseverance. Don’t expect to breeze through this level on your first few tries!
Essential Strategies for Level 1
Okay, now that we understand the layout and the basic mechanics of this level, let’s get to the important part – how to beat it! There is no single “correct” path. However, some methods are more reliable than others. Here are key strategies you can use to navigate this level more efficiently:
The “Slow and Steady” Approach
This method focuses on methodical and cautious movement. You don’t need to rush. Instead, think of the red square as moving in tiny increments. Focus on moving a small amount at a time and then letting the red square come to a complete stop before you move again. This will help you avoid running into a blue circle because of your square’s momentum. Watch the blue circles closely and time your movements when a space has opened. Remember, small movements are your best friend here. This approach is great for new players who are still getting used to the controls.
Learning the Blue Circle Paths
The blue circles may seem random, but their movement patterns are predictable. They move in straight lines and bounce off the walls. Take the time to watch them. Notice how they move and look for openings in their patterns. For example, some move horizontally across the screen, while others travel vertically. Understanding these paths helps you to know when to move. Pay special attention to their starting positions and how they interact with the blocks on the screen. This will help you identify safe zones where the blue circles won’t touch you. This is the critical information that will help you to get to the end of the level.
Using the Blocks to Your Advantage
The blocks on the level aren’t just obstacles – they are vital tools. Use them to create temporary safe areas. For example, move your red square behind a block to avoid a passing blue circle. Let a blue circle go past and then make a move. Use the blocks to your advantage and you’ll soon be on your way to the next part of the level. This adds a layer of strategy to the level. Instead of simply reacting to the blue circles, you will be thinking a few steps ahead.
Practicing Short, Precise Movements
As we mentioned earlier, the red square’s inertia is one of the biggest challenges. To overcome this, you need to practice using short taps on the arrow keys instead of holding them down. A short tap moves the red square slightly and will stop it much faster. This helps you maintain precise control and prevents you from sliding too far and colliding with a blue circle. This takes some practice, but it’s a game changer once you get it right. Start in an area of the level with fewer blue circles and practice controlling the momentum. You will find it will help a great deal in the later more challenging parts of the level.
Patience and Persistence
Level 1 of World’s Hardest Game is designed to frustrate. You will fail many times. It’s important to not get discouraged. Each time you restart, you’re gaining knowledge about the level layout and the movement of the blue circles. Treat each failure as a learning opportunity. Take a short break if needed and come back with a clear mind. Persistence is key! Don’t give up if the level seems too challenging at first. The feeling of finally completing the level is worth the effort.
Step-by-Step Guide Through Level 1
Let’s break down the level into a series of steps. This should help you to visualize a path to success. Remember, these are suggestions, and you might find slightly different routes work better for you. The important thing is to apply the strategies we talked about and to learn from every attempt.
- The Start: Your red square starts in the lower left corner of the screen. The first few blue circles you’ll see move horizontally across the screen. Before you move make sure you carefully observe their movement patterns. Wait for one to pass and then quickly move up a short distance. Wait behind one of the blocks for the other one to pass.
- Navigating the First Block: Move your red square to the right, staying close to the first block. Wait for a blue circle to move above you and another to move to the left. This will create a safe space for you to move the red square up a bit more. Make sure to move with small, precise movements using short taps on the arrow keys.
- The Middle Section: This part can be tricky. Here, the blue circles are moving more frequently. You will need to navigate them using the gaps between their paths. Move a small amount and then stop completely before moving again. Try to stay close to the wall or blocks when possible. Remember, slow and steady will help you here.
- The Final Stretch: Once you’ve moved past the most challenging part, there is a final space between a block and the top wall. Wait for a blue circle to move away, and quickly make your way to the goal. It’s crucial to keep the red square’s inertia in mind. Remember, short taps are key here. Once you’re safely there, your red square will turn green, and you will have finished the first level.
Advanced Tactics and Tips
Once you get the hang of the basic strategies, there are a few advanced tactics you can try to speed up your progress. These might require a bit more practice, but can give you an edge.
Predicting Future Movements
Instead of simply reacting to what’s happening right now, try to anticipate what the blue circles will do next. Look ahead and try to visualize their movement patterns. It’s like playing a game of chess where you’re always thinking a few moves ahead. If you can anticipate where the circles will be a few seconds in the future, you can move more confidently. This skill improves with practice, so don’t be discouraged if it doesn’t come easily at first.
Finding Consistent Safe Zones
There are areas on the level where you can consistently find openings to move through. Try to identify these zones. It might take some time. However, once you discover them, you’ll be able to use them in multiple attempts. Look for consistent spaces between the blue circles, particularly those near the walls and blocks. These spots often make your route much safer and easier to navigate.
The “Edge Hugging” Technique
This involves sticking close to the edges of the level or the blocks when possible. This often minimizes the chance of getting hit by a blue circle. The blue circles always bounce off the walls and blocks, so they are rarely in the corners. Hugging the edges can create more reliable safe paths. When moving along the edges, you might find that you have more time to react and make small moves.
Fine-Tuning Your Timing
Mastering this level is all about timing. Precise timing makes a massive difference between success and starting over. Pay attention to the spaces between the blue circles. Be patient. Wait for the correct moment before moving. The game rewards the players with excellent timing and the ability to wait. A single mistake can mean starting the level again, so be ready to be precise. Practice on the early parts of the level first before trying this in the harder sections.
Troubleshooting Common Problems
Even with these tips and strategies, you might still encounter difficulties. Let’s address some of the most common problems players face when playing World’s Hardest Game Level 1:
Problem: Constantly Hitting the Blue Circles
Solution: This usually happens because you are not fully stopping your red square before making another move. Remember to practice short taps and pause fully between movements. Slow down your pace and be more patient. You may be moving too fast, which will make it very difficult to predict the blue circles. Make sure to observe the patterns before starting a move. Try using the “Slow and Steady” approach we mentioned earlier.
Problem: Difficulty Controlling the Red Square
Solution: The square’s inertia takes some getting used to. Try practicing in an area of the level with fewer blue circles. Practice the short taps. See how far the red square moves after a short tap and use this to help you navigate. Focus on moving in small, controlled movements and learning how the square’s momentum affects your path.
Problem: Getting Frustrated and Giving Up
Solution: This game can be frustrating. Take breaks when you need to. Don’t let the many failures get to you. Every attempt is a learning opportunity. When you come back to the game, you will be more ready. Look back at your attempts and try to identify what you did wrong. Also, watch some videos of other people completing the level. This might give you an alternative approach that you hadn’t thought of.
Problem: Not Using the Blocks Effectively
Solution: The blocks are there to help you. Practice using them as a shield to avoid the blue circles. Try to use them to plan out paths through the level. Watch to see if there are any parts of the level where the blue circles consistently leave gaps. Use the blocks to help you find those gaps and safe areas.
Why Level 1 is So Important
Level 1 of World’s Hardest Game isn’t just a starting point. It’s a teaching level. It’s teaching you the important skills you’ll need for the rest of the game. It teaches you about patience and precise timing and movement. You need to learn the movement of the blue circles and how to use the blocks to your advantage. Mastering Level 1 sets the stage for your progress through the entire game. Once you beat Level 1, you’ll have the confidence to take on other challenges.
Beating World’s Hardest Game Level 1 isn’t about being the best gamer or using any particular tricks; it’s about understanding the mechanics, planning your moves, and never giving up. The level’s difficulty comes from the game mechanics, which force you to be incredibly precise and think a few steps ahead. By breaking down the level, using key strategies, and troubleshooting your mistakes, you can finally conquer this challenging starting point.
how to beat level 1 of worlds hardest game (coolmathgames) lol
Final Thoughts
Practice makes perfect; you must memorize the pattern of the red blocks. Consistent, short practice sessions are crucial. Small movements prevent fatal mistakes and increase your precision.
Carefully observe each attempt. Adjust your strategy based on what you see. It may take many tries but patience will help.
Finally, to address ‘how to beat worlds hardest game level 1’, focus on timing and precision. Stay calm, you can do it.

