
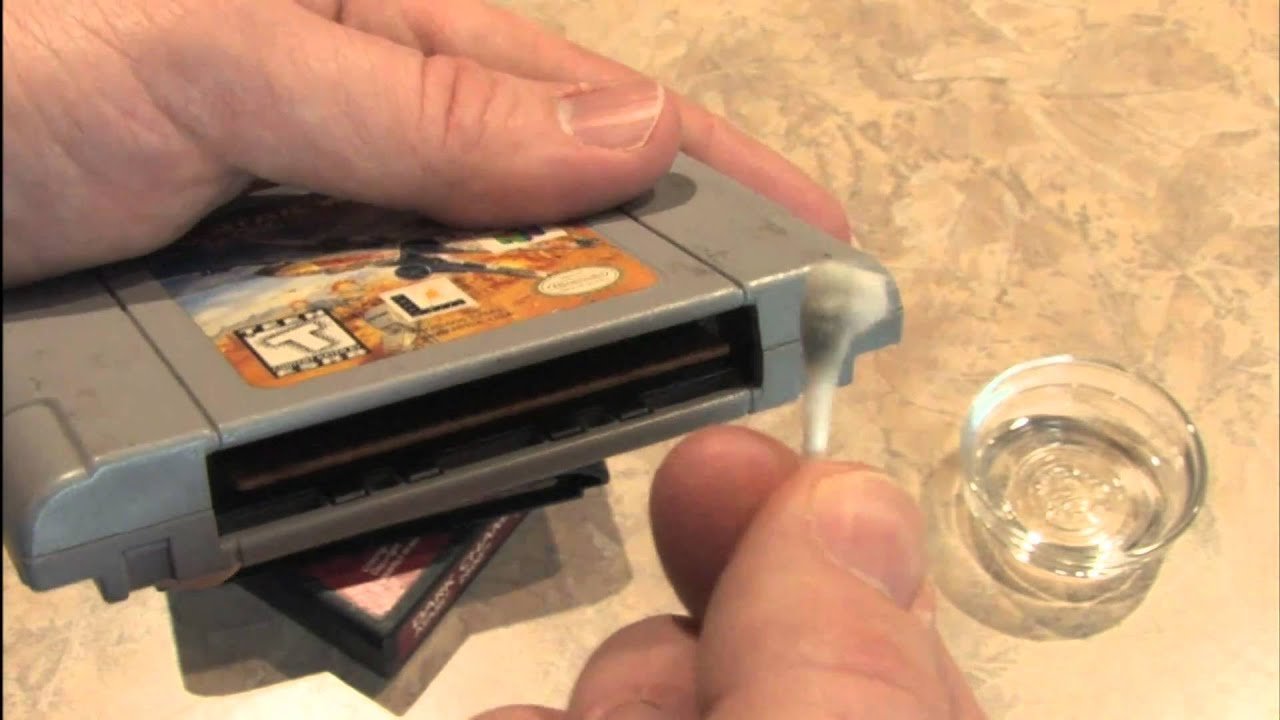
To clean N64 games, use a cotton swab lightly dampened with isopropyl alcohol (90% or higher) and gently clean the metal contacts. Ensure the game is completely dry before use.
Dust and grime can really hamper your favorite retro gaming sessions. If you’re experiencing glitches or your games aren’t loading, it’s probably time for a cleaning session. You might wonder how to clean N64 games correctly without causing any damage, that’s a valid concern for collectors. This process is straightforward. A quick, careful clean will get your cartridge back in working order.

How to Clean N64 Games: A Complete Guide
So, you’ve got a treasure trove of classic Nintendo 64 games, but some of them aren’t playing so well, huh? Maybe they’re glitching, or maybe they just won’t start at all. That’s often because the game cartridge contacts, the little gold-colored pins, get dirty over time. Dust, grime, and even fingerprints can mess with the connection, causing problems. Don’t worry; you can bring these games back to life! Cleaning N64 games isn’t too tricky, and this guide will walk you through it step-by-step. Let’s get those cartridges running smoothly again, so you can jump back into your favorite N64 adventures!
Why N64 Games Need Cleaning
Before we jump into the “how,” let’s quickly talk about “why.” N64 game cartridges have those gold connectors that read the game data. These connectors are delicate. Over time, they can get covered in dust, microscopic debris, and even oils from our fingers. Think of it like a layer of gunk that stops the game from communicating correctly with your console.
The result? You might experience:
- Games not loading at all.
- Glitching graphics or sound.
- Freezing during gameplay.
- Error messages on your screen.
These problems aren’t always a sign of a broken game. Often, a simple cleaning is all that’s needed to get things working correctly again. You’ll be amazed by how much difference a little cleaning can make!
Gathering Your Cleaning Supplies
Before you begin, it’s essential to gather the right tools. Using the wrong stuff could actually damage your beloved cartridges, so let’s make sure you’re prepared. You’ll likely have most of these items already around your house.
Essential Cleaning Items:
- Cotton Swabs (Q-tips): These will be used to carefully scrub the game’s connectors. Get a good amount as you may need several.
- Isopropyl Alcohol (90% or higher): This is the main cleaning agent. The higher the percentage, the faster it evaporates, leaving less chance of any liquid damage. Avoid using rubbing alcohol with additives, as these can cause problems. 70% is also ok to use if that is all you have, but try to get the higher percent when possible.
- Microfiber Cloth: This cloth will be used to wipe away any excess alcohol. It’s also great for dusting the outside of the cartridge and drying the pins.
- Optional: Small Screwdriver (3.8mm Gamebit): You’ll only need this if you plan to take the game cartridge apart. It’s helpful for very deep cleans, but it’s not essential for all cleaning scenarios. It is not suggested for beginners.
- Optional: Distilled Water: Distilled water can be used to dampen a cotton swab in a pinch, but should never be used on its own. It will be used in addition to the alcohol to help clean the pins when they are very dirty.
Important Notes about Cleaning Supplies
- Avoid Water: Plain water can cause corrosion on the metal contacts. Using distilled water is best, but as mentioned, it should always be used with isopropyl alcohol.
- Avoid Abrasives: Do not use sandpaper, steel wool, or anything else that could scratch the connectors.
- Use Lint-Free Materials: Paper towels can leave behind lint. A microfiber cloth is the best choice to prevent any build-up that can interfere with the connection.
The Basic Cleaning Method: External Cleaning
This method is what you’ll use most of the time. It’s perfect for when your game is a little dusty or dirty. This is where the cotton swabs and isopropyl alcohol come into play. Let’s get to it!
Step 1: Prepare Your Workspace
Find a well-lit area to work. Make sure your table is clear, and you have all your cleaning supplies ready. Lay down some paper towels to protect your work surface.
Step 2: Inspect the Game Cartridge
Carefully look at the game’s connectors. See how dirty they are and if you can see any large pieces of debris, grime, or corrosion. If the connectors look very bad, you may have to repeat the cleaning process a few times.
Step 3: Apply the Isopropyl Alcohol
Lightly dampen a cotton swab with the isopropyl alcohol. Don’t soak it! You don’t want the alcohol to drip everywhere. You just need enough to moisten the cotton. You may also want to have a few dry cotton swabs ready to go for later.
Step 4: Clean the Connectors
Gently rub the alcohol-dampened cotton swab back and forth along the gold connectors. Use small, short strokes. Be gentle but firm and make sure you’re getting all the visible areas on the pins. Remember, we are trying to remove the dirt, not scratch the metal. If the cotton swab starts to look very dirty, use a new swab to continue cleaning.
Step 5: Dry the Connectors
Use a dry cotton swab to carefully dry the pins. You can also use a corner of your microfiber cloth to wick away any extra moisture. Make sure the pins are completely dry before trying to use the game.
Step 6: Clean the Cartridge Exterior
Use a slightly dampened microfiber cloth to wipe down the outside of the game cartridge. This will remove any dust and dirt that may have accumulated. Let it dry before testing.
Step 7: Test Your Game
Once everything is dry, insert the game into your N64. Turn on your console and see if the game loads. If it doesn’t work, try cleaning it again. You may need to repeat these steps multiple times for heavily soiled cartridges. You may also have to use distilled water along with the isopropyl alcohol, but we will discuss that method next.
The Advanced Cleaning Method: Deep Cleaning
Sometimes, the basic cleaning method is not enough, especially if your N64 game cartridge has years of dirt and grime. The advanced method involves using a small amount of distilled water in conjunction with the alcohol. This will help dissolve hard to clean buildup and allow the alcohol to do the best cleaning job possible.
Step 1: Follow the Basic Cleaning Method
Start by doing the steps in the external cleaning method. After that process, if the game still does not work, then you can move on to the advance method. Follow steps 1-5 of the basic cleaning method before moving on to these next steps.
Step 2: Use Distilled Water
You will need another set of cotton swabs for this step. Lightly dampen a cotton swab with distilled water. Do not soak it, only lightly dampen it. You may also want to have a few dry swabs ready for the next step.
Step 3: Water Clean the Connectors
Gently rub the distilled water dampened cotton swab back and forth along the gold connectors, using small short strokes. Work over all the visible areas. Be careful not to use too much water.
Step 4: Clean Again with Isopropyl Alcohol
Using another dry cotton swab, rub it on the pins. You will notice it may pick up the water and any debris you may have loosened with the distilled water. Once this swab is dirty, go ahead and dampen a new swab with isopropyl alcohol. Again, rub the pins with small short strokes, making sure to cover the entire surface. This will remove any remaining buildup and water on the connectors.
Step 5: Dry the Connectors Completely
Use a dry cotton swab to carefully dry the pins. You can also use a corner of your microfiber cloth to wick away any extra moisture. Make sure the pins are completely dry before trying to use the game.
Step 6: Clean the Cartridge Exterior and Test
Use a slightly dampened microfiber cloth to wipe down the outside of the game cartridge. Then make sure everything is dry and insert the game into your N64. Turn on your console and see if the game loads. If it doesn’t work, try cleaning it again. You may need to repeat these steps multiple times for heavily soiled cartridges. If after trying both the basic and advance cleaning methods you are still having trouble, the game may have some deeper issues. You may consider taking it to a repair shop to have a professional look at it.
Optional: Disassembling Your N64 Cartridge (Advanced Technique)
For a truly thorough cleaning, you might consider opening up the game cartridge. This is only recommended if you feel comfortable with this process. Disassembling it allows you to clean the pins and the interior of the cartridge. However, this step requires a specific tool, the 3.8mm gamebit screwdriver. It also carries a higher risk of damaging the game, if you are not careful.
Step 1: Gather the Necessary Tools
You will need the 3.8mm gamebit screwdriver, your isopropyl alcohol, cotton swabs, and a microfiber cloth.
Step 2: Carefully Open the Game Cartridge
Use the 3.8mm gamebit screwdriver to remove the screws on the back of the game cartridge. Carefully separate the two halves of the cartridge. Note the position of the circuit board and other parts. Be sure to keep all small parts together so you can put them back correctly.
Step 3: Clean the Inside
Gently use a dry cotton swab to remove any dust or debris. You can use a lightly alcohol dampened swab for any particularly sticky areas. Do not soak any of the circuit board with alcohol. You will only want to clean the plastic casing and the metal pins.
Step 4: Clean the Connectors with Care
Use a lightly alcohol-dampened cotton swab to clean the gold connectors, just like we did with the basic cleaning method. Remember to dry them with a dry cotton swab afterwards.
Step 5: Reassemble the Cartridge
Put the game cartridge back together, making sure all the pieces are in their original positions. Do not force anything. If something is difficult to put back together, stop and see if you have something out of place. Once it’s all correctly assembled, put the screws back in and tighten them.
Step 6: Test Your Game
Insert the game into your N64. Turn on your console and see if the game loads. If it does not work after disassembling and cleaning, then you may have a more serious problem.
Warnings about Disassembling:
- Proceed with Caution: Disassembling a game cartridge can damage it if you’re not careful. Be sure you know what you are doing, or avoid this step.
- Work in a Clean Area: You do not want to drop any screws or small parts where you cannot find them. Also, dirt on the circuit board can cause problems.
- Keep Track of Parts: Remember where each piece came from when you take it apart, and make sure you put them back together correctly. Take pictures if you need a visual reference.
Preventing Future Dirt and Grime
Once your games are all cleaned up, you’ll want to keep them that way. Here are a few easy tips to help prevent them from getting dirty again:
- Store Games Properly: Keep your games in their cases or in a safe place away from dust and moisture.
- Handle Games with Care: Avoid touching the gold connectors. Hold them by the plastic casing.
- Keep Your Console Clean: Dust your N64 console regularly to prevent dust from entering the cartridge slot.
- Avoid Food and Drinks: Keep food and drinks away from your gaming area. Spills can cause major problems with the game cartridges.
If you keep your games clean and follow these tips, you can keep them working properly for a long time.
Cleaning N64 games is not a difficult process, and can make a huge difference in your gaming experience. It’s a simple way to bring your old games back to life! Remember to be gentle and patient, and you’ll be able to enjoy your favorite N64 games for years to come.
Cleaning a NASTY Nintendo game #videogames #n64
Final Thoughts
To clean N64 games effectively, use a cotton swab lightly dampened with isopropyl alcohol. Gently clean the metal connectors, removing dirt and grime. Avoid using excessive liquid; less is more in this instance.
After cleaning, allow the game to fully air dry. You now understand how to clean n64 games properly. This process should revive your old cartridges.

