To export your Unreal game, you navigate to File > Package Project > [Target Platform] in the Unreal Editor and then configure the necessary project settings.
So you’ve poured your heart into creating an amazing game using Unreal Engine, and now you’re wondering how to export your unreal game? It’s a pretty common question. Getting your creation ready for others to play is a key step that can seem a bit daunting at first.
Don’t worry; the process isn’t as complicated as it might seem. We’ll cover the basic steps you need to take within the editor to make your game playable on various platforms.

How to Export Your Unreal Game
So, you’ve poured your heart and soul into creating an awesome game using Unreal Engine. You’ve crafted breathtaking landscapes, designed engaging gameplay, and now you’re ready to share your creation with the world! But how do you actually get your game from your computer to other people’s devices? That’s where exporting comes in. Exporting, or building as it’s also often called, is the process of taking all your hard work inside the Unreal editor and packaging it up into a playable file. It might sound a little scary, but it’s totally manageable once you understand the basics. Think of it like packing a suitcase for a big trip – you need to organize everything so it travels safely.
Understanding the Export Process
Exporting isn’t just pressing one button and magically getting a game. It’s a series of steps where Unreal Engine gathers all your assets, code, and configurations and puts them together in a format that the target operating system can understand. Before we jump into specifics, let’s look at some key concepts:
Target Platforms
First off, decide where you want your game to run. Do you want it on Windows PCs, Macs, mobile phones, or even gaming consoles? Each platform has its own unique requirements. Here are some of the most common:
- Windows: The most popular platform for PC games, making it a good starting point.
- Mac: Another popular choice for computers, it is important to remember that different versions may have different requirements.
- iOS: Apple’s operating system for iPhones and iPads.
- Android: Google’s operating system for phones and tablets, with a huge variety of devices and versions to consider.
- Consoles (PlayStation, Xbox, Nintendo Switch): These require more complex development and often special developer kits. They aren’t available with the standard Unreal license.
Build Configurations
These are settings that determine how your game is packaged. Some popular build configurations include:
- Development: Used while you’re working on the game. It includes debugging tools and allows for quick iteration, but the game runs slower.
- Shipping: The final build you give to players. It is optimized for performance, with debugging tools removed. This option is the smallest size when you export a game.
- Test: A build that’s made for testers to play, it’s somewhere between development and shipping builds.
File Types
When exporting, Unreal Engine creates several types of files. Here are the main ones you will encounter:
- Executables (.exe on Windows, .app on Mac, .apk on Android, .ipa on iOS): These are the main files players use to launch your game.
- Data Files (.pak files): These contain all the game’s assets like textures, sounds, and models.
- Configuration Files (.ini files): These store various game settings, such as screen resolution and controls.
Preparing Your Game for Export
Before you press that big “Export” button, it’s good practice to make sure everything in your game is in good shape. It’s like cleaning up your room before you have company over. Here are the most important preparation steps:
1. Optimize Your Assets
Think of this as cleaning up your art supplies. Big, high-resolution textures and complex models can make your game run slowly. Here’s what you should do:
- Texture Compression: Use compressed texture formats like DXT for Windows or ASTC for mobile. These reduce the size of your textures without a lot of loss in quality.
- Model Optimization: Reduce the number of polygons in your models where you can. Sometimes high detail is not necessary, especially when the object is far away.
- Sound Compression: Compress your audio files to smaller sizes (like using .ogg or .mp3).
- LODs (Level of Detail): Use Level of Detail systems so that far-away objects use less detailed models, helping with performance. Unreal handles this automatically.
2. Test Thoroughly
Before you export, you have to play your game! Testing is like double checking that you did the homework correctly. You have to do more than just check the game to make sure that it loads up and runs, you also have to check these things:
- Play the whole game: Play through it like a real player would. Go through every level and see if you find any errors.
- Test on multiple devices: If you are making a mobile game, test it on different phones and tablets to check it works properly. If you are making a computer game, test it on different computers.
- Check for bugs: You want to find any error in the game.
- Get others to test: Have some of your friends or family members play your game, they may find things that you missed.
3. Set the correct map
You should set up the startup map for your game, this is the first map that loads up when a player runs the game. You also want to make sure there is a main menu for the player to start. You should check that all menus are navigable and responsive.
4. Set Project Settings
The “Project Settings” window is a very important place in Unreal Engine where you set how the game works. You will use it while developing the game, but you have to make sure you set the correct settings before exporting. Let’s look at some of them:
Maps & Modes
Make sure the correct default map is set under “Project Settings > Maps & Modes”.
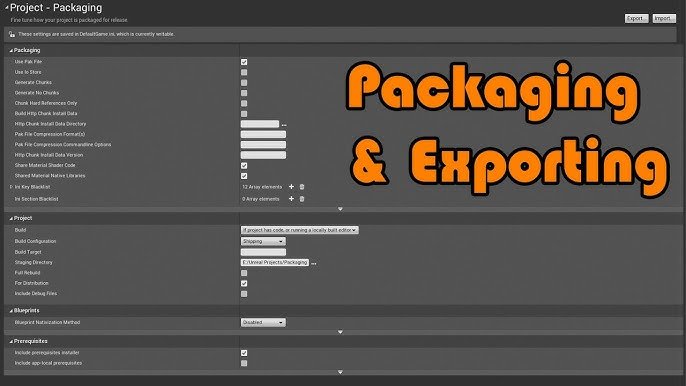
Packaging Settings
Under “Project Settings > Packaging”, you will find a lot of important configurations:
- Build Configuration: Select “Shipping” for a release build.
- Packaging Method: Select “By the Package” for a smaller and more organized game package.
- For Distribution: Check “Include prerequisites installer.” This option will make sure people have all of the software required to play your game.
- Full Rebuild: This is important. A full rebuild makes sure the all of the game data is included, and you should always use this option when doing final builds, especially if you made changes to anything in the project.
- List of Maps to Include: Make sure all of your game’s maps are included in the list. This option is important, otherwise your map will not be present in game.
Supported Platforms
In “Project Settings > Platforms,” you can set which platforms your game should support, like Windows, Android, or iOS. Check that your intended platform is selected and configured correctly.
Icons and Splash Screens
Make sure you have the right icons and splash screens for your game. This option will improve the look of the game. In “Project Settings,” you can set up these options under the “Platforms” section.
5. Project Clean-up
Cleaning up your project before exporting is like cleaning up your workspace before leaving work. Remove any unnecessary files or code that are not needed for the final game. Having extra assets may increase the size of the game. Also, make sure all files are organized.
Exporting Your Game: Step-by-Step
Okay, now that everything is prepared, let’s get to the actual export process. This step is like putting all the pieces in your suitcase carefully so that nothing breaks during transport. Here are the steps you need to take.
1. Access the Packaging Menu
Go to the main menu bar in the Unreal editor and click on “File”. Then hover over “Package Project” and select the platform you want to export to.
2. Set Export Options
A little window will open, asking for details on where you want to save your game. You will want to choose the directory that you want to save your game at.
3. Click “Package Project”
Now, press the button. Unreal will start to package your game, this can take some time so be patient. The time it takes depends on the size of the game and the hardware that your computer is using. A larger game with lots of detail will take more time to package.
4. Check the Output Log
While Unreal is packaging, the output log at the bottom of the editor will show you what’s happening. If there are any errors or warnings, these will show up there, allowing you to fix them. You should look at this window to see how the process is going.
5. Locate Your Exported Game
Once the packaging process is done, the game files are now located in the directory that you specified. You will see folders containing the executable file, data files, and configuration files that were described above.
Post-Export Checks
After you’ve exported your game, don’t just celebrate yet! You need to do a final check to make sure everything is working correctly. This is like doing a test drive after packing the suitcase. Here’s what you should do:
1. Run Your Game
Launch the executable file and play your game. Make sure everything looks and works as you expected. Check for any crashes or strange errors, and if you see some errors, you have to go back and fix them and then export the game again.
2. Test on Different Machines
Try running your game on other computers to check that it works fine. This is especially important if you made a PC game, to make sure that all computers are able to run it.
3. Consider Distribution Platforms
If your game is good enough to share with people, think about the options you have to distribute it. Here are a few popular methods:
- Steam: The biggest online store for PC games. It can be a lot of work to publish on Steam, but it is a good idea if you are looking to sell your game.
- Itch.io: A platform for indie developers to share games. This platform makes it easier to release a game to the public.
- Your Own Website: If you want full control of distribution, you can make your own website.
- Mobile App Stores: Google Play Store for Android and Apple App Store for iOS. Publishing here requires a developer account and following the guidelines set by those companies.
Common Export Problems and How to Fix Them
Sometimes, the export process can be tricky. It is like trying to fit too much stuff into your suitcase, and sometimes something just doesn’t fit. If you encounter errors, here’s how you can usually deal with them:
1. Missing Assets
If you get an error message about missing files, it means some of the assets in your game are not packaged. These are some ways to solve the problem:
- Make sure the map is included in the list of maps in the project settings.
- Make sure the assets are in your content folder.
- Check the output log to see which assets are missing and add them.
- Make sure no assets in the content browser have a red question mark on the icon, if this is the case, you have to reimport the asset.
2. Packaging Failure
This error means there was a problem with the packaging process itself. Check the output log for specific error messages. Some things that may cause packaging errors are:
- Having corrupted files in your project.
- Not having enough space on the drive you are exporting to.
- Missing pre-requisites.
- Errors in the game code, or blueprints.
3. Game Crashes
If your game crashes after exporting, there is probably some problem with your game that was not found during testing. Try the following options:
- Go back and debug your game to see if you can find any errors.
- If your game crashes at a specific map, try to play the map on the editor and see if it crashes.
- Look at the windows event viewer to see if there are any details on why the game crashed.
4. Performance Issues
If your game runs slowly after exporting, it means that you have not fully optimized it. To solve the problem, you should try these things:
- Reduce the resolution of the game.
- Lower the graphics settings.
- Lower the settings of textures and meshes.
- Try other optimization techniques in the project settings.
Exporting your game might seem a little intimidating at first, but it’s a super important part of the game development journey. The most important part is testing and doing a full rebuild so that you make sure the game is ready to be published. By understanding the process, paying attention to details, and doing lots of testing, you’ll be sharing your amazing game creations with the world in no time!
How To PACKAGE – Export Your UE5 GAME (Tutorial)
Final Thoughts
Exporting your Unreal game involves selecting the desired platform and configuring build settings. Package your project to create a standalone executable for testing and distribution. Choose the correct target directory for output.
Properly preparing your content and optimizing performance is key before export. Ensure all assets are included in your project before you begin the export process. This crucial step significantly impacts the end user experience.
Understanding how to export your unreal game simplifies getting your creation ready. You must follow platform-specific guidelines for packaging to ensure your game functions as intended. This approach makes the deployment process much more straightforward.

