
To stop the game on Scratch, click the red stop sign icon located above the stage.
Ever find yourself immersed in a cool Scratch project, and then wonder how to stop the game on scratch? It’s a simple question, but knowing the answer can save you from accidental endless loops.
This quick guide will show you exactly where to click. No complicated code or settings needed. It’s the most direct way to end your Scratch creation whenever you want.

How to Stop the Game on Scratch
Have you ever created an awesome game on Scratch and then wondered, “How do I make it stop?” It’s a super important part of making games – you need to be able to end them! Whether you’ve reached a winning score, run out of lives, or simply want to start over, knowing how to stop a Scratch game is key. Don’t worry, it’s easier than you might think! This article will show you all the different ways to do it.
The Stop Button: Your First Line of Defense
The simplest way to stop your Scratch project is by using the big red stop button, located right above the stage. This is the universal “emergency brake” for all your Scratch games. If something goes haywire, or you just want to stop playing, click that button! It instantly stops all scripts running in the project.
How the Stop Button Works
Imagine the stop button as a big red light switch for your program. When you press it, it cuts off all power to the code, immediately halting any ongoing action. This is different from, say, a game that ends based on a specific condition. The stop button is a manual, user-triggered stop.
This method is useful during the creation of your game, and while you’re testing how it works. But you probably don’t want players to just stop a game by pressing the stop button on the editor, which brings us to another methods.
Using the “Stop All” Block
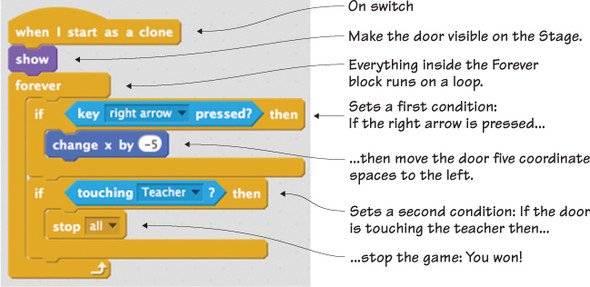
The “Stop All” block is another way to halt the game. This block is part of the “Control” category of blocks (they’re yellow!). It’s a powerful tool that gives you more control over when the game stops.
When to Use “Stop All”
You can use the “Stop All” block at the end of a game, like when a player wins or loses, when they finish all levels, or when time runs out.
How to Use the “Stop All” Block
To use the “Stop All” block, drag it into the script area of one of your sprites or backdrop. Then, connect it to other blocks to create the logic for your game. Here’s a basic example:
Let’s say you want your game to stop after a certain score:
- Create a variable called “Score”.
- Set the initial value of “Score” to 0.
- Add code that will change the value of the “Score” variable during gameplay.
- Drag in an “If … then” block and place it in your game loop.
- Place the “>” operator block in the if condition slot.
- Place your “Score” variable on the left-hand side of the “>” operator block and set the right-hand side to the score at which you want the game to end, for example 50.
- Drag in the “Stop All” block into the if condition area.
Now, the game will automatically stop whenever the score reaches 50 or more. It’s like building a smart ending for your game!
Stopping Specific Scripts
Sometimes you don’t want to stop everything at once. Maybe you have a background music loop that you want to continue even when the player loses. That’s when specific script control blocks come in handy!
The “Stop Other Scripts in Sprite” Block
This “Stop Other Scripts in Sprite” block is also located in the “Control” category of blocks. It stops all the other scripts that are not the currently running script, in the sprite that the block is used in.
When to use “Stop other scripts in sprite”
Suppose you have a sprite that has multiple scripts that animate it and do other tasks, but during a game over state, you want all other scripts for the sprite to stop running except the script that displays the ‘game over’ message. The “Stop other scripts in sprite” is ideal for this situation.
How to use the “Stop other scripts in sprite” Block
Let’s imagine we have a sprite called “Player” with two scripts:
- Script 1: This script makes the player move around using the arrow keys.
- Script 2: This script changes the player’s costume to a ‘game over’ costume and displays a ‘game over’ message when the game is over.
Here’s how you could implement the “Stop other scripts in sprite” to stop script 1 when the game is over:
- Add the “Stop other scripts in sprite” to the beginning of Script 2.
- Connect a “when green flag clicked” block to script 1.
- Set a condition that will cause the “game over” screen to be displayed. For example, when a variable called ‘lives’ equal to zero.
- Connect the “Stop other scripts in sprite” block to script 2, and create the necessary blocks for the “game over” scenario in script 2.
Now when the player’s ‘lives’ equals zero, the first script that moves the player stops, but the second script will still run, displaying the ‘game over’ screen and message.
The “Stop This Script” Block
The “Stop this script” block, also from the “Control” blocks, halts only the script that it’s placed in. This is like turning off a single light switch, leaving others running.
When to use “Stop this script”
This block is very helpful for scripts that are only supposed to run for a short time. For example, a sprite that only flashes or plays an animation once when the green flag is clicked should use this at the end of the script to ensure that it doesn’t repeat.
How to Use the “Stop This Script” Block
Here’s an example where we use the “Stop This Script” block in a sprite called “Coin”. The coin sprite should appear when the green flag is clicked for a short period of time, and then disappear.
- Add a “when green flag clicked block”.
- Add the blocks necessary to show the coin and keep it visible for a short duration.
- Add a “hide” block.
- At the end of the script, add the “Stop this script” block.
This way the Coin will only appear once for a short period of time, and the script will stop running.
Using Broadcasts and the “When I Receive” Block
Broadcasts are like sending a message from one part of your project to another. They can be super helpful for controlling when things start and stop. You’ll find broadcasts in the “Events” section (the brown blocks).
How Broadcasts Help Stop Games
Imagine that when a player completes all the levels, a message should be broadcasted, called “game over”, and any scripts in other sprites that are running should then be stopped.
Creating and Using Broadcasts
Here’s how to use a broadcast to stop a game:
- In the sprite or backdrop that is going to announce when the game is over, drag in a “broadcast” block.
- Create a new message called ‘game over’.
- Add the logic before that to make that happen, such as a condition, that when the user has completed all the levels, the broadcast block will fire.
- In all sprites where you want to listen to the broadcast, add a “When I receive ‘game over’ block from the events category.
- You can then add “stop all” or “stop other scripts in sprite” blocks to the “When I receive ‘game over’ block to end the game.
Broadcasts allow you to synchronize actions and create more complex game endings.
Example: Stopping a Game Based on Lives
Let’s create a simple example where a game stops when the player runs out of lives. We’ll use variables, conditional blocks, and the “Stop All” block:
Game Setup:
- Create a variable called “Lives”.
- Set the initial value of “Lives” to 3.
- Create the logic for a condition, such as hitting a sprite called “enemy” that reduces the player’s lives by 1.
Game Ending Logic:
- Drag an “If…then” block to your code.
- Place the “=” operator block in the if condition slot.
- Place the variable ‘lives’ on the left-hand side of the “=” operator block, and the value ‘0’ on the right-hand side.
- Drag in the “Stop All” block into the if condition area.
Now, when the player runs out of lives, the game will stop.
Tips and Tricks for Stopping Your Scratch Game
- Use Comments: Add comments to your code to explain how different parts work, especially around the stopping mechanisms. This will help you (or others) understand your code better if you look at it again later.
- Test Your Endings: Be sure to test your game thoroughly, including all possible game ending scenarios. This will help you catch any bugs and ensure that your game stops when it’s supposed to, and how you want it to.
- Error Handling: Sometimes, your game might not stop when you expect it to. Add error handling code if needed.
- Don’t Stop Everything Immediately: Think about what you want to happen before the game ends completely. Do you want a “Game Over” message to appear, play a sound, or perhaps show a final score? You can combine broadcasts with script stops for such effects.
- Combine Blocks: Don’t hesitate to use multiple blocks together to create complex stopping conditions. For example, you can use “if…then…else” blocks or “repeat until” blocks along with stop blocks to create more flexible endings.
Why Stopping Your Game Properly is Important
Stopping your game in a clear and controlled way is crucial for a good game experience. Imagine if a game just froze unexpectedly with no indication of what happened, or if it didn’t respond when the player reached the end. That would be frustrating! Proper stopping makes your game polished and professional. It also helps the player know exactly when the game has finished.
Going Further: Advanced Stopping Techniques
Once you become comfortable with the basics of stopping games on Scratch, you can explore more advanced techniques. Here are some ideas:
Using Clones and Stopping Them
Clones in Scratch are copies of a sprite. You can stop clones individually or all at once. If you have a game with lots of enemies or projectiles, you’ll probably be using clones, and will need to stop them.
To stop all the clones of a sprite, use the “delete this clone” block from the “control” category in the “when I receive” broadcast area for the game over broadcast. This will delete all the active clones for the sprite.
Custom “Game Over” Screens
Instead of just a hard stop, you can create custom game over screens using sprites and text. It adds a level of professionalism to your game.
You can use a sprite that will act as the backdrop for the “game over” screen, and then you can have another sprite with a text that displays “game over”. You can then use broadcasts with the “when I receive” blocks to show these sprites when the game has ended.
Pausing Functionality
While not a permanent stop, you can create a pause function in your games, allowing players to take a break and then come back to the same point in the game. This will usually involve the same blocks that you use for game stops, like broadcasts, but without the “stop all” blocks. Instead, the pause screen should overlay the game, and when the player unpauses, hide the overlay and resume the game.
Learning how to stop a game in Scratch is fundamental to creating fun and engaging projects. With practice, these techniques will become second nature, and you’ll be able to design games with clear, well-defined endings. Remember to experiment with different methods and always test your code!
How to End a Game in Scratch
Final Thoughts
To stop the game on Scratch, utilize the “Stop All” block. You must place this block within an appropriate script, often triggered by a specific event like pressing a button. This action immediately halts all running scripts.
You can also use the “stop this script” block, which only stops the current script it is in. It will not affect other game elements. Therefore, for a complete game termination, “Stop All” is the key.

