
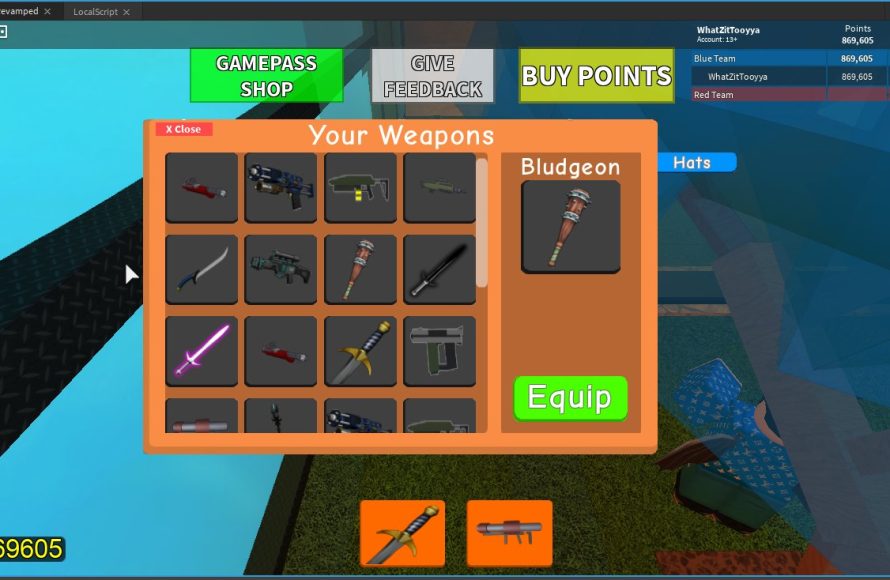
Effective Roblox UI design for games prioritizes clear navigation, intuitive controls, and a visually appealing style that complements the game’s theme.
Creating engaging experiences in Roblox relies heavily on well-designed user interfaces. A confusing or clunky UI can quickly turn players away, no matter how great the core gameplay is. Therefore, thoughtful roblox ui design for games is critical for player retention and enjoyment.
Good UI design guides players, making it easy for them to understand the game’s mechanics. It also enhances the overall presentation, contributing to a more immersive and professional feel. Getting it right can make a big difference.

Roblox UI Design for Games: Crafting Engaging User Interfaces
Creating a great game on Roblox isn’t just about cool maps and fun gameplay; it’s also about how players interact with your game. That’s where UI, or User Interface, design comes in. Think of it like the dashboard in a car – it shows you important information and lets you control things. In Roblox, the UI is all the buttons, menus, and information that players see on their screen. A well-designed UI can make your game easy to play, fun, and keep players coming back for more, while bad UI can make your game confusing and frustrating. This guide dives deep into making amazing Roblox UIs.
Understanding the Basics of Roblox UI
Before we start making fancy buttons and menus, let’s understand the basic building blocks of Roblox UI. These are the tools you’ll be using to create the interfaces your players will see.
Key Elements of Roblox UI
- ScreenGuis: These are like the canvases where you’ll paint your UI. They are the main containers for all the other UI elements and are what you will see on your screen. Think of them as the master background for your UI. Every UI element you create needs to be placed inside a ScreenGui.
- Frames: Frames are like containers inside a ScreenGui. You can use them to group related UI elements together. For example, a Frame might hold all the buttons for a shop or all the elements for your inventory. You can control the visual properties of a Frame, like its background color and transparency.
- TextLabels: These are used to show words and numbers on the screen. Use them for things like player scores, health bars, and button labels. TextLabels allow you to change text size, font, and color.
- TextButtons: These are buttons that display text. Players can click or tap them to perform actions. You’ll use them for nearly every interactive element in your game – from start buttons to options menus.
- ImageLabels: These display images on the screen. Use them for icons, logos, or other pictures you want to display. ImageLabels can show pictures you have saved or even images from the internet.
- ImageButtons: Similar to TextButtons, but these use images. They are great for adding visual flair or using icons in place of text.
- TextBoxes: These are input fields where players can type text. Use them for chat boxes or entering usernames.
- ScrollingFrames: If you have a lot of items or information, these allow the user to scroll up and down to see it all. They are good for long lists or inventories.
- Viewports: Viewports let you display 3D objects inside your UI. This is great for showing models of items or characters on a menu.
Properties of UI Elements
Each of these UI elements comes with properties that define their look, behavior, and positioning on the screen. Key properties include:
- Position: This determines where the UI element appears on the screen. Positions can be relative to the top-left of the screen or relative to the frame they are in.
- Size: This defines the element’s width and height. Size is also very important for different screen sizes.
- BackgroundColor3: This controls the background color of the element.
- BackgroundTransparency: This makes the element transparent or opaque.
- Text: This property is for TextLabels and TextButtons and defines the text that is displayed.
- TextColor3: This property is used to change the color of the text.
- Image: For ImageLabels and ImageButtons this defines the image that is displayed
- Font: Allows you to change the font of your TextLabels and TextButtons.
- ZIndex: This determines which UI element is drawn on top when UI elements overlap.
Principles of Good UI Design
Good UI isn’t just about making things look pretty; it’s about making them easy to use and understand. Here are some design principles to keep in mind:
Clarity and Simplicity
The UI should be clean, simple, and easy to understand. Avoid cluttering the screen with too many elements. Players should be able to quickly find what they need. Use clear labels and icons that are easily recognizable.
Consistency
Maintain a consistent style across your entire UI. Use the same fonts, colors, and button styles. This helps players get used to your UI and makes it easier to navigate.
Intuitive Navigation
Make sure your UI is easy to navigate. Buttons should be placed in logical locations, and menus should be organized in a way that makes sense. Players should be able to easily find the information or actions they are looking for without getting lost. A clear flow between screens is important for the user.
Responsiveness
Your UI should respond quickly to player actions. Buttons should highlight when they are hovered over, and menus should open and close smoothly. Quick responses make your game feel polished and professional.
Visual Hierarchy
Use visual cues to guide the player’s eye to the most important information. Use larger fonts for titles and smaller fonts for supporting information. Use contrasting colors to make important buttons stand out. This helps players know what to do first.
Accessibility
Ensure that your UI is accessible to all players. This means using sufficient contrast between text and backgrounds, providing options for text scaling, and making sure your UI is usable with various devices (PC, tablet, mobile). Also, be aware of accessibility options in Roblox to help everyone play your game.
Creating a Basic Roblox UI
Let’s get practical and make a simple UI. We will create a basic health bar display in the top left corner of the screen. This will show the player’s current health and maximum health using a Frame, TextLabel and ImageLabel. Let’s walk through this step-by-step.
Step 1: Creating a ScreenGui
- Open Roblox Studio and start a new game or open an existing one.
- In the Explorer window, find the “StarterGui” service and click the plus button next to it.
- Select “ScreenGui”. This will add a new ScreenGui to your game. Name it “HealthUI” to make it easier to find.
Step 2: Adding a Frame
- Select “HealthUI” (your ScreenGui) in the Explorer window and click the plus button.
- Choose “Frame”. This creates a new Frame inside your ScreenGui.
- Name this frame “HealthBarFrame” in the explorer.
- Select “HealthBarFrame” and in properties change its size to {0.2, 0},{0.05,0}. This means that it will be 20% of the screen’s width and 5% of its height.
- Also, change the position to {0.01,0},{0.01,0}, making the frame in the top left corner.
- Change BackgroundColor3 to a dark color.
Step 3: Adding a TextLabel
- Select the “HealthBarFrame” and click the plus button.
- Choose “TextLabel”. This creates a new TextLabel inside the HealthBarFrame.
- Name this “HealthLabel”.
- Set the position to {0.05, 0},{0.1,0}. This moves the label a bit from the left edge and a little down from the top of the frame.
- Set the size to {0.9, 0},{0.8, 0} so that it covers most of the Frame.
- Set BackgroundTransparency to 1 to make the label background transparent.
- Change the text to “Health: 100/100”.
- Set the TextColor3 to white or another bright color that contrasts with the frame.
- Adjust the TextScaled and Font properties for better readability.
Step 4: Adding an ImageLabel for Heart
- Select the “HealthBarFrame” and click the plus button.
- Choose “ImageLabel”.
- Name this “HeartIcon”.
- Set the position to {0.8, 0},{0.02,0}.
- Set the size to {0.15, 0},{0.9, 0}
- Set the BackgroundTransparency to 1 to make the label background transparent.
- Find a heart image. Click the little folder next to the “Image” property, to load the heart icon.
Step 5: Scripting the Health Bar
To make the health bar actually work, you’ll need to add a script. For this example, we will just make a very simple script that makes changes to the UI element when it is executed. In a real game, you would use scripts to change the UI elements as the player’s health changes.
- Select your ScreenGui named “HealthUI”.
- Click the plus button next to the “HealthUI” and add a new script by selecting “Script”.
- Rename the script to “HealthScript”
- Copy and paste the following into the script:
local player = game.Players.LocalPlayer
local character = player.Character or player.CharacterAdded:Wait()
local humanoid = character:WaitForChild("Humanoid")
local healthLabel = script.Parent:WaitForChild("HealthBarFrame"):WaitForChild("HealthLabel")

humanoid.HealthChanged:Connect(function(currentHealth)
	healthLabel.Text = "Health: " .. math.floor(currentHealth) .. "/" .. humanoid.MaxHealth
end)
The above script will find the player’s Humanoid and get the current and max health from it. It updates the TextLabel to show the current health and maximum health. This means when you play test your game your health bar will automatically show your current health.
Advanced Roblox UI Techniques
Once you understand the basics, you can explore more advanced UI techniques. These will take your Roblox UI design to the next level.
Animations and Transitions
Animations and transitions can make your UI feel more dynamic and engaging. For example, buttons can scale or fade in when they are clicked, and menus can slide smoothly into view. Use tweens for smooth animation effects. Tweens can make UI appear smoothly instead of instantly. It makes the user interface feel more modern.
Customization and Themes
Let players personalize their UI by adding themes, allowing them to customize colors and styles. A theme can also be made as a setting in your game to allow the user to choose from several different color options.
Using Plugins
Roblox Studio has plugins that can help create complex UIs. These plugins can automate some of the design tasks, generate templates, and make your design process more efficient. Explore the toolbox to see what is available.
Making UI Compatible with Multiple Screen Sizes
Creating UI that works well on phones, tablets, and computers is essential. Use scale-based positioning and sizing to ensure your UI looks good on all devices. Roblox has a setting in the ScreenGui that makes UI scale based on the size of the window it is being displayed on. This will help your UI look good no matter what.
Using NineSlice Images
For ImageLabels and ImageButtons, you can use NineSlice to create rounded corners and resizing. This property ensures that the corners of your image will not stretch with the size of the UI element. This is especially useful for buttons and frames that need to dynamically resize.
Testing and Iteration
Creating good UI is an iterative process. You should continually test your UI with players and gather feedback. Use that feedback to make adjustments and improvements.
Testing in Different Devices
Make sure to test your UI on various devices and resolutions to make sure it looks correct on all screen sizes. Play test on mobile, tablet and computer to ensure the user experience is good.
Gathering Player Feedback
Ask players for their opinions. Pay close attention to what players are having trouble with or what they find confusing. Players might not be able to tell you what is wrong, but they can tell you if they don’t like a specific thing. That’s why watching playtesting videos is very helpful.
Iterating on UI Design
Keep an open mind and be ready to make changes based on player feedback. UI design is a never-ending process. The best UI designs are the ones that are made with player feedback.
Creating excellent Roblox UIs can greatly improve your player’s experience. Start with the basics, follow good design principles, and keep improving your designs. With practice and perseverance, you can make UIs that make your games stand out.
Roblox demo – Responsive UI design
Final Thoughts
Effective Roblox UI design for games directly impacts player experience. Clear menus and intuitive layouts keep users engaged. Prioritizing simplicity over complex interfaces makes navigation easy.
Well-planned UI enhances gameplay and keeps players returning. Good placement and color palettes significantly improve usability. Consider different device screen sizes during design.
Ultimately, excellent roblox ui design for games creates a positive and enjoyable experience. It is about making your game more approachable and engaging.

